[3.20] Hollow Palm VGS/IC/Volcanic Fissure Railgun Juggernaut | V High DPS | League Start | FEARED
New version 3.20: Volcanic Fissure
10 Groundslams per second, thus "Railgun"
Ice Crash version
I modified this build to now also be playable with ICE CRASH as main skill and it turned out to be fantastic! Height of Hubris "The Feared" invitation cleared! All content viable and imo stronger than the VGS version! See the PoB section for a link.
Welcome to my very first guide in Path of Exile. I've got over 4000 hours (ugh over 5000 by now, I need a life) on my shoulders now and decided to share my most satisfying build I created so far.
I started the league with this build and it requires little investment to get to red maps quickly.
<<< BUILD CONCEPT >>>
We combine the acquisition of the Hollow Palm technique via One With Nothing cluster jewel, dexterity stacking for a very high damage output and Unstoppable Juggernaut ascendancy node for maximum accuracy and high attack speed. The main defensive layers are Fortify in 6L-Setup and 7-8 Endurance Charges which also provide a huge damage output and filling in the missing resistances (since hollow palm users tend to have resistance problems).
I prefer the Vaal Ground Slam skill for massive stuns in certain dangerous areas and generally Ground Slam for machine gun screen wide destruction, but I am confident that some other skills can also work well with this build if adjustments are made.
<<< PROS & CONS >>>
Pros:
+ Very tanky
+ Very high damage output without too much investment
+ Fast map clearing (I wouldn't say super fast, but I can clear a minotaur map in 1-2 minutes inlcuding boss)
+ Budget to red maps
+ Viable league starter
+ Satisfying gameplay
Cons:
- Uses a bunch of hotkeys for several activations (Ground Slam + Vaal Ground Slam, Ancient Protector Totem, Ancestral Warchief Totem, Molten Shell + Vaal Molten Shell, Flame Dash and Dread Banner), no one-click wonder
- Can't run physical reflect maps (unless you get the Elder Body Armour prefix)
- No leech maps are very difficult
- Resistances can get slightly tedious to cap the more you invest into damage, but less so than most other hollow palm builds
- Requires atleast 1 Unset Ring for full potential
- Baram's mana runes are annoying
- Low HP pool (still very tanky though)
The main mentality you have to play this build with is hit & run. You don't stand around much in one spot because even though the build has a high survivability, it also might get overwhelmed at times and can't facetank everything. A lot, but not everything. Maintain your Molten Shell buff when you know there is high damage incoming (usually during boss fights) and use Vaal Molten Shell during mapping. The build uses both Ancestral Protector Totem and Vaal Ancestral Warchief Totem (ONLY THE VAAL VERSION FOR WARCHIEF!) since one normal totem is the limit. Place your dreadbanner only during encounters where you know you will be staying a while (like boss encounters). Vaal Groundslam is a very powerful stun with large area and high damage output and can even interrupt a lot of Unique monsters (shaper/elder guardians for instance), so use that to either quickly clear shrines or legions monoliths and to interrupt annoying casts on uniques monsters.
Don't be scared of dropping on low life (below 50%) because that's where the Starkonja evasion increase kicks in and turns into armour as we use iron reflexes to transform all evasion to armour. The high leech output this build provides with Vaal Pact and several leech nodes boosts fills your life in no time. If that's not enough, don't be afraid to use your Instant Life Flask every now and then.
<<< Core Items >>>
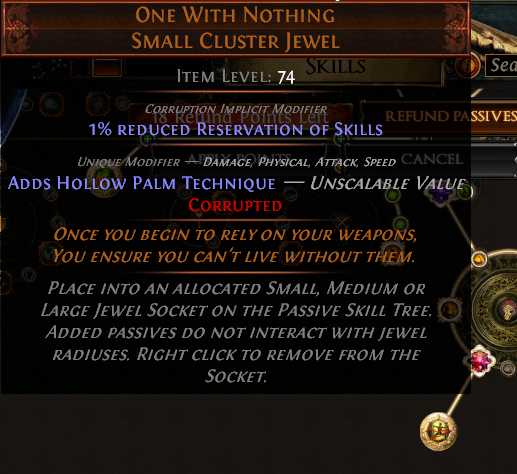
One With Nothing is the absolute MUST-HAVE item in order to play this build as intended. Without it, don't even bother looking at the rest. Explanation: One With Nothing grants us the Hollow Palm technique that provides 60% MORE Attack Speed and 14-20 Added Attack Physical Damage per 10 Dexterity while UNENCUMBERED. Unencumbered means that you aren't allowed to equip any weapons or gloves (those slots MUST stay empty).
Cost: Around 1-2 exalted orbs on first few days of league start. Price drops relatively quickly usually. Item drops from Delirium Bosses so might take 1-2 days until they are being sold.
WARNING: This item is the most expensive piece of "gear" you will need early on to make the build work, so plan to acquire it once you hit yellow/red maps (see leveling section).
Astramentis is the second core item in this build. You can acquire an Astramentis with level 20 and zoom through the chapters if you have both Hollow Palm + Astramentis. However, even lategame, this Amulet provides us with up to 139 TOTAL ATTRIBUTES (that means 139 base Dexterity) before multipliers kick in. The damage boost from this relatively cheap Unique is astonishing.
Cost: Around 15-30 chaos orbs on league start.
Other great but NOT core items:
This helmet provides a lot of damage output due to its high dexterity and attack speed but also grants us good survivability because of the high maximum life. Not only that, but because we use Iron Reflexes to turn Evasion into Armour, it serves well as a good Pseudo-Armour base Helmet with an even better low-life (50% or less) bonus that increases our armour even more if we take a savage hit or drop low otherwise.
Cost: 1-5 chaos orbs.
Free Perma-Freeze Immunity and a crapton of damage. Need I say more?
Cost: 10-30 chaos orbs on league start. Elder drop, so usually takes a couple of days until they are being sold.
<<< Gear >>>
Stat priority for rares:
-> Dexterity (try to get it wherever you can)
-> Elemental Resistances (atleast 50-60% each, rest comes from endurance charges)
-> Maximum Life
Anything besides those basic stats are not mandatory.
>> Budget
Body Armour can also be a Tabula Rasa. 10%+ Cyclopean Coils should still be fairly cheap (10c usually). Low rolled Astramentis is also not too expensive. Total cost here shouldn't exceed 1-2 exalted.
>> Upgrades
Body Armour: 6L Carcass Jack / 6L Wildwrap
Both of these are viable upgrades as both provide elemental resistance and damage boost. Carcass Jack is really nice for faster speed clear and survivability while the Wildwrap grants us increased overall single target damage.
Boots: Two-Toned Boots with Veiled Orb rolls for "Cannot be Chilled" & +30% Movespeed. Remember to still get Resists on boots.
Rings: Could try to roll/buy a cheap Curse Vuln on hit unset ring now.
Belt, Helmet and Amulet are hard to beat, so keep Cyclopean Coil, Starkonja and Astramentis in those.
>> Endgame
10% chance to gain a frenzy charge on hit is one of the two stats we require on this rare chest
12% Dexterity is the other stat we require on this rare chest
The other stats are bonus. See crafting section on how to make this yourself.
Starkonja is very hard to beat as we want to match the high dexterity stat on it (58 is highest on a rare helmet), but if you want to use a rare helmet, try getting following stats:
-> High Dexterity (using Essences)
-> Nearby Enemies take 9% increased Physical Damage (Elder base)
-> Life
-> Resistances
Pride has 30% reservation efficiency is mandatory as lab enchant! (3.17 No longer a requirement but nice to have, pick whatever enchant you like that benefits the build)
We have two choices here. Either you go for Onslaught Boots for more damage (usually around 20-30ex base) or you use a Two-Toned Boots pair with warlord influence to get +1 maximum endurance charges (see crafting section).
Cyclopean Coil is hard to beat as BiS Belt (once you replace Astramentis with a better Jade Amulet you should replace the Cyclopean Coil with a Stygian craft (see craft section)).
Try to get a Cyclopean Coil with a high "% Increased Attributes" and use Attribute Catalysts to boost it even more. If you feel gutsy, corrupt it after using catalysts and beg for %dex (+ %str preferrably) on implicit. A good corrupt one costs around 15-20 ex.
Astramentis will probably be your best Amulet for the entire league unless you have a lot of currency to spend (40+ ex). If you want to know how to possibly craft a better Amulet, see craft section.
Anoint it with Endurance (Clear Oil + Black Oil + Golden Oil) and boost it with attribute catalysts.
You will require atleast 1 Unset ring so we can fit all the gems we need and you'll also want Curse Vulnerability on that ring (32% preferrably). Getting Vuln + Dex + Resistance is very hard/costly, so settle for Vuln + either of the other stats.
Stat Priority:
-> Curse Vulnerability
-> Dexterity
-> Resistances
-> Life
-> Non-Channeling Skills have -7 Mana Cost (Elreon Craft)
I chose a synthesis endurance charge ring because I use 15% Pride reservation as lab enchant on the helmet and reduced reservation on the fluid motion jewels. This way we won't need a second unset ring and won't require Enlighten lvl 4 on our auras.
The base of this ring costs around 4-10ex.
Stat Priority:
-> Dexterity
-> Resistances
-> Life
-> Non-Channeling Skills have -7 Mana Cost (Elreon Craft)
Ice Crash Version Gear
>> Ice Crash
Endgame gear
Budget replacements (stat priority below) Body Armour: Any Armour base 6L with statstick (Dex->Res->Life->Armour%) Helmet: Fractal Thoughts without lab enchant is cheap af Boots: Any Armour base with statstick (Dex->MS->Res->Life) Belt: Cyclopean Coil (high attribute roll) Amulet: Astramentis 95 attributes is cheap enough Rings: One Redeemer ring with frostbite curse, the other one basic statstick (Dex->Res->Life)
Stat Priority in general
-> Dexterity
-> Resistances
-> Life
-> Armour
-> Accuracy
Jewels (see PoB for placement)
-> One With Nothing (duh)
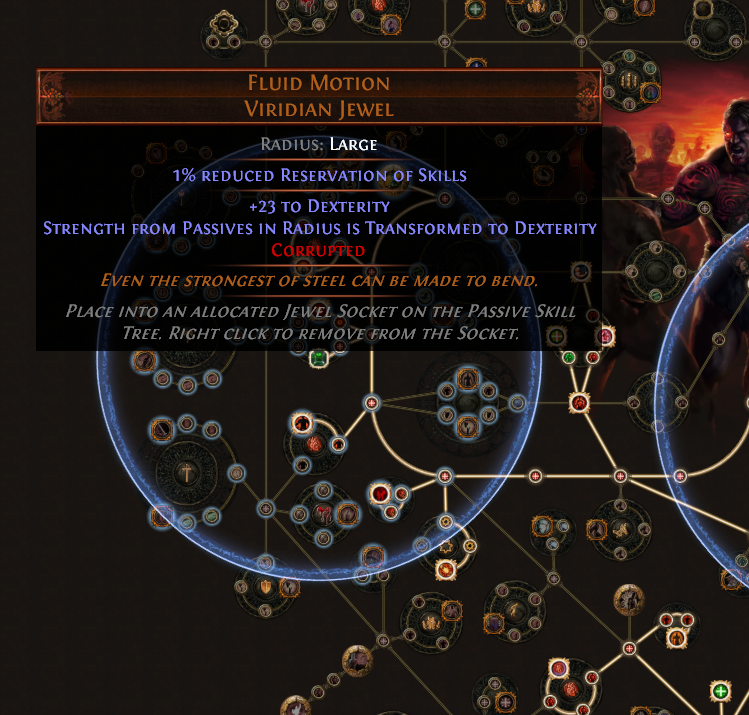
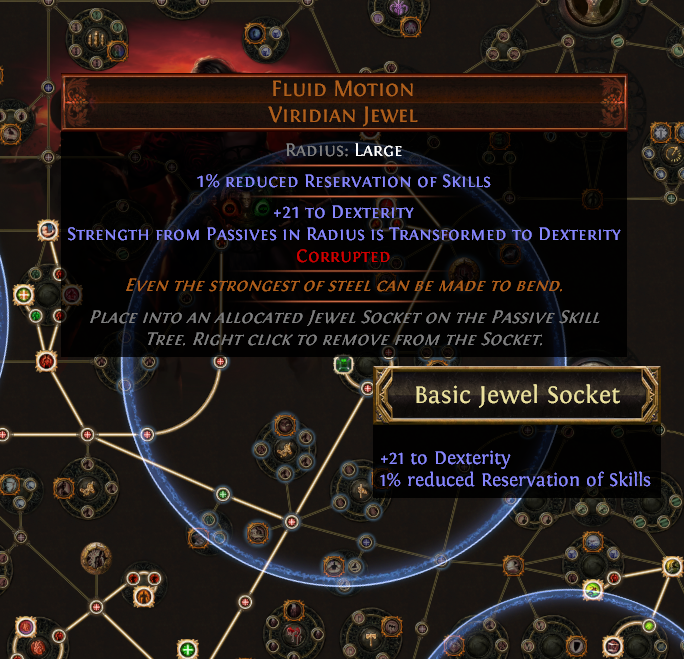
-> 2x Fluid Motion
-> Brutal Restraint or Lethal Pride (Restraint is simpler)
-> Forbidden Flame+Flesh "Unyielding" (very cheap usually >1 ex total)
-> Split Personality (Dex+Life) OR Watcher's Eye (Hatred quite expensive)
-> Large Cluster Jewel (Cold Damage base)
<<< Flask Setup >>>
My Setup of choice:
1. Instant Life Flask incase there is nothing to hit during a boss encounter due to Vaal Pact.
2. Lion's Roar provides a huge damage output and a strong armour boost.
3. We use Magebane now instead of Iron Reflexes, so instead of a Jade Flask, pick a different flask. I highly recommend Basalt Flask for more armour.
4. Sulphur Flask is another big damage boosting flask. You can upgrade that into a Bottled Faith if you have enough currency and if you replace the Jade Flask with another Flask to cover all the neccesary immunities.
5. Quicksilver Flask is a nobrainer usually.
Just make sure you get all the immunities that make life easier. You won't need Freeze immunity because we get that from Cyclopean Coil.
<<< Gem Setup >>>
Body 6L:Vaal Ground Slam - Melee Physical Damage Support - Brutality Support - Multistrike Support - Impale Support - Fortify Support If you can afford, replace Melee Physical Damage Support -> Brutality Support -> Multistrike Support with their Awakened versions (i.E. Awakened Multistrike Support) in that order (cost efficient). Final 6L:Vaal Ground Slam - Awakened Melee Physical Damage Support - Awakened Brutality Support - Awakened Multistrike Support - Impale Support - Fortify Support
3L:Vaal Ancestral Warchief - Ancestral Protector - Maim Support
No Links:Vaal Molten Shell, Flame Dash, Dread Banner, Blood and Sand, Pride, Herald of Purity (requires Helmet enchant 15% reduced pride reserve (3.17 No longer a requirement but nice to have))
NOTE: If you use Enlighten Support lvl 4, you will need TWO Unset rings instead of ONE and either the Boots or the Helmet as 4L (whichever you dont use for totems) and link as follows:
4L with Enlighten lvl 4:Blood and Sand - Herald of Purity - Pride - Enlighten Support
<<< Jewels >>>
If you are on a small budget, get the cheapest version of all of these jewels as they still provide a significant damage boost for almost no investment!
You have a total of 4 Non-Cluster Jewel slots, so acquire 2-3 Fluid Motion jewels and 1-2 rare jewels with Resistances and Max Life. Later on you can upgrade one of those jewels it into a Watcher's Eye with Impale lasts 2 additional stages if you can manage your resistances.
Try and get "Corrupted Blood cannot be inflicted on you" on a jewel. If it's too expensive, go for the passive cluster next to "Unwavering Stance" keystone passive and save those points on the attack damage on leech cluster below "Magebane" keystone passive.
For your Fluid Motions, try and get "1% Reduced reservation" as implicit. The Dexterity value doesn't have to be max, a high roll is nice but not mandatory, the reservation implicit helps you more (not mandatory anymore, so get whatever implicit you want on those).
Stat priority on rare jewel:
- Life
- Resistances
- Attack Speed =/= Damage
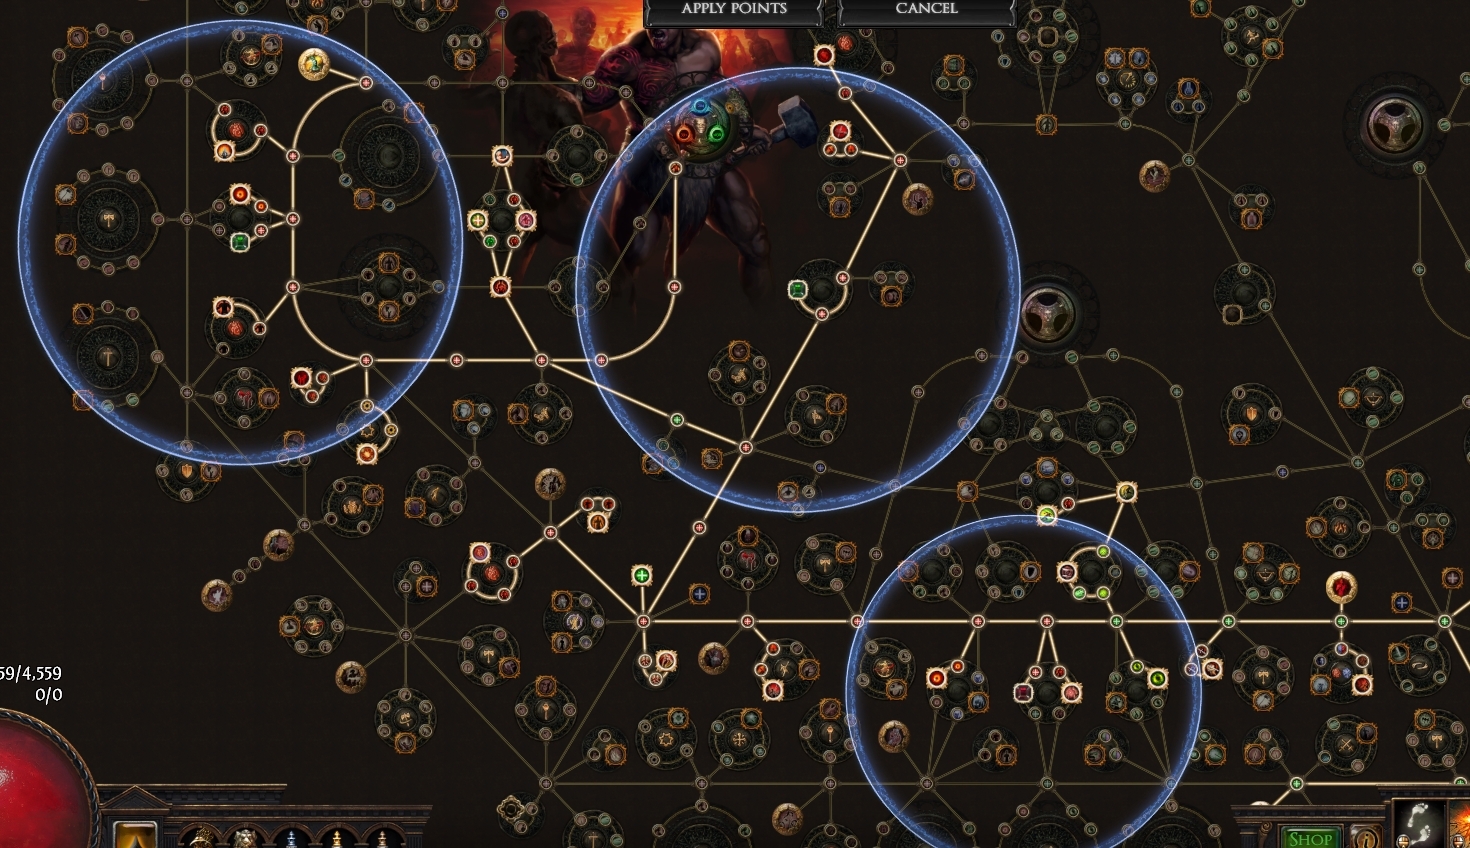
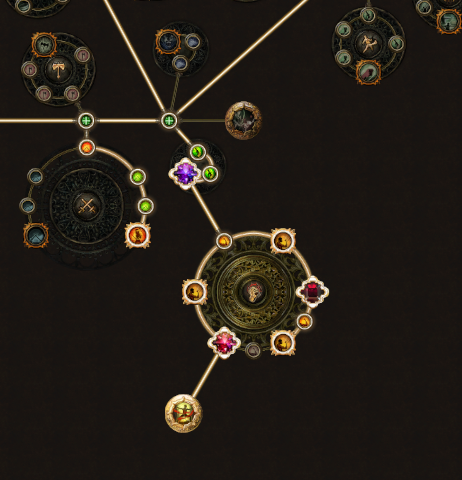
>> Jewel Placement
The placement of these Jewels is important and provide us a really huge damage boost.
1. Overview of all three slots with relevant placement
2. First Fluid Motion
3. Second Fluid Motion
>> Cluster Jewel
NOTE: You get TWO Jewel slots in a Large cluster. One of those slots is required for One With Nothing and the other slot is open for any rare jewel or Watcher's Eye you want to implement into the build.
1. Your Cluster Jewel belongs in this cluster
2. What you need on your Cluster Jewel (go for 8 passives)
3. Master The Fundamentals has no downside for us and grants increased elemental resistances, BiS!
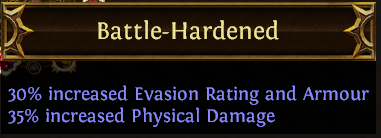
4. Battle Hardened gives us a solid defensive boost and a lot of damage
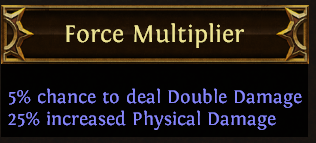
5. Force Multiplier is a no brainer aswell for even more damage
6. Your One With Nothing jewel belongs in that slot. Reduced reservation One With Nothing is very expensive, so don't bother until very late.
<<< Leveling & Tree >>>
>> Level 1 - 65 WITH Hollow Palm (won't work on league start)
If this isn't your first character and you already bought a One With Nothing jewel to acquire Hollow Palm, then you will zoom through the chapters and won't have to mind gearing at all except for your core items One With Nothing and Astramentis (and whatever dexterity gear you find).
> Gear
One With Nothing + Astramentis + optionally Tabula or 5-6L Briskwrap (can be difficult to get the red sockets as they are offcolors)
We will be using the Two-Hand Sword Terminus Est or any good alternative Two-Hand Sword you can find as main weapon (until we get One With Nothing ofcourse). If you need longer than level 75 to get One With Nothing, continue picking jewel slots, life nodes or other damage sources you find on the passive tree and ofcourse for gear aswell. You can even consider going to the cluster jewel slot designated for our One With Nothing setup and pick a cheap two-hand cluster jewel temporarily.
6-Link Gem setup:Sweep - Brutality Support - Melee Phys Damage Support - Pulverize Support - Fortify Support - Impale Support
Level your Ground Slam in some random gem slot along the way
>> Level 80+
Now is the time you are either struggling to progress without One With Nothing (Hollow Palm) or you already acquired the Jewel and are ready to move on to where your build explodes and you melt through the Atlas.
If you have One With Nothing now, you will need respecc 44 points total to reset the points you don't need anymore (if my calculation is correct) and will have to build new bridges (new tree connections) first before refunding passives (see passive tree 80+ poe planner below).
> Gear
Your gear should now start to look something like this
If you can't afford a 6L no worries, a 5L is fine (Ground Slam - Brutality Support - Multistrike Support - Impale Support - Fortify Support).
Just pick up whatever you find. Try using one hand maces or axes (either dual wield is fine). Sceptres are fine too but generally lack damage compared to maces and axes. Can't use swords/claws with Ground Slam.
Stat priority:
-> Phys Damage (only until you get your Hollow Palm notable)
-> Life
-> Resistances
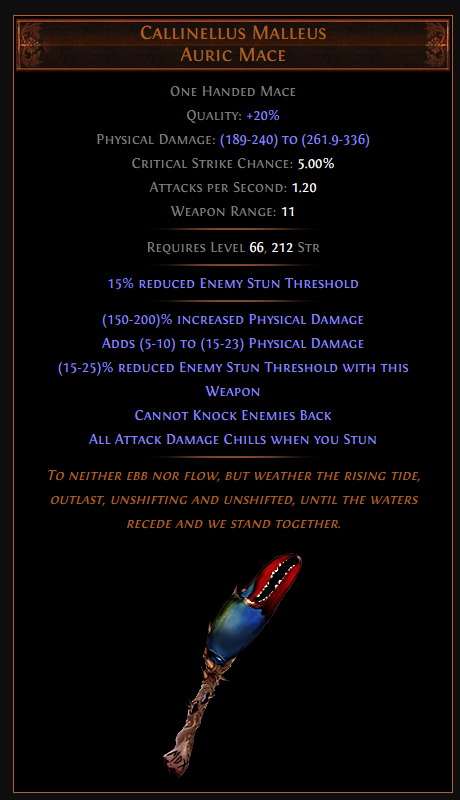
Weapon Example:
For Gems just pick up whatever Physical Damage support gems you can find to improve your Ground Slam. Also get Herald of Ash in Act II until you use Brutality support to increase your AoE damage. Link Leap Slam with Fortify support until you change to Hollow Palm where you have to swap out Leap Slam for Flame Dash (sadge) because you can't use weapons anymore.
The gems you will want by the time you hit Act 6: 4L:Ground Slam - Melee Physical Damage Support - Brutality Support - Multistrike Support(5L-Impale Support, 6L-Pulverise Support) 2L:Leap Slam - Fortify Support 3L:Vaal Ancestral Warchief - Ancestral Protector - Maim Support No Links:Molten Shell or Vaal Molten Shell, Blood and Sand, Dread Banner and Pride (if you can sustain your mana (rush to mana leech node beneath Vaal Pact in passive tree))
If you don't have Hollow Palm yet, switch your weapons to Maces or Sceptres (if you havn't already) and try to get some solid physical damage on some rare ones. If you DO have Hollow Palm, use the 1 - 65 Hollow Palm Passive Tree (see above) or skip to the 80+ Tree below.
Alternatively get two of these (usually 1 chaos orb cost):
The rest of your gear is still irrelevant until you have Hollow Palm but you can boost your damage until then with cheap uniques such as:
- Abyssus Helmet
- Lion's Roar Flask
- The Magnate Belt
- Meginord's Vise Gloves
With recent changes to mana efficiency and changes I made to the build itself, there is no "mandatory" enchant anymore. So just get Ground Slam damage/AoE as enchant or the 30% Pride reservation efficiency enchant (for more comfort)
For Amulet Anoint we have two options:
Budget: Weathered Hunter (Sepia Oil + Orange Oil + Teal Oil)
This will increase your damage nicely and also provide additional elemental resistances
Best-in-Slot: Endurance (Clear Oil + Black Oil + Golden Oil)
This grants +1 Maximum Endurance Charges and requires too many passive points to reach on tree.
We pick Undeniable first because it's a huge damage boost for the leveling process as it caps our accuracy and also gives us more attack speed.
Unflinching is the second choice to get some endurance charges passively and from there on it's a matter of preference. If you lack survivability, pick Unrelenting, otherwise ramp that AoE size and damage up even more with Unyielding
Unbreakable is not worth it as we have a lot of leech and with Vaal Pact it is pretty much useless.
Unstoppable is also a waste since we get Unwavering Stance from the passive tree.
<<< Pantheon & Bandits >>>
Major Pantheon:
Based on your prefered playstyle, you can pick either Soul of Solaris for boss encounters or Soul of Lunaris for safer mapping. I prefer Soul of Solaris.
Minor Pantheon:
Soul of Grukthul (for additional damage reduction)
Bandits: Kill them all (Passive points are BiS)
<<< Crafting Tips >>>
These crafting tips are NOT the only way to craft said required items for this build. There are plenty of different ways to craft any item, so if you are creative and experienced, you don't have to follow step-by-step.
Every item can be replaced by a better rare, it's just that some of these rares can become so incredibly expensive (like Amulet for example), that it's very difficult to actually replace their recommended unique counterpart.
>> Body Armour
Requirements: Awakener's Orb + Veiled Chaos Orbs + Redeener Body Armour + Elder Body Armour + 2 or more Exalted Orbs
One of your Body Armours should be an Astral Plate preferrably ilvl 86 (as all endgame items should be).
Step 1: Roll your affix modifiers until you get both required suffixes:
Your Redeener Body Armour needs to have the "10% chance to gain a frenzy charge on hit" suffix modifier
Your Elder Body Armour needs to have the "% increased dexterity" suffix modifier (make sure it is T1 9-12%).
Make sure that those are the only affix modifiers of that specific influence type to guarantee the desired result.
Step 2: Take the Awakener's Orb and fuse those Body Armours together resulting in the Astral Plate being the SECOND click of the Awakener's Orb interaction (to get the Astral Plate as combined result).
If you get a satisfying result you can end the crafting here.
If you get 3 prefixes that aren't really good, continue with "Special Harvest Step", otherwise continue with Step 3.
Step 3: Use the prefix craft "Suffixes cannot be changed" for 2 ex cost and then reroll your Body Armour with a Veiled Chaos Orb. Unveil the item and see if the result is satisfactory. If you get 3 prefixes that aren't happy with, continue with Special Harvest Step.
Special Harvest Step: Use the Harvest Craft that says "Reforge a Rare item with Lucky modifier values, keeping all Suffixes" (not sure if there is a not Lucky version of this) until you have a satisfying result or get one open prefix (two or less prefixes total). If you get an open prefix slot and are unhappy with the other rolls, continue with Step 3.
Recommended Veiled Mods:
% Increased Maximum Life/Mana Hybrid (prefix)
You and your Minions take 100% reduced reflected physical damage (prefix)
% Increased Attributes (suffix)
Dexterity + Int/Str Hybrid (suffix)
Dexterity + % Quality Hybrid (suffix)
Best result:
# Maximum Life T1 - Craftable
% Increased Maximum life T1 (Elder mod)
% Increased Maximum Life/Mana T1 (Veiled mod) - Craftable
10% chance to gain a frenzy charge on hit (Redeemer mod)
% Increased Dexterity T1 (Elder mod)
% Increased Attributes T1 (Veiled mod) - Craftable
>> Amulet
>> Rings
>> Boots
>> Helmet
>> Belt
<<< Changelog >>> 3.19 CHANGES UPDATED!
- AMAZING 40% MORE Damage with no downside thanks to the addition of the new Keystone passive "Precise Technique" where Winddancer used to be. If you struggle with Accuracy, take the accuracy cluster left of precise technique with +3 accuracy per dexterity mastery earlier on.
- Replaced Flesh and Stone gem with Herald of Purity because it provides as a higher total damage.
- Ground Slam now has a higher base radius (up to 10 from 6) and Rapid Expansion Jewel is no more, so we replace it with either another Fluid Motion, Rare Jewel or Watcher's Eye.
- The addition of "Magebane" Keystone passive in 3.16 is a huge defensive buff and replaced the Iron Reflexes the build used before. This means less armor but a lot of spell suppression.
- Overall the damage and defensive aspects of this build have been significantly buffed and I can't simulate Precise Technique yet (PoB update not available), but it'll probably be around 3-5 million more dps than before on an affordable budget (~30-50ex), way more on min-max ofcourse (but who even has the money and time for that?).
3.16: Right now it looks like this build is getting a buff in defensives for 3.16 and took a slight nerf to damage from previous league (3.15) changes. At most we are talking about a downgrade of 15 million dps to 10 million dps but still enough to destroy bosses in seconds.
3.17: The damage nerf above (3.16) has been completely negated by the addition of the above mentioned Precise Technique keystone passive and a few minor changes. The new ascendancy jewel from pinnacle bosses may even be interesting for the 40% more damage Berserker ascendancy, but needs more testing if it's worth taking 10% more damage in return.
3.18: Added a PoB link to the new Ice Crash version of the build that I modified it into. It's really amazing how powerful it turned out and with the new Headhunter change it's even more stunning + we don't get punished by the Archnem phys to ele conversion mod that punishes brutality builds atm.
3.19: Despite all the nerfs, nothing changed for this build. Infact, there might be some new uniques worth trying, but will require testing. Only nerf affecting this build is the change made to Molten Shell, but it's irrelevant as it's still really powerful. Kalandra reflections can increase our damage A LOT as we can stack Dexterity a lot higher than before. I would estimate 50+ mill dps is very possible with this build now.
If I forgot anything important, please let me know and I will try and fix it. Will try to help where I can and fill in the WIP areas as soon as I have more time.
Since the orb damage calculation seems broken in PoB, does any1 know what's the better quality on VF? Regular for 20% increased fire damage or anomalous for 1 more projectiles? Same with enchant, 40% increased dmg or two projectiles?
I'd personally go for projectiles, but seen some people say the balls don't scale that well, so I'm unsure, considering PoB isn't here to rescue me as usually.
Last edited by ThundraBoy666 on Dec 13, 2022, 6:34:12 AM
It's in the PoB, but since you asked: VF, Elem. Attacks, Melee Dmg, Fortify, Pulverize, and Multistrike.
I recommend using Fire Pen. instead of Pulverize until you've got the Flammability ring and/or exposure cluster node.
Yes, that's a very good tip. Pulverize is the last gem you insert into the build and definitely should take fire pen until you have a flammability ring.
Since the orb damage calculation seems broken in PoB, does any1 know what's the better quality on VF? Regular for 20% increased fire damage or anomalous for 1 more projectiles? Same with enchant, 40% increased dmg or two projectiles?
I'd personally go for projectiles, but seen some people say the balls don't scale that well, so I'm unsure, considering PoB isn't here to rescue me as usually.
Go with Damage % instead of projectiles.
The projectiles do scale somewhat, but they are mainly for the leech hits.
I will experiment with a couple of things next few days and come back with more results.
Since the orb damage calculation seems broken in PoB, does any1 know what's the better quality on VF? Regular for 20% increased fire damage or anomalous for 1 more projectiles? Same with enchant, 40% increased dmg or two projectiles?
I'd personally go for projectiles, but seen some people say the balls don't scale that well, so I'm unsure, considering PoB isn't here to rescue me as usually.
I noticed the damage spike to the monster's health when the balls hit so I think the balls are doing their job well.
I've been treating VF like the old molten strike since they function and feel very similar to each other, so I personally would go extra proj as well since they are broken on old molten strike.
So far I've been having a blast playing this build with volcanic fissure, cleared some floor 4 sanctums with it and can't wait to see how others build upon it so I can copy them to upgrade my character lmao
Another tip, for those who haven't gotten the cluster jewel for VF, I recommend grabbing Lava Lash, as it can supplement some damage until then. Of course, we do plenty of damage once you start throwing on items and jewels, so it all depends on what you desire more, at the time.
Thoughts on picking up Fortify on tree for a free link, or something like iron reflexes and then using Garukhan's flight?
Not worth it anymore. I used to run iron reflexes and garukhans+starkonja, but the version with armour and onslaught boots is much better for the current version. Garukhans is still a nice budget item for the remaining stats it has.
Finally tried out Dancing Dervish and I am really put off by how clunky it is.
It can definitely work for bossing, but I 100% prefer the quality of life over the damage boost it offers.
Btw, going to try fit in Determination into this build. Ice Crash used Hatred which was 50% reserve and we use Herald of Ash now (25% reserve) instead of Anger (also 50% reserve) which isn't worth using. So we end up "saving" 25% mana that can be put to better use. So my idea is to either us Helmet enchant + Mastery or 2 Unset rings (flamedash and molten shell) and make an Enlighten setup for Herald of Ash+Purity and Determination.
Then following that I will take Unbreakable ascendancy instead of Unyielding. With that we will have Determination + a lot of Armour from Body Armour and thus reduce a lot of damage. Should make the char a lot chonkier than the ice crash version.
Will take some time to get the currency for that tho, but for anyone richer than me currently.