


[1.3.0] [BL/TM] BM Flame Totem solo Magic Find/group culler. (78+Maps solo/Dominus)
|
Added chaos = 1.5
GMP = 1.65 in version 1.2 Faster projectiles = 1.1 Faster casting = 1.2 Fire pen = 1.4 with a mana cost of 51 @ lv20 flame totem: 51 * 1.5 * 1.65 * 1.1 * 1.2 * 1.4 = 233 It used to be around 350 mana with old flame totem and GMP costs |
|
|
So gonna do this build for next league again, thanks for the wealth maker build! gotta love it
|
|
|
Done all the preparations to play Detonate Dead in the new league. Went as far as calculating which gems i should take from quests and so on. Original plan was to level as searing bond + flame blast and transit to DD at higher levels.
Guess what? Searing bond is nerfed. Flameblast is nerfed. And now DD itself is nerfed. Boo fucking hoo Fuck this, i am playing MF again !!
Spoiler
 |
|
|
I think I'm going to run a mana based version of this with the reduced cost of the skill. I will run the new Herald of Ice + Clarity for extra DPS.
There's a good chance I won't even need the aura nodes but I threw them on there just in case. Should be able to MF farm extremely quickly and safely! IGN: Dmillz
|
|
|
I was asked to make a quick leveling guide for the build as I played it on Garena 1.2. I might have gone and overdid it a bit, I tend to do that and get wordy, so I've added many spoilers. I hope you get some use out of it, Expjah can use whatever material here freely.
How I level and progress quickly to Merc Sarn with dual searing bond (sb) with this build (marauader) – Pt. 1 of 2 Overview:
Spoiler
All of the top racers have similar strategies in regular season races (not descent or EL), progress with the best gear gem combo available to them at various points, until they reach their final farming area for the given race. Most of the time they progress under leveled until they get there, and then farm like crazy. I don’t recommend “racing” as they do, but rather deliberately progressing with this build under leveled until we hit the final farming area which is Merc Sarn.
Under leveled, really? You don’t have to, but the game will partially keep you caught up. I’ve used this method many times before with totem builds, only having to grind levels to make sure I didn’t hit a xp penalty. With totems, more danger lays in some of the harder areas and mobs rather than the bosses. You can crawl through these levels by arbitrarily placing totems half a screen in front of you to pick up aggro. All the new boss fights are doable and remarkably easy when you have dual totems up. The only semi-difficult boss is Dominus. Aren’t I squishy? Not really, all the beginning nodes are armour and HP. Playing Garena 1.2 with the new 12hp/level buff, I took maybe 3 HP nodes that weren’t directly in the path I needed for totem nodes. Took blood magic almost as soon as I went dual totems, no close calls until I hit cruel ebony barracks with some blue arcers. Main strategy is for totems to take all the hits and aggro. Totem life is SUPER buffed, they can tank like crazy, especially because they are +1 level from a scepter most of the time. Why Merc Sarn not Docks? I’ve easily outpaced a buddy who was farming Docks with a full group at my level as a test. When I have flame totems doing decent damage I was leveling every 15 minutes easily. I’m not saying a Docks party full of Geofri crest arc witches can’t clear faster, but I can rely that solo, I’m going to get all the loot, hit an average level time, and actually be safer (Void dogs) other than Perpetus (avoidable). You also have flasks refills both ends of the shortest linear map other that strand. When you portal in Sarn, you go to forest encampment which by far has closer vendor and stash access. Gems:
Spoiler
Quest rewards:
Normal - Heavy Strike Hillock - Cleave Eggs - Decoy Totem Brutus - Leap Slam Merveil - Added Fire Sins - Flammability Crema - Searing Bond Grav - Fire Pen Archives - Temp Chains Cruel Hillock - Flame Totem Hailrake - Increased Burning Dmg Brutus - Flame Totem Merveil - Blood Magic/Life Leech/Spell Totem (Sell) Weaver - Reduced Mana (Sell) Grav - Reduced Mana (Sell) Archives - Added Chaos Merc Hailrake - Reduced Mana (Sell) Merveil - Reduced Mana (Sell) Archives - CWDT Buy List: *GMP *Faster Casting *Faster Projectiles Culling Strike Item Rarity Enfeeble Increased AOE Increased Duration Molten Shell Enduring Cry Muling: I have 2 accounts, and it’s very easy to have 2 clients open at the same time (800x600 for slower comps easy). Takes about 15-25 minutes to mule some of these gems (each character) if you want to by using your over leveled character to rush a new character. Marauder/Templar mule – Brutus - Molten Shell Sins - Enduring Cry Shadow mule – Brutus - Clarity (Sell) Weaver - Faster Projectiles Crema - Enfeeble Grav - Item Rarity Skill Point Progression:
Spoiler
Note: I take Shamanistic Fury which differs from OP's planned build
I know straight off the bat that I’m going to reclaim 6 points, these points are important because they allow me to progress and do decent dps early game. The 6 points are 2 melee dmg nodes at the beginning, 2 reduced mana and increased accuracy nodes, versatility, and born to fight. This gives me the int and dex I badly need, reduces the costs on my mana, and gives me a healthy 45% increased phys dmg. This will carry all the way to lvl 28 when I switch to sb. Start to Lvl 28 – Take both melee dmg nodes and hp nodes until Warrior’s Blood. Go up to Born to Fight through Versatility. Go through Heart of the Warrior to Diamond Skin. Go through fire res nodes, go down left corner and continue up to entrance to ancestral bond node, which should now be 4 away. Reclaim 4 points (the 2 melee, born to fight, and 1 accuracy/reduced skill node) http://www.pathofexile.com/passive-skill-tree/AAAAAgEAFHEhAicvMfs9_FhjWfNfP2oecql7jH_jjM-bWJ7NpKynMKgYrKq8n8bY0iHjn-RR6hjvDvIv9kj3Mvjr After reclaimed http://www.pathofexile.com/passive-skill-tree/AAAAAgEAFHEnLyoTLKcx-z38WGNZ81orXz9qHnKpf-OMz57No_KkrKcwqBisqryfxtjSIeOf6hjvDvIv9kj3Mvjr Lvl 28 – Lvl 54 – (Note: I always take the path with totem life/res, not dmg nodes) I tend to take Blood Magic early and stack 3 life flasks and 2 quicksilvers until I get a granite, do it whenever you feel comfortable. 3 Nodes to Ironwood. Cut in by barbarism (don’t take yet) and go to Totem Mastery. Go through Physique to Totemic Zeal. Go back to ancestral bond, go up, take 1 pt for athleticism, take 2 pts for purity of flesh, go up around and down, pickup agility. I do this so I can spec out of versatility and reclaim 2 points. Go down and get Shamanistic Fury. Also take enemy critical strike multi reduction anytime. At this point you have all totem nodes, should be getting into Merc, and have very tanky totems. This is also the point where survivability usually becomes a little more difficult with res/armour/life. http://www.pathofexile.com/passive-skill-tree/AAAAAgEABqAQzBRxHRQnLyftKhMrtiynNZI26TwtPfw_J0rESshYY1nzWitfP2SEZp5qHm6qcql4aYxGjM-PRpBVns2j8qSspwinMKeUqBisqrXytz64k7yfwBrE9sauxtjR_dIh2L3a3eNq45_qGO8O8i_2SPau9zL4k_jr-b360v4K Lvl 55 – Lvl 81 This is where I usually start transitioning to flame totems, I can count on having a 4 link available so I determine my clear speeds between 4 link FT+GMP+Fire Pen+Faster Casting and SB+Increased Burning DMG. Although tool tip doesn’t show it, many times the flame totems clear faster. Choice: Damage – Go arsonist. Res and armor – If light/cold res needed you can spec in and out next to diamond skin when needed. Better though to get Sanctuary for 8% block chance and 20% all res. Life – Pick up barbarism, get bloodless, finish the athleticism/purity of flesh circles, get combat stamina, go to Templar area get all life nodes and the regen node. Endgame – For damage – Heart of Flame and Cruel Preparation (+71% fire, +2% fire pen, +20% life, +5% all res, +30 int) For armour/hp – Master of Arena and Steel Skin (+20% life, +54% armour, +1% life regen, +50 str, +10 int) For group play/movement speed (5 additional pts used vs others) – Leather and Steel, Thick Skin, IR (+20% life, %8 avoid status ailments, 32% eva, 32% armour, +90 dex, +10 int) Huge armor boost with someone running Grace. Also can take any of the 5 +8% dmg nodes skipped over. Last edited by Ins0mn1ac#0994 on Aug 21, 2014, 1:19:45 AM
|
|
|
Pt. 2 of 2
Gear progression:
Spoiler
I follow all the top racers’ strat by going all evasion at least until I switch to leap slam (lvl 10). I also craft a Jade Chopper at lvl 9 before Brutus and a poleaxe at lvl 18 around sins.
Phys dmg weapon recipe – Weapon (any rarity) + Blacksmith Whetstone + Rustic Sash (magic) To get eva gear early on you need to get a jade amulet as soon as possible. MS boots of any kind is ok, even lvl 1 iron greaves/rawhide boots/wool shoes. Also any increased attack speed (ias) gloves are great when leap slamming. Usually go leather cap and shabby jerkin/strapped leather through Brutus, tricorne and strapped leather through Merveil. By sins and weaver u should be leap slamming primarily, taking armour or armour hybrid gear. IAS on gear will greatly help leap slam speed. Switch out Jade ammy for turquoise. *Very important* - Around level 15 you should be looking for quartz scepters as drops, preferably 3 link with R-R-B. You can take your time and keep a few for a backup if you don’t find the linked and colors; it’ll just save some currency. +1 Fire Recipe – Scepter (magic) + Ruby Ring (any rarity) + Alteration Orb (You can make a ruby ring with one of the str gems you don’t need any more like cleave + iron ring) Searing Bond+Increased Burning Dmg will fill the red slots; Flammability for the blue, or Item Rarity if you are farming and feel you are doing enough DPS. You should also be looking for Kite shields or shields with good res mods. Layered/Ceremonial are good choices. SB Switch – Equip +1 fire scepter and shield. By now I’ve gone BM, so I try to have 3 life flasks and 2 quicksilvers since I’m not leap slamming everywhere anymore. I do keep leap slam for terrain jumping though. Your choice of rings should be res/life/casting speed/fire dmg. For ammy, I’d keep just upgrading turquoise. Armour or armour hybrid for rest of gear, again res/life/regen most important, except for boots, IMO movement speed is very important to this build, I would take a slightly worse ms boot over a better boot w/o ms. From here on out there really aren’t any changes in gear strategy other than upgrading gear and getting your links. My personal strategy is to keep looking at ALL magic and rare scepters to see if I can get +spell dmg prefix and +cast speed suffix so I will have it ready for the switch to flame totems. Using SB:
Spoiler
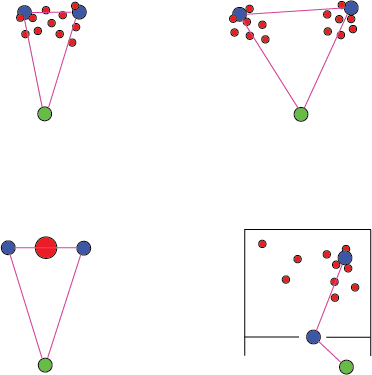
SB has a small AOE around it, so placing it at the back of a group on the mobs is very effective, it will take care of mobs directly surrounding and any that are directly between. When 2 groups are present placing them on the furthest mobs from each group seems most effective and running between to catch all mobs. For bosses I usually put one on each side so any piercing or far reaching attacks are directed away from me (i.e. Vaal Smash, Vaal Lightning Beam). For suicide rooms I use a kind of “L” strategy for safety.
*Made a little diagram below in next comment* Never stop moving even if you’re in the perfect place. Always place totem and move, place another and move. You won’t believe how many ranged attacks and even melee attacks will miss you because you’re not where they aimed. Even if it is jiggling side to side 3 or 4 steps. Quick new boss strats:
Spoiler
Brutus - Keep your totems on 2 opposing sides of him, keep your distance, if adds get next to you they'll burn. Replace whichever totem goes down. Spikes don't really hurt you.
Merveil - She's annoying because she teleports now 1st form, keep placing your totems on opposing sides on her. 2nd form, same strat, but make sure you just find a space where the water columns don't hit you, totems can take it. Kill the 2 special adds when they show up. Things I always look for when farming/progressing:
Spoiler
3L R-G-B
Scepters (Spell dmg/Casting Speed/Fire Dmg) Iron rings (any rarity/level) – 7 Iron rings + Paua/Coral rare ring = Ammy of same lvl as rare ring Stone Hammer/rock breaker/gavel (white) – 20q hammer + map = chisel Last edited by Ins0mn1ac#0994 on Aug 20, 2014, 12:56:15 AM
|
|
|
Nifty little Searing Bond layout I made to go with text from above.
Spoiler
 |
|
|
Ok, so 233 instead of 350 should make a witch more than viable.
Especially, because we can run auras to help out .... I'll try some ideas when I am back later :P Thanks |
|
|
Amazing writeup Insomniac, thanks a bunch for taking the time to write out that detailed guide.
@Skellerton
|
|
|
Wow Ins0mn1ac, thanks alot for the write up, really nicly done with the pictures and spoiler tags for better overview!
You should deffinently make guides for builds, seems you got the talent for it bro! Will be doing a variation of this build for the beyond leauge and the leveling guide will make it so much easier! IMO the BM version is still supperior in HC leauges, i have been doing alot of testing in the skill tree, and if you go mana it seems you will loose to much life or dmg or have mana problems. Will be interesting since this is my first BM character! Thanks again Ins0mn1ac! |
|


