


[3.5] Guffin's McSundae Strike | All Bosses Down | Fast and Safe Mapping | Skillchoices
|
3.5 VIDEOS: Deathless Uber Elder Run (~1:40 min) T16 Armoury Clear (34% Pack size, 4 Sextants, Domination) Deathless Shaper Run Deathless Uber Atziri Run T16 HC Version Survivability Showcase (100% extra Ele Damge, Turboed and Charges) Deathless Uber Elder Kill on a 60c Budget T16 Grotto Clear on a 60c Budget
Full Health Shaper Kill
I'm lovin' it, and I know you will too :D This is a Fire and Cold Conversion Claw Build using Molten Strike to shred Bosses and Frostblades for Trash Clear. As Slayer/Raider, given time Investment, you can farm any Content with many Customization Possibilities (HC, Skillchoice, etc.) at a great Pace! If you want to skip the explanations, there are PoB links at the Bottom of this Post. Be sure to check the second Post, which contains the FAQ, Build Variations and some Tips for Deep Delves. PROS: - One of the fastest Melee Map Clears - One of the highest Single Target DPS in the game with endless scaling - Prime Bossing Build - All of the above while being super safe (HC viable with adjustments) - A Variety of Clearskills possible without recolouring - Cheap to get started, not Uber Lab dependant -> okay-ish League Starter - Runs all Mapmods except "Cannot Leech" (and "Ele Reflect" on T16s or with -max) CONS: - Not as budget friendly as Summoners/Totems/Mines to get into the Bossing Endgame - Requires a faster Playstyle than Stuff like RF Juggs (more Buttons pressed) - No Phys Mitigation-/CI-/Maxblock-/etc. Tank. You need to dodge sometimes during Bosses - "Melee" Skills will never clear as fast as QOTF TS/KB Builds or Autobombers - Scions are the hardest Class to level Offensives: - No upper limits since this is ele conversion Molten Strike - Personally I reached over 8 Million Shaper DPS with MS, and 1M with Frostblades on a pseudo 5l Defensives - Evasion and Dodge based (66% Attack- and 40% Spell Dodge while mapping) - 200% Life in SC excluding Belly, 232% in HC at the sacrifice of DPS (which we have enough of) - Fortify, Kaom's Heart, Endurance Charges, Vaal Grace possible for HC - Overleech Carries hard - 3 Utility Flasks (4 in HC) + Taste of Hate for Phys mitigation - Maim, Chill, Freeze and Shatter reliably - Extremely Strong Life Gain on Hit from Claws - Never in true Melee Range These are assuming an Endgame Character at Level 95. Levelling Paths are further down.
Ascendancies
In any Variation of the Build, we go Slayer/Raider and take the Ranger Start. Slayer is a super popular Scion choice for one basic reasons: You get Overleech. Overleech is great. It basically means your life leech doesn't stop when you are at full life, it keeps running in the background. As opposed to any "normal" build with leech, you are always at Max Leech Rate while playing. While they have to attack to build up Leech Rate every time they lose life, yours is always running. It keeps you topped off from many small hits without a dent in your HP Bar, and even 5k Hits get healed back up in a second. This is an invaluable defense mechanism, that allows us to stand even in Uber Elder degen grounds at full Life. The free 10% Culling strike is also a 11% more Multiplier for our Damage. 20% increased AoE after we killed something is okay for mapping with Herald of Ice. Raider is used to bolster our DPS and Speed in various ways: Whenever we are fighting Bosses we generate Frenzy Charges by hitting them, granting us 4% more Damage and Attack Speed per Charge. While we have full Frenzy Charges, we have Onslaught (even if it's not displayed in the buff bar). This gives us 20% Attack Speed and is up 100% of the time while mapping and on any Bossfight that lasts more than a few seconds. These both together make our movement skills extremely fast as well as giving us a rather insane boost to Damage. The 4% Dodge Chance is a nice Freebie, and builds well into our Defenses. Path of the Ranger enables us to start from a second Point on the Skilltree, saving us a lot of Skillpoints compared to the Levelling Trees.
Trees
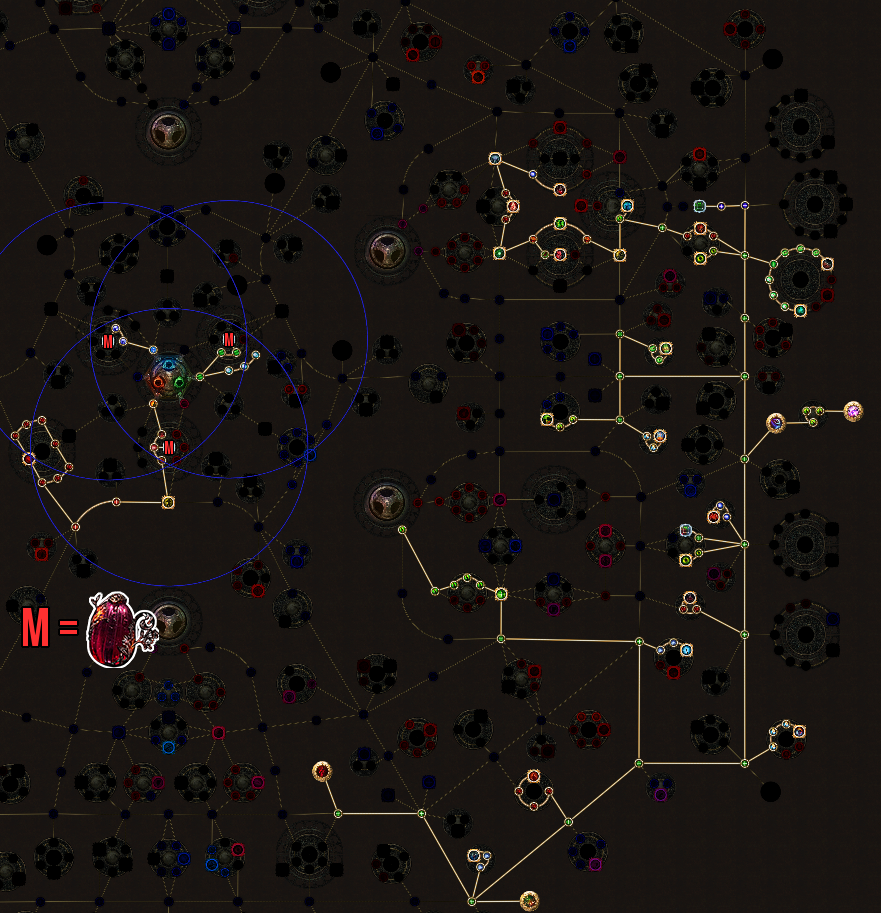
SC Tree (204% inc Life):
Image Version
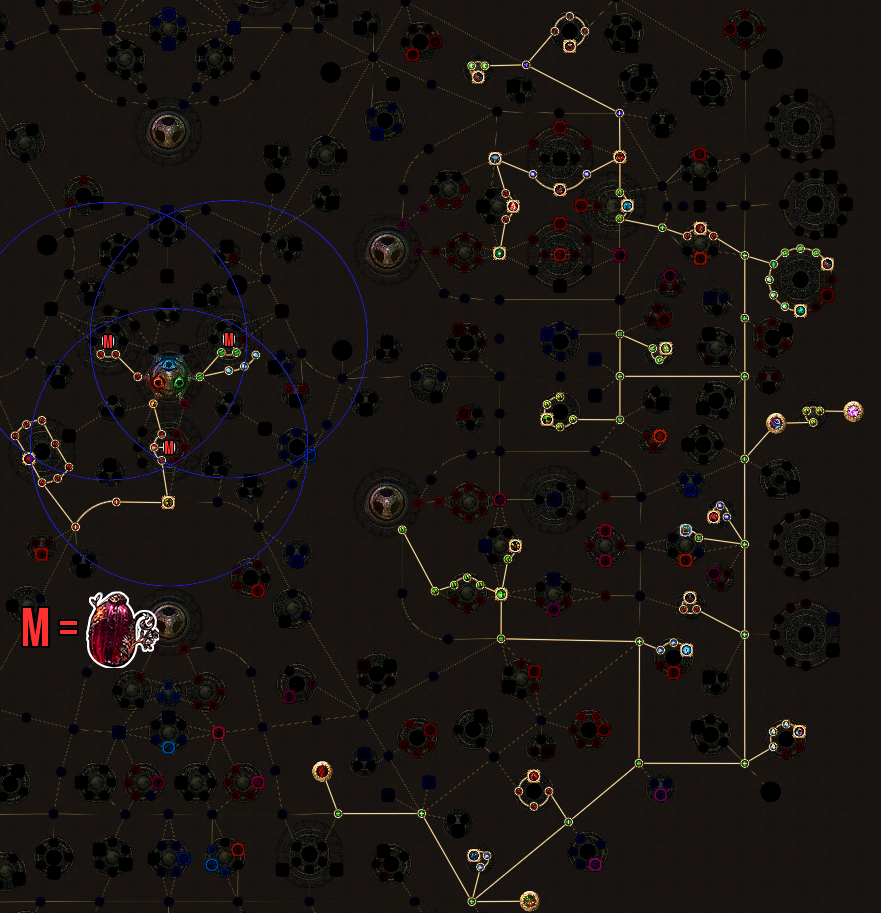
PoE Planner PoE Website HC Tree (236% inc Life):
Image Version
PoE Planner PoE Website The Trees above are with 2 Might of the Meeks Jewels and 1 Unnatural Instincts Jewel. These work great in conjunction, as the Boni gained from Unnatural Instincts get amplified by the Meeks. The Meeks give us additional 23% Max Life, 8% Allres, 25 Flat Life (or 10 INT) and another 10 Flat Life. Unnatural Instincts grants 26% Attack Speed, 82% Crit Multi, 8% max Life and 10 INT (Values already amplified by the Meeks). These Jewels can cost a lot tho, and until we get them here are our Alternatives:
Non/2 Meek Trees
No Meek Tree (185% inc Life):
Image Version
PoE Planner PoE Website 2 Meek Tree (196% inc Life):
Image Version
PoE Planner PoE Website As a general Rule we pick up Life, Attack Speed, Crit Chance, Crit Multi, Ele Penetration and %Physical Damage increases. Since we are Ele Conversion, we need Winter Spirit for our first 40% Conversion to Cold. As we convert from Physical to Elemental, we benefit from any Physical as well as Elemental Nodes/Increases, which is what makes Ele Conversion Builds so strong. Elemental Penetration Nodes also act as a kind of More Multiplier against high Resistance Targets. Vitality Void is a Notable you can take for 3 Points that significantly strengthens our Overleech. I generally don't deem it necessary for general Gameplay in SC, but if you feel you need stronger Leech you can pick that. Acrobatics, Phase Acrobatics and Vaal Pact are all huge boni to our survivability, and absolutely non negotiable. Point Blank is a significant Damage increase in every Situation for both Molten Strike and Frost Blades. If you follow the SC tree, you will be missing exactly 40 INT to level the important Gems to 20. This is fixed on Amulets/Rings, or maybe by taking a 30 INT node. As with most Builds, these are just guidelines. The only non negotiable aspects are Winter Spirit and the 4 Keystones. If you find you need more Life, or maybe you have some gg Jewels: grab Life and Jewel Sockets :) If PoB tells you Accuracy is worth more for you than XYZ, go for it!
Bandits and Pantheon
Bandits: We help Alira. 20% Crit Multiplier is a nice DPS Boost since we are a crit based Build, and 15% to all elemental Resistances makes gearing a lot easier. The Mana Regen is noticeable while Levelling. Pantheon: Is more impactful for us than most other builds. Make sure to upgrade the relevant ones quickly.
Bossing
Major - Arakaali LvL 2 "50% increased Recovery of Life and Energy Shield if you've stopped taking Damage Over Time Recently" is triggered by Cast When Damage taken linked to Immortal Call, which stops us taking damage from Blood Rage for a split Second. This is huge Boost to survivability as it makes our Leech incredibly fast, healing 5k damage hits in a Second. Minor - Whatever Take whatever suits you best for Defenses. Yugul is worth it for fights with a lot of Cold Damage like Uber Elder.
Mapping
Major - Arakaali LvL 2 For the same Reasons as in Boss Encounters. Minor - Whatever Depends on your Situation/Map. Shakari's Poison Immunity for Poison/Caustic Ground maps, Grukthul is good in general, Abberath for burning ground maps. Ele Reflect Maps Yugul LvL 2, no debate. Yugul grants 25% reduced reflected ele damage taken and 5% reduced cold damage taken if you have been hit recently. Check the Mapping Tips further down to see how to deal with ele Reflect. This Build has the comfort of running arguably the strongest singletarget Skill in the game, further enhanced by the insane support lineup thanks to ele conversion, alongside a clearskill in a pseudo 5 or 6 link. For that, we use a Claw and socket our Molten Strike into the Chest, while the Clearskill is in a Shaped Helmet. For Mapping, no gem- or weaponswaps are needed. We use a Claw as our Weapon of Choice due to the extremely strong Life Gain on Hit, which synergizes well with the hundreds of Projectiles from MS, and their extremeley strong Nodes and high Crit Values. The Gear explanations include Trade Search Links for every single Piece of Gear, be sure to check them out and adapt them to your needs :) Be sure to follow the Stat Priority when looking for Rares, as Rings and Amulets are incredibly important for us!
Gem Links
The links are sorted in descending order of importance. So the last gem in a chain should be the last one you slot in when you upgrade your amount of links. The colour of the Text implies the colour of the Gem. Do NOT use Damage on full Life until you have the Slayer Ascendancy, as you will not be always on full Life until then. Molten Strike + Elemental Damage with Attacks + Damage on full Life + Concentrated Effect + Multistrike + Ancestral Call OR Elemental Focus Since we convert from Physical to Elemental Damage, we can make full use of EDwA and Ele Focus. As we are always on Full Life thanks to our Overleech, DoFL is a no brainer. Molten Strike being an Area Skill enables us using Conc Effect, and the lack of AoE doesn't hurt us since we clear with another skill. Whether to take Ancestral Call or Elemental Focus depends on your preferences. Ancestral Call will double our amount of Projectiles (which are the main Source of Damage), but requires perfect Positioning. We want to be slightly out of Melee Range, and click between us and the Boss on the ground. Our Projectiles will go off, and our Ancestral Call will copy them. That said, this never results in double DPS but instead like 50% More on average, depending on RNG and your execution. Ele Focus on the other Hand is 100% reliable Damage, but might be slightly less on occasion and offers less Life Gain on Hit (due to less Projectiles). Frostblades + Multistrike + Elemental Damage with Attacks OR Ancestral Call + Damage on Full Life OR Pierce OR Chain This is our Clearskill Setup using Frostblades. While all the possibilities might seem confusing at first, it's a simple decision: If you need more Damage, go with EDwA instead of Ancestral Call. If you need even more, go with Damage on Full Life instead of Pierce and grab the Pierce Nodes on the Tree:
Spoiler
If you have enough Damage and need Clearspeed, go with Ancestral Call and the Pierce Gem. If you have tons of Damage, use Chain instead of Pierce for even more Speed. Herald of Ice + Curse on Hit + Assasins Mark This is our Curse Setup. While Mapping, your Herald of Ice explosions will Curse enemies and killing them generates you Power Charges and Mana. This is generally the best for Mapping Speed. If you want more passive tankyness you can choose Warlord's Mark instead of Assassin's Mark, generating Endurance Charges instead which will provide security against Physical Damage. I recommend socketing this Setup into the Boots, as we exchange those for Uber Elder etc., anyways and on Bosses we don't want Herald of Ice (see further down). Whirling Blades + Faster Attacks + Blood Magic OR Fortify This is our Movement Setup. We're not a running Build, but will reach great Speeds via Whirling around. Also, WB is simply the best tool to Dodge Stuff during Bosses as there is no Delay on the Startup as opposed to many other Movementskills. Fortify is an extra Defense Layer over Blood Magic, but it feels bad in No Regen Maps and whenever you have to backtrack. Cast When Damage Taken (Lvl 1) + Immortal Call (Lvl 3) The CWDT setup triggers our Arakaali Buff and is important to have everywhere. Check the Pantheon part for more information. Remember to not accidently link any other Gem that is within CwDTs Level Range with it, or you won't be able to cast it yourself anymore :P Hatred, Blood Rage, Frostbomb (Lvl 1), Ancestral Protector (~Lvl 12), (Ice Golem) These go anywhere you have Space and don't need any links. Hatred is an incredibly huge DPS boost, even more so with the Watcher's Eye Jewel I recommend for Endgame. Blood Rage grants us a lot of Attack Speed and generates Frenzy Charges while killing. The Health Degen is a non matter, as our Overleech keeps us at Full Life. This Skill should be kept up at all times. Frostbomb and is a huge Boost to our DPS on Bosses or Abysses. Don't level it, as that provides no advantages. Ancestral Protector offer a LOT of additional DPS and can be comfortably used while mapping (Breaches, Abysses) and on any Bosses. Don't level it too high as we don't have the Strength for it. Ice Golem is conditional and I don't recommend socketing it in while mapping, it will die 99% of the time anyways and you don't need it for clearing. On Endgame Bosses I take it tho. Vaal Haste + Inc Duration VH can be used while mapping if you want more Speed. You will have to sacrifice some Gem Slots tho, and I generally don't recommend it. Quality and Levels can be good DPS upgrades. It is worth noting however that, unlike Spell Builds, we don't benefit from a Level 21 gem hugely. This makes investing into them usually a thing left for the very Endgame. 20 Quality on all your Gems that Support MS and your Clearskill is essentially an easy low budget upgrade for late maps though! Adding quality to Blood Rage is also worth it. You can see what the increased Quality does in the Wiki Pages I linked.
IMPORTANT Swaps for Bossing
For Endgame Bosses like Shaper/Uber Elder and co.: Our Herald of Ice Curse on Hit setup and the Clearskill get removed. HoI adds relatively little Damage and the CoH won't happen on Singletarget Fights. Having a Clearskill makes no Sense, as we use Molten Strike all the way during these Fights. Herald of Purity Herald of Purity with its tons of added Phys is just way more Damage than Herald of Ice. Ice Golem or Lightning Golem Both of these offer some DPS Benefit for just one Gem Socket, and it doesn't hurt to drag them along for Bosses. Which one to take depends on whether or not you have Lycosidae already: if you don't, you choose Ice Golem because he provides Accuracy. If you do have it: Lightning Golem for the Attack Speed.
Stat Priority
This is a rough Stat priority for Rares (which are very important for us) from most- to least important in each Category: Defenses: - Life - Resistances until 75% - Evasion>Armour>>>ES Offenses: - Flat Phys added to Attacks - %increased Elemental Damage with Attacks - Accuracy (also on Abyss Jewels) (Until we get our Lycosidae) - Global Crit Multi, Attack Speed - Flat Ele Damage (also on Abyss Jewels) - Exactly 40 INT to level Gems Just keep in mind to always compare Item options in PoB before making a Purchase, to get 100% accurate results on what is an Upgrade, and how big that one is.
Gear
League Start Gear Overview
Recommended/Required Uniques: Example Rares: Recommended/Required Flasks:
Endgame Gear Overview
Ignore the Gems you see here, just follow the ones shown in the Gemlink Section 100%. At the end of this Segment you will see some important Choices for Bossing Encounters. A Rare Claw with as high of Physical DPS, Attack Speed and Crit as we can get is the centerpiece of this Build. We NEED a Claw with the "Life Gain on Hit" Implicit due to its strong synergy with our rapidly hitting Skills. Also, we are looking for a decent Crit Roll as we are a crit based Build. Attack Speed is important not only for the feel of the Build, but also for the effectiveness of sources of added Damage. An Amulet with 10 average added Physical Damage adds 18 dps to a 1.8 APS Weapon, but 20 to a 2.0 APS one. Trade Link
Low Budget
Wasp Nest OR Touch of Anguish as your main weapon. Both are cheap starter Uniques with solid phys DPS. Wasp Nest offers a bit of everything and will feel extremely smooth. ToA is purely crit focused and heavily lacks in Attack Speed. They offer almost the same damage tho, so price might be the deciding Factor. That said, I recommend a Wasp Nest. For ToA look for high crit and physical rolls, for the Wasp Nest you want reasonably high/midtier Rolls on everything ideally. Wasp Nest Link, ToA Link Lycosidae is the premier Choice for our Shield. It completely eliminates any Need for Accuracy, which is an insane DPS Boost, and also adds Survivability via up to 70 Life and some Block Chance. Trade Link
Low Budget
A Rare Shield or one of many Unique Shields, like the Great Old One's Ward can be taken until you get your Lycosidae. Note that you will need Accuracy on the rest of your Gear if you go with that Choice, and should play with an Ice Golem. Rare Link, Ward Link Belly of the Beast is probably the best Choice we can make for a Chest. More Life always means more tankyness obviously, but the Strength of our Overleech also scales with the amount of max Life we have. The additional allres makes hitting Res Caps also a bit easier. Trade Link
Low Budget and Alternatives
Tabula is the obvious choice as an easy 6l for Molten Strike. A rare 5 or corrupted 6 link Chest with Life and Resists might be cheaper/better occasionally tho. Tabula Link, 5l Rare Link, 6l Rare Link Loreweave is a popular Choice for many Builds, but I don't recommend it for this one. It is strong offensively, but the horrible Life Values make us suffer a lot. And it's not like we need more Damage anyways. That said, if you have 7k+ Life with a Loreweave on, you can surely go for it in Softcore. Trade Link A rare Chest with a lot of Flat Life, 15+ %Max Life and Basecrit to Attacks. You can get equal Life as a Belly on these, with the added offensive Benefit of Flat Crit to Attacks. At that point we are in the 100EX Territory though, and the DPS Gain is minimal for that Investment. Trade Link A pseudo 5l for Frost Blades is required to make the Clear feel good. This will be achieved by buying a rare Shaped Helmet with "Supported by Hypothermia" Affix, which acts as a 5th DPS Support for our Frost Blades. Even with Life and Res on these, they usually go for very cheap. Trade Link If you don't use Lycosidae yet, enable Accuracy in the Trade Search. Maybe lower the Hypothermia Roll to 18 for Budget. Tombfist with 2 Abyssal Sockets is unbeatable. These offer both a lot of Life and offensive Value, and with a Murderous Eye Jewel in the socket you will Intimidate enemies all the time. This is effectively a 10% more Multiplier for our Damage, because we don't have any other sources of increased Damage taken on the enemy. The best Corruptions are "+1 to Frenzy Charges" and "+0.x% Crit to Attack". Trade Link
Low Budget
Tombfist with one Abyssal Socket are the cheap Version of this. These offer less Life and Damage, but are still better than any Rare. Trade Link Rare Boots with Life, Res and maybe some Amount of Dodge. Dodge Link, No Dodge Link A Stygian Vise with WED, Life, Resists and a good Jewel. Trade Link
Low Budget
Rings, Amulets and Jewels are extremely important for this Build, and it is required to keep them up to date with the content we're Doing. Be sure to follow the Stat Priority and adapt the Trade Searches to your Needs. Rings, Amulet, Abyss Jewels, Normal Jewels Low Budget Links: Rings, Amulet, Abyss Jewels, Normal Jewels These Trade Links were made with using Lycosidae in mind. Simply tick the "Accuracy" Boxes in the Search if you don't have it yet :) Remember to upgrade your Rares as you progress through the Game Aim for higher Life, higher flat Physical Damage, higher WED, higher Crit Multi etc. 2 Unique and 3 Magic Flasks will be your Setup while Mapping.
Explanation of Choices
Taste of Hate is a DPS increase similar to Hatred, by giving us part of our Physical Dmage as extra Cold. Most importantly though: by taking a portion of all physical Damage as elemental Damage, we reduce the incoming Amount through our Cold Resistance and gain some Survivability. It also helps with Ele Reflect Maps, as we take less Cold Damage while its activated. Trade Link A Dying Sun offers 2 additional Projectiles. These are a Clearspeed Increase for Frostblades, but most importantly a huge DPS boost for Molten Strike. The "less Fire Damage taken" doesn't hurt either. Trade Link Atziri's Promise is just a simple big DPS increase, especially since we benfit from both of its Affixes. Also, it is one of the few Sources of easily achievable Chaos Res in the Game. Trade Link Wise Oak is a similar Case as Taste of Hate: it offers a big DPS increase as long as our uncapped (the Number in Brackets in your Char Page) Fire/Cold Res is our highest with all Flasks up. If we manage to balance multiple Resistances, we benefit from the Buff in all Cases. So it's possible to balance all 3 Resists and penetrate all 3 Resistances, while also taking less Damage of all 3 Elements. Trade Link At a League Start or as a poorer Player, you won't have access to the Dying Sun and Taste of Hate yet. So I recommend mapping with a Wise Oak and Atziris Promise. But as you get more Currency, swap those out for Dying Sun and the Taste of Hate. Not only for more Damage and faster clearing, but also Survivability. A Diamond, Stibnite, Quartz, and Basalt Flask The Diamond Flask is a must have for both DPS and Safety alike, as it greatly boosts our Crit Chance which also leads to more reliable Freezes and Shatters. The other 3 Flasks are great Defensive Benefits, and you can choose depending on your Preferences. You need to get Bleed Immunity, Freeze Removal and Curse Immunity on 3 of these. Don't forget to quality them for more Duration and roll your Curse Immunity one with %increased Duration. All of these Flasks will be super cheap to get, but you probably will have from levelling anyways. Watcher's Eye with one of the Hatred Mods is ideal for our Build. In order from best to worst: "+1.xx% to base Crit", "xx to xx added Cold Damage", "xx% Cold Pen". Trade Link for all 3
Mapping specific Setups and Choices
Rare Horror crafted Helmets with 20 Hypothermia OR a Tempest's Binding are a great/better Place to socket Frost Blades into than a "normal" Level 20 Hypothermia Helmet. Going for one of these, preferably the Horror Crafted Rare, will allow you to play with Ancestral Call, Multistrike AND Chain in your Frostblades Links (if your Gear is good enough) for optimal Clear. The Rare Helm might be hard to find, it may be easier to craft one yourself with Essences of Horror. TB is not available in every League, Harbinger Orbs are required. Rare Link, TB Link Darkray's will give you the most Speed and Damage while mapping, at the loss of life. The 12% Dodge Chance we get at full Frenzies helps with Survivability, but doesnt counter the big Hit we take in Life Values. Darkray Link Fight for Survival can be swapped in for one or two of you Rare Jewels to add some Proj Speed to Frost Blades. As these Projectiles have a "lifespan", they travel farther the more Speed they have. This feels pretty good for Clear, but don't forget to swap your real Jewels back for Uber Elder and Co. :P Trade Link While farming Maps, going for a proper 6link for your Frostblades and socketing MS into the Helmet is an Option as well. This can be easily done with a Horror Crafted Elder Helmet with Level 20 Conc Effect, which comes out to about a 5.6 Link for actual Damage and is good enough for everything in the Game. The preferred Frost Blades Links would be: Frost Blades + EDwA + DofL + Multistrike + Anc Call + Chain/Pierce
Bossing (Uber Elder etc.) Setups
Lightpoacher: since we don't use a Clearskill for the Endgame Bosses, it makes sense to ditch our Pseudo Link Helmet. A 2 Socket Lightpoacher offers 15% Allres, upwards of 80 Life and a Shitton of Damage with the right Jewels. An Enchant with additional Molten Strike Balls offers a VERY significant DPS increase. Hale Negator is basically the same and offers a significant Survivability increase, but the loss of 45% Res is pretty huge. Other than that you can craft a really good Rare Base with -X% to Cold/Fire Res, but that is expensive to do. Lightpoacher Link, Enchanted Trade Link, Enchanted Negator Link, Crafting Base Link Bubonic Trails offer a significant DPS increase over Rare Boots via Abyss Jewels and it's own Stats alike. A 2 Socket Version will offer significantly more Life, but comes at a hefty Price Point. A 1 Socket one is totally fine. Enchanted 1 Socket Link, 2 Socket Link Ralakesh's: can help you reach completely full Charges before a boss fight. Equip them, wait for full Charges, equip your other Boots and move to the Boss. Jaws of Agony: in a weaponswap can be used to generate Power Charges inbetween Phases of Fights. use these LvL 1 Links: Ice Trap + Multiple Traps + Cluster Trap For our Flask Setup, we simply go with full DPS Flasks.
Survivability (HC) Choices
Kaom's Heart boosted my HP up to 9k with the HC Tree. The lack of Sockets doesnt hurt since we clear with FB in a Pseudo 5l anyways. That is enough to clear even T16s with "difficult" mods for our DPS, as shown in the HC Video at the top. MS is preferably in an Elder Helmet swap (Conc Effect and Horror Essence) Kaoms Link, Helmet Link A well rolled Basalt Flask could replace your Atziri's Promise if all you do is farm shaped T10-T12s, as the added damage rarely matters there. Just keep in mind that Atziri's actually makes a very noticeable difference against Chaos Damage, which we don't encounter that often tho. A rare elder Belt with %inc Life Recovery Rate is insane, since it boosts your survivability through Leech by tons. They come at a hefty pricepoint tho, if you want other good rolls like Life, Res and WED. And you do. Trade Link A rare elder Amulet with % of max Life to max Life Leech Rate is a similar boost to our Leech, albeit less impactful than the Belt. These Amulets usually are pretty rare and hard to come by, especially with decent Stats. Trade Link I recommend taking the CWDT + IC setup and Arakaali at all times for more safety while Mapping. Vaal Grace is an Option instead of Vaal Haste for even more Survivability. CoH + Warlords- instead of Assassins Mark is also a Choice. It will add additional tankyness in a passive way. You could also just run an Enduring Cry, which needs to be maintained tho. EDIT: This Section is currently out of Date. I didn't have time to update it yet. Expect it for the 27th Dec. I will rework this soon. I recommend Levelling with Sunder, which you can buy from Nessa after The Siren's Cadence, until Maps. I recommend fully swapping to the main Build/Setup at around Level 70 and after having done Merc Lab.
Ascendancy and Skilltrees
Ascendancy Progression: Slayer into Raider into Ranger Start Normal: +20 Dex/Strength and Passive Point Cruel: Take Slayer and +40 Dex Merciless: Take Raider Uber: Take the Ranger Start
Uber Lab Tips
General Recommendations: If it is your very first time doing this Lab, check out this detailed Guide. Carry 2 Life Flasks with you, at least one being instant. If you happen to have it, Blood of the Karui is an excellent Flask for this. Other Flasks should be a Diamond, an Atziri's and a Basalt. With our Overleech, we will be generally safe during Trap Sequences if there is something to kill before. Run the CWDT+IC Setup from the gemlinks section along with an upgraded Arakaali Pantheon (check the Pantheon section) for even more Safety. Along that, go for Ryslatha to get passive Refills for your Life Flasks. These are very general trees, since I don't know your particular levelling Situation. Do you have levelling Uniques? Do you have good Rares? Are you using Claws from early on or something else? Do you play SC or HC? Do you need some Stats for your Skills? Try to adapt it to your needs: if you need more Life, go for the Scion Life wheel (the biggest Life Cluster in the game) earlier. If you have some good levelling Claws, maybe pick the Claw nodes earlier. Etc. Level 30/After Normal Lab Tree: PoE Planner PoE Website Level 52/After Cruel Lab Tree: PoE Planner PoE Website Level 68/After Merc Lab Tree: PoE Planner PoE Website Level 75/After Uber Lab Tree: PoE Planner PoE Website Only take Vaal Pact once you are High Level and have some amount of Leech. Take Winter's Spirit after you have one Cluster of Elemental Penetration. Make sure to get Acro early on. Use Bloodrage during Levelling. If you struggle with INT, keep in mind Aspect of the Lynx, Coordination, Trickery and the 2 travel Nodes towards the Jewel Socket are nice sources for it. Coupled with Int on one Ring or Ammy (or both with very low Rolls), you are set. You can take a +30 INT Node until you manage to fix it with gear. After that, progress towards the Endgame Tree however you see fit. Generally the Claw Nodes are big tho :P
Levelling Gear and Gems
RaizQT made an awesome Guide about levelling with Elemental Sunder, which suits our purposes extremely well: Check it out! I really recommend watching through it, as most people can learn a ton from it and this is the most efficient way to level for us. That said, here is a guide for Sunder levelling: Below are some Uniques that are useful while levelling. You probably won't have access to them if the Char is a League Starter, they are mostly for second Characters. None of these are needed, they just speed up the process. Armour: Tabula, Goldrim, Wanderlust, Lochtonial, Ondar's, Haemophilia Weapons: 2x Screaming Eagle, Offhand Princess, MH Brightbeak, OH Tempestuous Steel, MH Flesheater Jewellry: Heup, Blackheart, Meginord's, Deceiver, Carnage Heart, Praxis, Thief's Torment All sorted in Ascending order of Lvl Requirement. Replace Brightbeak with Flesheater if DMG becomes a problem. Keep in mind to not use too many at once, as some of them lack life. Keep some Rares around to get some flat life.
General Mapping and Bossing Playstyle
We zoom around the map at lightning speed thanks to our high attackspeed with Whirling Blades. Activate Bloodrage at the start of the Map and recast it if necessary. Use Molten Strike for big rares/uniques and map Bosses. If you decided to use Ancestral Call: stand a bit out of Melee Range of Bosses and aim between both of you on the Ground, so that your Ancestral Call Procs and doubles your Balls. Make sure to use the Attack in Place Feature on your Frost Blades and Molten Strike. If you click out of your reach with a Skill the character will walk a distance before he is "in range" to use the skill, which makes you loose control and can lead to deaths. This new feature will make you always "attack in place", so that you actually perform an action when you want. You can put Ice Golem on Left Click. It will work just like the normal Left Click (walking around, picking things up) until you hold Shift+LClick to cast the Golem. Don't forget to place your Ancestral Protector and Frostbomb on Bosses! The Frostbomb under the Boss, the Protector away so that he doesn't die. You can use AP while clearing a Breach or Abyssal Crack as well, as your travelling slows down a lot.
Map Mods
Ele Reflect: We can run it without problems, even though all of our Damage is Elemental. For these maps you need to: Pick Yugul (Check the Pantheon Section further up). Make sure your left Ring has no important resists or Stats (that loosing would brick your gear) on it. You Equip Sibyl's Lament here. Ideally, your other Ring should be a Shaped Ring with reflect Reduction. All together, you have 95% reflect Reduction. 40% from Sibyl's Lament + 25% from Yugul + 10% from Primeval Force + 20% from a Shaped Ring. Add on top the fact that we take 20% less Cold and Fire Res due to Taste of Hate and Dying Sun, as well as our Overleech, and we will be topped of most of the time. This turns instantly rippy if the map has -Max Resists as well as Ele Reflect though, since the reflected damage will hit you way harder. Also, I don't recommend running T16s with ele Reflect. Chance to avoid Elemental Ailments: Is totally doable, but you loose a bit of safety cause you will rarely chill/freeze/shatter enemies. Also makes your Curse on Hit work less often. Also, the Hypothermia for our Frostblades will be a lot less effective. The main turn off is, that you won't hear those juiiiiicy Shattering sounds tho :D Less Recovery Rate of Life/Energy Shield: Is a direct nerf to your Leech. It's not a huge downside most of the time, but I don't recommend running T16 guardian maps with that mod, as your survivability against the Boss will suffer.
Uber Elder
These 2 are your Friends. You take the same gear as for all other Endgame Bosses, but swap out Bubonic Trail for Kaoms and instead of the Herald we take a Purity. Kaoms Roots prevent you from being slowed during Elders Cone, which makes dodging things a breeze. It also prevents you from getting stunned by Shaper's Balls, so you don't tank two. Add on top of that the huge HP Boost, and these are a must have. Try to get some with either "1 to X Lightning Damage if you haven't killed recently" or "10% Ele Pen if you haven't killed recently". The Pen offers more DPS, but not by a lot. Trade Link Purity of Ice helps against the many sources of Cold Damage in this fight and boosts your survivability a lot. Using Kaoms makes you lose Gem Sockets. To keep your CWDT setup for the insane Survivability from Arakaali, you need to drop your Ancestral Protector and/or Golem. All in all this is a big DPS loss, but you will still have enough. Uber Elder isn't a huge DPS check, it moreso checks mechanic knowledge and survivability.
Uber Atziri
Keep your normal mapping Flasks. Getting Cursed/Bleeded sucks here. Also the Mobs are 100% Magic packs and probably the tankiest in the game, so I recommend going with your Bossing Setup for the whole run (ditching the pseudo 5/6l for Frost Blades) and clearing with Molten Strike all the time. For Atziri, keep your Flask Charges for the split Phases and focus down the Spear one. With the correct timing you can prefire quite some Balls for a quicker Kill. Always keep in mind to stand behind the Clones, as standing between them will make your Ancestral Call hit unintended ones.
Uber Lab Farming
While this is not a dedicated Uber Lab Farmer, and others can do it faster, it's still possible to reach great speeds with the same great survivability we enjoy everywhere while instantly phasing Izaro. Note that you can NOT League Start as a Lab Farmer with this Build. You can however farm your own enchants lategame. For maximum Speed, use Leapslam with a Brightbeak along a 3 Green Prismatic Eclipse in a weapon Swap. Skip all mobs and only use your main Weapons for Argus/Izaro. For Flasks I recommend 2 Blood of the Karui along an Atziri's, a Diamond and a Basalt or Taste of Hate. Insanity Gloves like these can be used to make our Leapslam even faster. Our Overleech keeps us safe on Trap Sequences. To further enhance it you can use the CWDT+IC Setup along Arakaali level 2 explained in the Pantheon section. Ryslatha should be taken for Life Flask refills. If you want to farm for a long Time, respeccing from Raider to Pathfinder for more Flask Sustain is a possibility. As a very inexperienced Lab Farmer (never really done it) I managed to get 3 1/2 to 4 Minute 3 Key + 2 Darkshrine Runs on a good day: All these PoBs were made with my personal Character and Gear from Bestiary (Claw) + Incursion (Rest). SC Mapping SC Bossing HC Mapping HC Bossing If you don't know what PoB is, I strongly recommend picking this insanely powerful tool up here and checking out this video guide or its written form. . Last edited by Guffinn#6759 on Dec 25, 2018, 6:02:09 PM Last bumped on Oct 2, 2019, 11:09:00 AM
|
|
|
FOR NOW I ONLY UPDATED THE FIRST POST, THIS 2ND ONE WILL GET DONE ANOTHER DAY
 Besides the wide variety of Clearskills you can choose from, there are also some other possibilities to make a Ele Conversion, Crit Based Slayer/Raider work! I will outline some of them here. Everything that's not mentioned will be the same as in the "main" Guide.
Molten Strike
Molten Strike is the most busted Melee Skill together with Blade Flurry. This Build Variation has some downsides compared to the "main" Build, but will excel in high Level Delves. Molten Strike with ancestral Call will cover the whole Tunnel, and the rapidly hitting hundreds of Projectiles give us awesome Life Sustain through Life Gain on Hit from our Claw. Here are the Pros and Cons compared to the "Main Build": PROS: - Easier and cheaper to gear for (No Stat Stick or Accuracy needed) - Excels in high Level Delves CONS: - Lower Clear Damage, as Reave doesn't get as much converted to Ele Damage - Not as good mechanically for Bosses (only slightly)
Trees
These are assuming an Endgame Character at Level 95. SC Tree (192% inc Life):
Image Version
 PoE Planner PoE Website HC Tree (220% inc Life):
Image Version
 PoE Planner PoE Website As you can see, these are absolutely minor Changes compared to the "main" Tree. We drop Twin Terrors, as we are not Dual Wielding anymore, and path on the lower Side to grab Point Blank for a huge more Multiplier. Along the Might of the Meeks from the Main Build, 2 Wildfire Jewels are required for maximum Molten Strike DPS. These add 2 Projectiles per Jewel, which is a huge and required Multiplier for our Damage for 1c each. I tested out using the Slayer Start, but the pathing results in less DPS with the same Life.
Gear
The Gear stays exactly the same, except for these minor Changes: Lycosidae for your Offhand, since Molten Strike isn't stat-stickable. This eliminates the need for any Accuracy on Gear, making Rings and Amulets slightly cheaper. Also, Lycosidae will be significantly cheaper than a good Stat Stick. Trade Link The Jewellry Stat Priority changes, as Accuracy is a wasted Stat now. Also, since we are not Dual Wielding anymore, any modifiers for "Dual Wielding" become worthless. Rings, Amulet, Abyss Jewels, Normal Jewels If the results are too pricy for you, simply lower the "Weighted Sum" or "Count" in the Search form :) A Watcher's Eye with flat added Crit Chance while affected by Hatred. This is our best Choice, as Molten Strike already has built in 60% Conversion and we can reach 100% from the Tree without a Conversion Watchers Eye. Trade Link A Dying Sun will replace the Lion's Roar when we face tough Targets (or Delves). The 2 added Projectiles are a huge DPS boost, and the added max fire Res doesn't hurt either. Trade Link A Helmet with "3 added Molten Strike Projectiles" is a rather huge, but not required, upgrade for Bosses. You have the Choice between several different Helmets here, but I recommend Lightpoacher like usual for the Res, Life and very nice Damage. A good rare Helmet or Starkonja's are choices as well tho. Lightpoacher Link, Starkonja's Link, Rare Link
Gemlinks
Gems are, as always, sorted in the descending Order of DPS they provide. The Colours indicate the Gem Colour. The only thing that changes from the "main" Build is your 6 Link: Molten Strike + Concentrated Effect + Elemental Damage with Attacks + Damage on full Life + Elemental Focus OR Multistrike + Ancestral Call The same generic scaling as for Blade Flurry, but you have the choice between Ele Focus and Multistrike. While Ele Focus results in higer DPS, Multistrike is not far behind and might feel a lot better to use. I recommend trying both Options out and deciding on your own. Ancestral Call might seem like a weird Choice if you're new to Molten Strike. The resoning behind it is, that it doubles the amount of Projectiles (our main Source of Damage) we fire. This even works on Bosses, but you have to use the "Attack in Place" feature for Molten Strike and stand a bit away from the Boss.
Playstyle
The playstyle stays vastly the same as with the "main" Build. Instead of using Blade Flurry for Bosses or tough Rares, you simply use Molten Strike (with the "Attack in Place" feature turned on). Make sure to stand close to the Boss, but around a distance so that your Ancestral Call still doubles your Projectiles.
PoB
I will only include one PoB (the SC Bossing one) for my Build Variations as everything else is covered by the main Guide already. SC Bossing PoB If you don't know what PoB is, I strongly recommend picking this insanely powerful tool up here and checking out this video guide or its written form. PoB doesn't calculate Molten Strikes DPS correctly, as multiple Projectiles and their Chance to hit the target don't get accounted for. I'm gonna quote the amazing WaffleT on how to calculate an approximation of your Molten Strike DPS: " So as an example for me personally with 2 Wildfire Jewels, a Dying Sun, Ancestral Call and NO Helm Enchant: Ball average Damage 115.495,5 x Attack Rate 6,91 x Chance to Hit 0.47 x Number of Projectiles 18 + Molten hit DPS 609.941,7 = 7.361.647 Shaper DPS Note that this is under 100% ideal Circumstances, which are hard to hit. Perfect Range for Ancestral Call and the Melee part to work and maximum Point Blank applied to every Projectile (which isn't realistic).
Spectral Throw
Spectral Throw is still an "A Tier" Skillchoice and while it isn't as "good" as the BF/Reave Combo, it certainly is an extremely viable Skill to do all Endgame Content with minor Changes as well. If you enjoy the playstyle, give it a shot :) Here are the Pros and Cons compared to the "Main Build": PROS: - Easier and cheaper to gear for (No Stat Stick or Accuracy needed) - Slightly more relaxed/slower Playstyle. Doesn't require as much "managing" and Buttons - Lower INT requirement, more Gem Sockets available CONS: - Lower Boss DPS - Slower Clearspeed (slightly) - Less safe Mapping (slightly) - Not as good mechanically for Bosses (not by a lot tho) - Requires a Gemswap for hard Bosses
Trees
These are assuming an Endgame Character at Level 97. SC Tree (192% inc Life):
Image Version
 PoE Planner PoE Website HC Tree (228% inc Life):
Image Version
 PoE Planner PoE Website As you can see, these are absolutely minor Changes compared to the "main" Tree. We drop Twin Terrors, as we are not Dual Wielding anymore, and path on the lower Side to grab Fangs of Frost and Point Blank
Gear
The Gear stays exactly the same, except for these minor Changes: Lycosidae for your Offhand, since ST isn't stat-stickable. This eliminates the need for any Accuracy on Gear, making Rings and Amulets slightly cheaper. Also, Lycosidae will be significantly cheaper than a good Stat Stick. Trade Link The Jewellry Stat Priority changes, as Accuracy is a wasted Stat now. Also, since we are not Dual Wielding or using BF anymore, any modifiers for "Dual Wielding" or "Area Damage" become worthless. Rings, Amulet, Abyss Jewels, Normal Jewels If the results are too pricy for you, simply lower the "Weighted Sum" or "Count" in the Search form :) A Helmet with 30% Reduced ST Decelleration is required for maximum DPS, and makes a rather huge difference. The Helmet slot got freed up since we don't use a seperate Clearskill anymore. You have the Choice between several different Helmets here, but I recommend Lightpoacher like usual for the Res, Life and very nice Damage. A good rare Helmet or Starkonja's are choices as well tho. Lightpoacher Link, Starkonja's Link, Rare Link
Gemlinks
Gems are, as always, sorted in the descending Order of DPS they provide. The Colours indicate the Gem Colour. The only thing that changes from the "main" Build is your 6 Link: Vaal ST + Elemental Damage with Attacks + Damage on full Life + Hypothermia + Added Cold + Slower Proj/GMP You always use GMP for mapping, and Slower Proj for hard Bosses. All Map Bosses up to T15 will be easily disposed by a Vaal ST + GMP ST tho. As your Helmet Slot isn't occupied by a Clearskill anymore, you can take some other Stuff along while mapping. This could be an Ice Golem, or a CWDT Setup (which I previously didn't recommend for SC mapping). That means you would run with the Arakaali Pantheon at all times.
Playstyle
The playstyle stays vastly the same as with the "main" Build. Instead of having to manage Reave Stacks and casting Vaal Reave from time to time, and using BF to clear tough rares or map Bosses, you only use (Vaal) ST. Clear Trash with ST and pop one of your three(!) Charges of Vaal ST for Stuff like Strongboxes, Abyss Rares or Map Bosses. For Guardians and Shaper/Uber Elder/etc. you swap out GMP for Slower Proj. Make sure to stand close to the Boss, but preferably around a distance so that your ST hits the Boss at the Apex of it's Arc. He will receive more Hits at once like that. If neither the Main-Guide, nor any of these Variations here are to your liking: I implore you to check out "Monhsaroh's Immortal Flicker/Molten Strike Champion-Jugg". It is another Build that farms all the Content in the Game very comfortably, and Mohnsaroh is also very helpful and quick to reply in his (very well structured) Thread :) Here are some generic Tips once you get to really deep Levels: Consider the HC Setup. The added Survivability is essential. Consider using the Molten Strike Variant for very deep Levels. Molten Strike with Ancestral Call covers the whole Corridor, and the Life Gain on Hit from our Claw coupled with the hundreds of Projectiles offers an insane Amount of Sustain. Switching to this Version only requires minimal Tree and Gear Changes, so give it a shot if you are into pushing the Delve Ladder :) Otherwise use Blade Flurry for everything. In deeper Levels the Damage will matter more, and you don't need Reave for the crazy speed Clear like during mapping. Especially since the corridors are so narrow BF will cover a lot of area anyways. The crazy Damage of BF will carry you once your Damage falls off in deep Levels. Consider a Blasphemy Setup. You can drop your Herald of Ice for a Blasphemy Temp Chains or Enfeeble for added Security. Get Crit Mitigation through Belt of the Deceiver or a Chest Corruption for 500+ Depths. Set up an Ichimonji Weaponswap with Vigilante Strike and a "Vigil" Jewel on your Tree for 36+ Second Fortify or use another Source of Fortify. Get more Freeze Chance. Freeze is insane in Delves, and there are a couple ways to get it more reliably: Pathing on the lower Arm of the Primeval Force Cluster, Grabbing Fingers of Frost, using a Taming Ring, using a Doryanis Invitation. Not all of these are equally viable, but all worth considering. Frost Wall can be an invaluable Survival Mechanism, if you happen to get overwhelmed. Linking this in a CWDT Setup is great. Conversion Trap can be similarily used to thin down Packs. That way you have to deal with less Mobs at a time. Maybe link it to Increased Duration if you can.  Not much changed for this Build, but it did not get nerfed in the slightest and received some Minor Buffs. Blood Rage can now be cast instantly, without interruption of Movement. This is a QoL Change, that shoves off 3 seconds or so off every map run and might help on Bosses too. (Vaal) Ancestral Warchief was introduced. AW was already close to Protector in terms of DPS gain, but the Vaal Version now grants even more "more" Melee Damage. This puts it over Protector for Bosses, as long as you remember to use it from time to time. That said, Protector is still preferable for mapping. Herald of Purity is the new Minion and Phys focused Herald. It is stronger than Herald of Ash for Bosses, simply because if its flat added Physical Damage to Attacks. Until you have it at Level 20, Ash is better tho. Q: What about Hrimsorrow/Shroud of the Lightless/Loreweave/Abyssus/Bloodseeker? A: I don't recommend using them for the following Reasons:
Hrimsorrow and other Conversion Items
Hrimsorrow might offer a lot of Conversion, but lacks heavily in Life and Damage overall.
100% Conversion is not the be-all end-all. The Damage and Life Tombfist offers through 10% Attack Speed, 6% Max Life and 2 Strong Abyss Jewels (80+ Flat Life and tons of Flat Damage) is unbeatable for us. Also, the Intimidate we get from socketing a Murderous Eye into them is a flat 10% more damage. Hrimsorrow just gives us less DPS and way less Life than a Tombfist with even mediocre Jewels. While more Conversion is always good, the Items to get that Conversion aren't: Conversion Vinktar offers far worse DPS than any of the Bossing Flasks we can use. Stormchargers don't only make your Life Drop tremendously, they also can't compete with the Damage from Bubonic Trail. Temple Conversion Gloves would make you lose Intimidate from Tombfist (10% more Damage), 6% max Life and the DPS from Abyss Jewels. While these are the most reasonable items out of any of the ones mentioned here, only mirror worthy perfectly divined 6T1 Spiked Gloves with Conversion would beat Tombfist.
Shroud of the Lightless
Shroud looks tempting because it offers free Elemental Penetration as a sixth Link. That said, our worst and last link (Melee Phys) still offers a LOT more DPS than the Ele Pen would. And if you don't heavily stack Abyss Jewels, the Life is also worse. And even then, the DPS from a proper 6link is still way more.
Loreweave
Loreweave seems like a very good choice in the eyes of many. It seemingly adds a ton of survivability via 80% max Res and a lot of damage via flat Phys, Crit Chance, and WED. That said: Physical Damage is the most commonly encountered and most dangerous Damage in the Game due to not being able to outplay/avoid it. All dangerous Elemental One Shots (Volatiles, Bearers, Atziri Falmeblast, Shaper Balls, etc.) can be completely avoided, while the hundreds of thousands physical Attacks with big Crits etc. while mapping/delving cannot. And on this Build, we don't have significant Phys Mitigation so we have to stack as much Health (e.g. through Belly of the Beast) to counter that. Loreweave not adding even remotely as much Health as Belly is a significant Survivability loss in all Situations, also because the strength of our Leech scales off of our max Health, which would be low with a Loreweave. While Loreweave might seem attractive because of the bigger Damage, all in all Belly offers more Survivability while also adding 15% Allres. This makes gearing easier and lets me drop any Res on my Rings for example, so I can get more damage. Also, Loreweave fucks up our Defenses against Uber Elder from Purity of Ice and Taste of Hate (also while mapping with ToH), since it actually gives us way less max Cold Res than we normally would have. Check this chart:
75 vs 80 max Res
As you can see, a Character with 5000 Life and 75% Res would die from a 20000 Elemental hit, while the 80% Maxres Loreweave Wearer would survive with 1000 HP to spare. The difference in reduction gets more noticeable the larger the incoming Damage is. In "real Life" PoE you will never receive 20k Ele Hits tho, if you don't decide to stand in Volatiles. So the Loreweave upside isn't as noticeable as the Chart might make you think. Also, with my recommended SC tree, a 5000HP Loreweave Character would sit at 5500 with the Belly and survive the 20k Hit regardless. Added on top of that is the fact, that there are more sources of Physical than Elemental Damage in the game, against which Loreweave offers nothing but Belly offers a shit ton more Life. Belly has Loreweave beat HARD in terms of Survivability, and the DMG upside of Loreweave isn't that big. Don't use it.
Abyssus
Abyssus is a popular Item that many Build Guides use to artificially increase your DPS numbers. I say artificially because you don't do any DPS when you're dead. And with Abyssus you will be dead. A lot. Yes, it is the biggest DPS upgrade you can find on any piece of gear. But it is well balanced, and doesnt offer any Defenses. You actually take increased physical damage. While this Build is very survivable, and in HC even could be called tanky, it doesn't have the Physical Mitigation a Jugg has. You will avoid almost all damage, and heal back up from small or big hits instantly, but that doesn't help if you get one Shot. Without Abyssus you won't get one Shot. With it you still avoid 99% of attacks, but if that one juicy rare with crit multi hits you, you're instantly dead. I don't recommend this item, even with only a 40% increased Damage taken roll. Don't use it.
Bloodseeker
Bloodseeker is a trash Claw for DPS, and no amount of Points can weigh that up. The low attack Speed makes map clears incredibly slow too. The instant Leech directly counters Slayer Overleech and doesnt work with it. Also, I consider Overleech to be the superior defensive mechanism. Especially on Boss Fights, you are safe even when there isn't Stuff to attack. This is especially relevant on Uber Elder. Q: What's better Claws or Foils? A: For us, it's Claws.
Check this for an explanation
You can path for Foils pretty efficiently and get the same-ish damage, but Claws pull ahead thanks to the following: - Free Life and Mana Leech from Claw Nodes - Free Life gain on Hit from Claw Implicits (super strong actually) - Free %inc Life Leech per Second from Claw Nodes - better Crit Chance on the Weapons Claws get a ton of QoL and Defensive advantages on top of having the same damage as Foils. If you take into Account that with Foils you have to actually grab a Mana Leech node to sustain, you achieve less damage with them. Even with the offensively stronger Implicits on Foils, they simply don't compare to Claws in the end (for us). If you happen to ID a 500pDPS Foil tho, go ahead and use it :D Q: What's better in the Helmet? Innervate or Hypothermia? A: Tough Question actually!
Answer
Hypo is a More Multiplier, thus offers more Damage by default, but only against Enemies that are already chilled. This means that on the first hit it's worthless, and on the second hit it does a lot of Damage (cause the first one chilled enemies). Innervate on the other Hand has upfront Damage, but less overall. So a pack that would get one shot with Innervate, might take 2 Swings wih Hypo. But a pack that would get 2 Shot with Hypo might take 3 with Innervate. That said, the fact that Hypo only offers Damage on the 2nd Hit gets offset by our insane Attack Speed and Multistrike, which means that we always do 3 Swings anyways with 1 Button Press. That said, if you are surrounded by mobs you swing once in every Direction (sometimes). So in that case Innervate would maybe one Shot everything, while Hypo might need 2. Innervate also grants Shock Chance, which is insignificant against Bosses, but actually applies a big Shock against Trash. That acts as a more Multiplier on its own. And as an added Bonus, the "Innervate" Buff you get boosts your BF Damage a bit. Hypo offers Freeze Chance as a Bonus. All in all they are pretty equal, but I prefer Innervate. If you have 2 Helmets with similar Mods, but one has Hypo and the other Innervate, I would go for the cheaper one. Q: What advantages does this Build have over physical-Foil based Reave/BF Ascendants? A: More DPS and more Survivability due to Acro, Claw LGoH and Freeze/Shatter. Here is the Char of a popular phys Foil Guide-Creator: 6.7kk Shaper DPS vs the same Char with my Tree and the Foil as a Claw: 7.7kk Shaper DPS Q: Is this Build SSF Viable? A: Kinda.
Explanation
You need a Moonbender's Wing and a Thunderfist or a Shaped pseudo 5l Helmet to truly follow this guide. Moonbender's is low level and the only Unique Tomahawk, so it can be chanced easily. Thunderfist's can be Chanced from Murder Mitts or dropped, they are not that rare. A Shaped Helmet might be easier to aquire tho.
Seeing that people still play Unique dependant builds in SSF (Summoners, QOTF Wanders etc.), this one should work out as well. You have the benefit of not needing Uber Lab and working with just Reave until you get a pseudo 5 Link. That said, rare Itemization in terms of Rings/Amulet/Belt is important for this Build. So if you are not fond of crafting, you might be in for a tough time in SSF. Q: Why not use Vaal Double Strike? A: Explanation here:
Double Strike Thoughts
You need Chance to Bleed as a gem to make it work as a Main Link. Vaal Double Strike - Chance to Bleed - EDwA - DoFL - Ruthless - Ele Focus. The Double Strike Part itself is at 3.7kk Shaper DPS compared to my 5.3kk with BF. Each Vaal Double Strike Clone is 950k DPS tho, so with 2 Clones up you slightly beat the normal BF DPS and with 4 Clones up you come out ahead. It's cool when you can burst down a Boss with all 4 Clones, like random map Bosses or Guardians. On Shaper/Atziri/Uber Elder it is worse than BF due to immunity/transition phases. You blow your clones P1 and then you are a wet noodle, comparatively. Souls take ages to build up on Bosses and you won't get many uses out of VDS. You can maybe start with 4 Clones on a fight (map bosses, shaper, uber atziri), but you usually won't reach them during the fight. Also keep in mind that Double Strike is a true Namelock Melee Skill with (almost) no Range. Feels way worse than BF with its big-ish AoE and autoaiming on fights. Also, BF hits everything in it's path which makes stuff like Portals on Uber Elder super easy and can actually be decently used to kill extremely tough packs while mapping. Q: What about Elementalist/XYZ instead of Slayer? A: It's strictly worse. We lose the main Component of our Survivability, and the Damage might be the same.
Explanation
We will be looking at Elementalist instead of Slayer for this Example: Survivability: By dropping Slayer we lose one of the most OP defensive Mechanics in the Game. Period. DPS: I have 5.400.000 Shaper DPS with my Incursion Gear as Slayer/Raider. So it would take me 10 Seconds to kill a 54.000.000 Health Enemy. With Culling Strike, thats down to 9 seconds because he gets culled once he reaches 10%. This 9 second killtime on a 54kk Health enemy means, that my effective DPS is 54kk/9 = 6.000.000. Without Slayer (20% inc Damage while leeching), I'm sitting at 5.268.000 Shaper DPS. Now I take Elementalsit and sit at 5.846.000 Shaper DPS. Add in a Lightning Golem since we can take 2 (wont be up always tho, probably rarely) and I sit at 6.000.000 DPS. And that even only IF the Lightning Golem survives. Q: How does Damage on full Life work, if Blood Rage is running and the Health Number is always below Full? A: It's only visual. As long as your Life Recovery through Regen and/or Leech is bigger than any Degen, you count as on full Life even if the Globe says "(Health-5)/Health". The Damage Multiplier applies. Q: How do "Stat Sticks" work and don't you lose DPS by not using 2 Claws? A: No, we don't lose DPS or Attack Speed.
Explanation
A "Stat Stick" is a Weapon that you don't attack with, but only wield to gain it's global Benfits (meaning they always apply). Skills like Reave or Blade Flurry are limited to certain Weapontypes, and for example can't be used with Axes and Maces/Sceptres. This means, that when wielding a Weapon that can be used, and one that can't, your Skill only attacks with the usable Weapon. By using this Method, you were always able to gain Benefits from the unusable Weapon in your Offhand as long as they apply globally and not to the weapon itself. Old Examples for this are Moonbenders Wing with 50% global Phys to Ele Conversion, Deaths Hand, Rigwalds Savagery, The Dark Seer, etc. "War for the Atlas" introduced Shaper and Elder Items. One handed Shaped Sceptres, Claws, Swords and Axes (and other weapon types) can roll "Gain X% of physical Damage as extra X Damage" mods, which apply globally and not locally onto the weapon itself. This turned out extremely overpowered, as a Physical Stacking Build such as this gets insane Benefits (at its maximum one Mod can be equal to a Hatred Aura) from these Statsticks. Ironically, not using our second Weapon for attacking still allows us to benefit from Dual Wielding Boni (10% more Attack Speed, 20% more Attack Phys Damage, 15% additional Block Chance) at no loss. A Skill such as Frostblades/Molten Strike/Spectral Throw, which uses all Weapon Types, can not make this work. Wielding a "Stat Stick" would be a significant DPS loss for a Frostblader, due to Statsticks having horrible DPS by design. You'd either have to use 2 equal weapons (which is incredibly costly), or one weapon and a Shield. Q: Why "McFlurry" Flurry? A: McFlurry is a type of Ice Cream, and this is a cold conversion Blade Flurry build :P From newest added to oldest: - Removed rare Boots from the HC Segment as that's redundant at this point - Reworded Survivability/HC segment - Added Scions bad levelling experience as a "Con" - Added Blood Rage + Full Health FAQ Segment - Added Statstick/Ele Conversion FAQ Segment - Removed/Reworked some outdated wording - Added a Disclaimer to only take LGoH Claws - Expanded on Uber Lab Farming with Insanity Gloves, PF Respec and personal Results - Added Info on proper BF usage to the Gameplay Tips Section - Added a rare Elder Amulet (max Life Leech Rate) to the HC Choices - Updated PoB Links - Updated Videos for 3.4 - Added a bit onto the Loreweave Discussion - Some reformatting in the FAQ - Added Ichimonji Setup and Crit Mitigation to the Delve Tips - More emphasis on the second Post in the Introduction - Updated Ring and Amuler Endgame Tradelinks with higher WED weighting - Swapped "Build Variations" (now first) and "Delve Tips" in the 2nd Post - Revamped the League Start Gear Segment - Added a rare Chest Endgame Option - Reworked the Belt Trade links for Delve mods - Expanded a bit on the Delve Notes - Updated Trees to Unnatural Instincts, and included a 2 Meek Tree. - Reformatted the FAQ a bit, added some Linked Items, one SSF addition regarding Rares - Added Bloodseeker, XYZ instead of Slayer Discussion and Innervate vs Hypo to the FAQ - Reworked Specral Throw Trade Links to weighted Sums - Added a Molten Strike Variant to the Build Variations - Added Tips for very deep Delves - Reworked levelling Trees (now includes mana Leech node. Only said to take it if you need it prior) - Reworked many rare Tradelinks to be Weighted Sum Searches - Updated everything for 3.4 - New "Rare Jewel" Trees - Added a 60c Budget Uber Elder Kill Video - Finally added Ralakesh's Impatience to the Endgame Bossing Gear - Some minor Text and format Changes - Added an Explanation for Path of the Ranger/Skipping Points on the Tree as Scion - Revamped the Gear Overviews for Endgame Gear - Added Trade Links for endgame Mapping Items (completely forgot about those) - Added a Spectral Throw Variation of the Build to the second Post - Added Conversion Item Info (they all suck) to the FAQ, minor Tree Changes (1 Node) - Updated Rings/Amulet Trade Links to include crafted accuracy - Updated some HP numbers, Defensives, added 2 Trade Links for endgame Bossing - Expanded on Endgame Mapping Gear with Rares - Reordered Trees: Might of the Meek now shows first and is recommended - minor Changes to Text in mapping/Uber Elder Tips - Added Trade Links for every single Piece of Gear (rares included) - Optimized Gem Links a bit to better fit Sockets - Moved the "not recommended Items" to the FAQ to make Space, and expanded a bit on it - Added comparison PoBs for Phys Foil vs Ele Conversion Claws to the FAQ - Now explicitly recommend Wasp Nest over ToA, feels way smoother as a starter - Added some Gemchoices for excessive Map farming - Shortened some of the BB Codes for more Space in the Post - Added new Might of the Meek Trees and PoBs (more Life, same DPS) - Updated Trade Links for Incursion - Added another Sunder Levelling Guide and levelling Uniques recommendations - Updated some Progression Gear recommendations - Updated all Gemlinks and Skilltrees for 3.3 - Added a blurb about generic Corruptions - Added a Video showcasing the HC Versions Tankyness - Added HC Gear/Gemchoices - Moved the FAQ into the 2nd Post (1st one was at 49/50k letters again) - Added some Notes concerning SSF - Reuploaded all Images (old hoster died) - Added Tips for first-time and farming Uber Lab - Added Claws vs Foils notes to the Gear Section (E: now in the FAQ) - Added Info about Enchants and Gemlevels - Added some example Rares for progression Gear (hopefully the last gear I have to buy for linking) - Shortened every URL for more Space (was at 47/50k letters prior) - New levelling Trees - Added RaizQTs Sunder ele Conversion levelling Guide - Added a new Video with a more crazy map clear example - Added a Shaper full-Health-Kill.gif - Added some Loreweave Thoughts - Added more Trade Links for rare Items - Some formatting changes, fixed some Typos From earliest ETA to latest: - include Vitality Void Info - include Hale Negator - Add Foil Variations - Add VDS, Cons Path, other Stuff - Update Build Variations PoB (and Images?) - Add Depp Delve Pushng PoB  Lastly, thanks for taking interest in my Guide :) I know this is not an innovative Build, but it is certainly a strong one that newer and experienced players alike can play as their sole character to do all content in the game. I'm always down to hear constructive Criticism and answer questions. Hope you have a nice day everyone :) . Last edited by Guffinn#6759 on Dec 21, 2018, 3:00:58 PM
|
|
|
Dope build, dope guide +1
|
|
|
hey,
nice looking guide :) gonna try this with my leftover bestiary currency (and im aware i wont get the best stuff at this stage of the league). in case i like it, would you say this build could work as starter into the new league? im sorry for this kind of bad question, but im really inexperienced when it comes to bf builds. thanks in advance! |
|
" Ty for the nice words mate :) That's not a bad question at all. It works as a league starter for sure, I myself started with it in Bestiary! With the 1Alch to 3c Uniques shown in the "Progression Gear" segment, I pushed into red maps easily. Just gotta upgrade rares as you go. Blade Flurry is insane even on a Budget, and for clear any skill is able to 1 Shot Stuff on a (pseudo) 5link these days. The cherry on top is, that our Uber Lab is pretty unimpactful. All you get from it are a bunch of Skillpoints, which is nice but not build enabling. So if you struggle finding trials, it's no problem. Hope I could help, Guffin . Last edited by Guffinn#6759 on May 15, 2018, 11:01:42 AM
|
|
|
Shout out for the awesome, well written, colourful guide.
Been playing around in Flashback HC with this while waiting for Incursion. Having fun and will probably make it one of my dual league starters (usually run two characters and keep them around the same level) Keep up the good work! |
|
" Tyty, I try :D Actually curious how it works out in HC. With 205% inc Life and Kaom's I can get 7.5k Life. Coupled with Slayer Overleech, full Acro and Defensive Flasks it seems incredibly safe. But as I don't play HC myself I have no way to tell. Feel free to keep me updated how it goes for you :) .
|
|
" My goal is to get through Act 10 before Flashback ends, but I am by no means a fast leveler so I do not know if I will make it or not :) Seems to do ok so far, though Flashback can throw some nasty combination of mods at you and I have died twice now. Once at 27 and again at 35. I am not normally a HC player and have only been doing so for something to do until Incursion starts so I probably do not play as cautiously or build as defensively as I should. That being said I feel if I did slow down a bit this build would be perfectly safe to do so! |
|
|
Trying this build for some quick SSFHC fun on the Flashback event. Most difficult part so far is getting comfortable with the Sunder levelling part. I see a lot of people using it to great success, but for me it's kinda... clunky? Dunno if you need to pass a certain attack speed treshold for it to get smooth. As for the uniques, it's just a matter of pure mindless grind. :p
|
|
" I've been using Frost Blades for clearing and Dual Strike for ST. Feels pretty good so far though I am not very high level. |
|


