


Kayella's build archive - Big DPS Summoner
|
old PoH EB / MoM build
 
PASSIVE TREE & POB PASTEBIN
Path of Building Pastebin https://pastebin.com/mkEh23nU Passive Tree  Level 100 Ascendancy 1. Commander of Darkness 2. Mindless Aggression 3. Unnatural Strength 4. Plaguebringer Pantheon Soul of Lunaris Soul of Shakari
EQUIPMENT
Weapon, Armour & Accessories
Spoiler
Weapon: Pledge of Hands. 6-link: 6 blue. Chest: Rare +1 Spectre number delve chest. 6-link: 5 blue, 1 red. Helmet: Devouring Diadem. 2-link: 1 blue + 1 red. Unlinked: 1 green, 1 blue. Gloves: Rare crafted gloves. 3-link: 3 blue. Unlinked: 1 green. Boots: Rare crafted +1 spectre level boots. 2-link: 2 red. Unlinked: 2x 1 blue. Belt: Stygian Vise. Jewellery: Amulet: Rare with +1 Intelligence skill gems Rings: 1x Unset ring, 1x Vermillion ring. Jewels & Flasks
Spoiler
Jewels: You can craft or buy ghastly eyes. Mod priorities: #1: life #2: increased minion attack/cast speed or increased minion damage #3: Taunt Highly recommend for Sirus fight 'Corrupted Blood cannot be inflicted on you' Unique Jewels: Anatomical Knowledge: +flat life & 8% increased maximum life Unending Hunger: 50% chance for minion to gain Soul Eater Watcher's Eye with 'Phasing while affected by Haste' Recommended Flasks:
IMPORTANT CRAFT
The single most important craft for this build is 'Gain 10% maximum life as extra maximum energy shield'. This will add 500-700 base ES, depending on your total life. 
GEM LINKS
Weapon
Spoiler
Note: This gem set up is for Slave Drivers. See minion section for other gem configurations. Body Armour
Spoiler
Support minions. They will provide feeding frenzy buff to your spectres and -10% lightning res on monsters. Note: Minion Life can be left off if you only have a 5-link. Note: You can replace Stone Golem with Animate Guardian. Helmet
Spoiler
2-link aura: Unlinked: Note: Haste must not be linked to Generosity as this build uses the Watcher's Eye and Haste aura to give permanent phasing. Boots
Spoiler
2-link cwdt: Unlinked: Note: You can level up CWDT to trigger at about 30% of your eHP. Gloves
Spoiler
3-link curse: Unlinked: Unset Ring
Spoiler
Regular mapping: Endgame bossing: Note: Swap Decoy Totem for Desecrate against endgame bosses because they will not target the decoy. Also, Devouring Diadem (helmet) consumes corpses to regain life and energy shield. This means that desecrate is like a life flask against bosses that don't have adds to give you flask charges.
RECOMMENDED ANOINTMENT
Death Attunement +1 to Maximum number of Spectres Minions have 8% increased Attack Speed Minions have 8% increased Cast Speed +1 to Maximum number of Raised Zombies +1 to Maximum number of Skeletons
HOW TO SUMMON SPECTRES WHILE USING PLEDGE OF HANDS
There is a trick to summoning your spectres one by one even though you have greater spell echo built into Pledge (repeat cast 2 times). You will need an offhand weapon with +1 to socketed gem. You must have level 20 raise spectre in your +1 offhand. The gem must be in the same socket as your PoH. Example: Raise Spectre 21 in socket 2 in PoH & Raise Spectre 20 in socket 2 in +1 offhand. Now you can desecrate & summon with your offhand, then swap back to PoH without spectres despawning. Demonstration video: https://youtu.be/45L0xTzSjCQ
HOW TO SWITCH FROM WAND & SHIELD TO PLEDGE OF HANDS
Here's the shopping list ff you want to switch: 1. about 60-80 regret orbs 2. 6-link PoH (all blue for SDs, or 4b2w to use every spectre) 3. +1 int amulet 4. One unset ring 5. Devouring Diadem 6* Watcher's Eye with Phasing/Haste [optional, but highly recommended] All other items are the same. Note that amulet anointment is Death Attunement instead of Ravenous Horde. I highly recommend using a level 21 Raise Spectre and +1 int amulet to get 5 spectres. You can get a 5th spectre with empower, but you then lose a damage support (big damage loss). 28 JAN: replaced PoH build with new W&S build. 🔰🌀✨ Video guides on youtube! https://www.youtube.com/KayGaming ✨🌀🔰 🔶🔷🔶 Kay's Summoner build guide: https://www.pathofexile.com/forum/view-thread/3179145 🔶🔷🔶 Last edited by kayella#0845 on Jan 27, 2020, 11:08:38 AM
|
|
|
Build guide at end of Metamorph league (10 March 2020).
--   Welcome to my spectre specialist build guide. There are two builds in this guide: Wand & Shield / Life This build is designed as a league starter and SSF build. It can take you from a fresh league start all the way to endgame bossing on cheap or self-crafted gear. It is focused on having high survivability while still having good DPS. Wand & Shield / EB & MoM This build keeps the survivability of Wand & Shield / Life and more than doubles the DPS by using several endgame items and a different passive tree. The build is recommended if you enjoy playing spectres and want to invest currency. Both builds can be used with any spectre. Slave Drivers are the feature spectre and the guide's gem links are for them, but I have gem links for other spectres further down the guide. These builds are based on my own configuration and theorycrafting. Feel free to change the build as you like. Many people have shared their changes over many leagues and it has helped to tweak & update this guide. Thank you to everyone who contributed! I recommend using LocalIdentity1's version of PoB: https://www.reddit.com/user/LocalIdentity1/ If you have a question about the build, could you please post it here in the build guide? I cannot always answer questions in-game.  7 MAR Major change planned for the build! A bit like mini ascendancy. I will be bring back the build guide to one standard build called 'fresh league starter / ssf'. 'EB & MoM', 'Spectres & Spiders' and 'PoH' will be under 'advanced build options' and explained how to upgrade the standard build. 21 FEB New build guide video! It's a preview of planned changes for 3.10 PoE 3.9 - Spectres & Spiders Summoner Build Guide Build write up is on page 855: https://www.pathofexile.com/forum/view-thread/2181275/page/855#p22906788 9 FEB Updated AG information: - near gear recommendation: blind aura - moved its own section Updated Alternative Spectres: - removed spectres that are no longer viable 1 FEB New video! SG vs Sirus AL8: https://youtu.be/VmsatHljnzg  PoE 3.9.2 - Solar Guards vs Sirus [AL8] PoE 3.9.2 - Cannibal Fire-Eaters vs Sirus [AL8] PoE 3.9.2 - Risen Vaal Advocates vs Sirus [AL8] PoE 3.9.2 - Slave Drivers vs Sirus [AL8] with explanation PoE 3.9.1 - Goatman Fire-Raisers vs Sirus [AL8] More videos at https://www.youtube.com/KayGaming My twitch stream: https://www.twitch.tv/kayellapoe  
PASSIVE TREE & POB PASTEBIN
Path of Building Pastebin https://pastebin.com/UUz1EdjT (includes levelling trees) Passive Skill Tree  Level 100 Bandits Kill all Ascendancy  1st: Mindless Aggression 2nd: Unnatural Strength 3rd: Bone Barrier 4th: Mistress of Sacrifice Pantheons Major: Soul of Lunaris - avoid projectile, extra dodge, avoid chain Minor: Soul of Shakari - poison immunity
EQUIPMENT
Note: Always look for highest total life and any resists you need. See: Crafting section below for how to craft your gear. Armour
Spoiler
Helmet: Crafted +1 helmet -> (Wraithlord) -> life helmet -> Crafted +3 helmet Chest: Any chest -> 5L rare -> Tabula Rasa or 6L rare -> (6L Vis Mortis) -> 6L crafted delve +1. NOTE: never buy 5-link Vis Mortis! (thanks MoistCheezIT for Vis Mortis) Gloves: Crafted gloves Boots: (Bones of Ullr) -> Fossil-crafted boots Weapons
Spoiler
Wand from Atzoatl or Convoking wand with +1 minion gem or Convoking wand with +1/+1 minion/spell gems NOTE: must not have 'adds x lighting damage to spells' Shield: Any shield with high life -> Crafted Shaper shield with 'recover 5% life when block' Accessories
Spoiler
Belt: Any belt -> Stygian Vise Jewellery: Amulet: Rare amulet or Jinxed Juju or Amulet with +1 int gems Rings: any ring; vermillion recommended. Jewels & Flasks
Spoiler
Jewels: You can craft or buy ghastly eyes. Mod priorities: #1: life #2: increased minion attack/cast speed or increased minion damage #3: Taunt Highly recommend for Sirus fight 'Corrupted Blood cannot be inflicted on you' Recommended Unique Jewels: Anatomical Knowledge: +flat life & 8% increased maximum life Unending Hunger: 50% chance for minion to gain Soul Eater Recommended Flasks: Blood of the Karui - fast life recovery + instant life recovery Bubbling Divine Flask of Staunching - instant life flask & remove bleed Chemist's Quicksilver of Adrenaline - 70% increased movement speed Experimenters's Quartz Flask of Heat - 10% Dodge & remove freeze Rumi's Concoction - 20%/10% block & 3000 armour
CRAFTING GUIDES
Note: Crafting results are random, so you may need to repeat the craft several times to get the required mods.
Cheap 5-link/6-link chest
Look for a 5-link/6-link chest with INT base & Screaming Essence of Greed. SSF: Farm 6 Dapper Prodigy cards.
Trigger Wand
Trigger will auto-cast any gems in your wand when you use another skill. You will need: wand with 1 free suffix. Bench craft 'trigger' (3c).  Note: This craft comes from syndicate encounters and is rare.
+1 Minion Wand
You will need: Convoking Wand Bound fossil 1-socket resonator Note: +1 minion gem has a very low chance. You may need to use many bound fossils to get the mod. The craft for +2 minion wand has a higher chance to get the mod, but will cost more.
+2 Minion Wand
You will need: Convoking Wand 4-socket resonator Jagged, Shuddering, Corroded, Metallic fossils Notes: These 4 fossils will block all mods except spell and minion.
+1 Spectre Gem Level Boots
You will need: Any boots 2-socket resonator Bound, Shuddering fossils
+2/+3 Minion Helmet
This will give your support minions more survivability. You will need: item level 86 Bone helmet 1-socket resonator Bound fossil
GEM LINKS
Body Armour
For Slave Drivers: 6 blue sockets. For more DPS, swap Feeding Frenzy for Conc Effect: Please see Recommended Spectres section below for Awakened Gems and gems for other spectres.
Helmet, Boots & Gloves
Helmet: 1 red & 3 blue. 1. Stone Golem gives life regen. 2. Zombies + meat shield take incoming damage. 3. Elemental Army: -10% lightning res exposure. Boots: 3 blue, 1 red. 1. Wrath + Generosity gives minions more lightning damage. 2. Skitterbots chill and shock enemies. 3. Convocation teleports your minions to you and heals them. Gloves: 4 blue. 1. Armageddon Brand is used to apply Elemental Equilibrium (-50% lightning res). 2. Armageddon Brand applies Elemental Weakness curse (-50% elemental res). 3. Flame Dash to teleport away from danger or over terrain. NOTE: Arma Brand is not needed for damage, so level 1 is enough.
Weapon & Shield
Weapon: 1 green, 2 blue. 1. Desecrate spawns corpses. 2. Bone Offering consumes corpses to increase block chance for minions and necro. 3. Skeletons add extra minions for Bone Barrier buff and pulling agro. NOTE: You can use Vaal Skeletons. NOTE: Keep Desecrate at level 1. Shield: 2 red, 1 green 1. Cast When Damage Taken + Immortal Call will reduced damage taken by 28%. 2. Phase Run gives +40% movement speed, phasing (run through monsters) and reduced visibility (monsters won't attack you). NOTE: The green socket must be unlinked. NOTE: Cast When Damage Taken should be level 15. NOTE: Immortal Call should be level 16.
RECOMMENDED ANOINTMENT
Ravenous Horde Minions deal 20% increased Damage Minions have 5% increased Attack Speed Minions have 5% increased Cast Speed Minions have 20% increased Movement Speed Minions have 10% chance to gain Onslaught for 4 seconds on Kill
BUILD OPTION: SHIELD CHARGE INSTEAD OF PHASE RUN
If you prefer Shield Charge: 1. Link all sockets in your shield 2. Replace CWDT, IC and PR with Shield Charge, Faster Attacks and Fortify. You will have to use Bone Armour as your Guard skill.
BUILD OPTION: MORE DPS
For mapping, the standand gem and equipment set up has enough DPS. But you might want a DPS boost for boss fights. You can do this when the boss's attacks are easy to dodge and it's safe enough that you don't need max block. The easiest way to do this is to have a second weapon set using Victario's Charity with Holy Flame Totem, and Flesh Offering instead of Bone Offering in a second trigger wand. Your mapping weapon set will be the same as in the guide. Your DPS weapon set will look like this: Note that you need Holy Flame Totem to generate frenzy charges. Arma Brand doesn't hit quickly enough. This combination can give double your DPS. 
EARLY LEVELLING NOTES
In act 1, use holy flame totem and zombies. Stand close to the totem for 6% heal. Zombies will sometimes die, re-summon them. Later, you will get skeletons. Summon skeletons to kill monsters and bosses. In act 2, you will get skitterbots. Link them with infernal legion gem. They will burn and kill most monsters. Summon skeletons against bosses. In act 3, replace skeletons with spectres. Keep zombies & skitterbots.
USEFUL CRAFTS FOR LEVELLING
Craft 10% ms boots
Sell to town vendor: white boots + augmentation orb + quicksilver flask. Socket links and colours do not change.
Craft Flask of Animation (heals minions)
Keep your minions alive in Acts 1 - 5. Sell to vendor: Orb of Transmutation + Any life flask + Bone Spirit Shield.
Craft +1 minion gem helmet
Increase minion damage in Acts 3+. Only do this craft if you find a 4-link helmet. Sell to vendor: Orb of Alteration + Flask of Animation + blue helmet.
GEM CHECKLIST
Make sure you have these gems at the end of each Act.
End of Act 1
Linked: Unlinked: Buy amber amulet from Nessa if you need strength to level up Holy Flame Totem.
End of Act 2
Linked: Unlinked:
End of Act 3
Linked: Unlinked: Offhand/Levelling:item post="15674173" index="153"]
End of Act 4
Linked: Unlinked: Offhand/Levelling:
End of Act 5
Linked: Unlinked: Offhand/Levelling:
Buy all remaining gems in Act 6
PASSIVE TREES
Levelling trees are at my imgur account: https://imgur.com/a/FYLPyDM. The level ranges are labelled below the image. The level ranges are based on my own playthrough which included doing the side quests for extra passive points. You might be slightly ahead or behind.
FULL WALKTHROUGH FOR ACTS 1 - 10
Act 1
starting zone: pick up wand. pick up 'fire ball'. open chest. pick up 'arcane surge'. link: fireball + arcane surge. kill hillock. enter the town. town: talk to tarkleigh. take raise zombie. buy freezing pulse. sell fireball. link: freezing pulse + arcane surge the coast: get waypoint. go to tidal island. tidal island: kill hailrake. take medicine chest. portal to town. town: talk to nessa. take quicksilver flask. take summon phantasms. waypoint to coast. the coast: go to entrance to mud flats. mud flats: break eggs. find entrance to submerged passage. submerged passage: portal to town. town: talk to nessa. buy holy flame totem. waypoint to submerged passage. link: holy flame totem + phantasms. submerged passage: find flooded depths and kill deep dweller. portal to town. town: talk to tarkleigh. take skill book. submerged passage: find entrance to the ledge. the ledge: find entrance to the climb. the climb: find entrance to lower prison. lower prison: find waypoint, head back to town. town: talk to nessa. take minion damage support. buy infernal legion. waypoint to lower prison. link: zombies + minion damage lower prison: labyrith trial, find entrance to upper prison. upper prison: find entrance to boss. kill boss. exit to prisoner's gate. prisoner's gate: waypoint to town town: talk to tarkleigh. take summon skeleton. talk to nessa. buy flame dash & minion damage. waypoint to prisoner's gate. link: skeletons + infernal legion + minion damage prisoner's gate: find entrance to ship graveyard. ship graveyard: find entrance to cave. cave: find the dead slave. get the allflame. exit to ship graveyard. find entrance to canvern of wrath. cavern of wrath: get waypoint. waypoint to ship graveyard. ship graveyard: find fairgraves, kill. portal to town. town: talk to bestel. take skill book. talk to nessa. take flesh offering. buy bone offering. waypoint to cavern of wrath. cavern of wrath: find entrance to cavern of anger. cavern of anger: find merveil's lair & kill boss.
Act 2
southern forest: find entrance to forest encampment. forest encampment: go to old fields. old fields: find entrance to the den. the den: kill old beast. find exit. old fields: find entrance to crossroads. crossroads: follow path to find waypoint. continue following path to find broken bridge. broken bridge: find & kill kraitlyn. portal to town. town: talk to yeena. take quicksilver. go to riverways. riverways: follow path to find waypoint (use flame dash to jump over the streams). head to the left of the map to find entrance to wetlands. wetlands: find & kill oak. find waypoint. waypoint to riverways. riverways: follow path to find entrance to western forest. western forest: follow path to find waypoint. continue following path to the bottom of the map. kill blackguard. pick up thaumetic emblem, open path. find & kill alira. find weaver's chamber. weaver's chamber: kill weaver and get maligaro's spike. portal to town. town: talk to eramir to get 2 passive pts. talk to silk. take death mark. talk to yeena. buy concentrateed effect, elemental focus. link: zombies + minino damage + deathmark waypoint to act 1 town. act 1 town: talk to bestel. take skill book. waypoint to crossroads. crossroads: go to the right to find entrance to felshrine ruins. felshrine ruins: follow path to find the crypt. crypt level 1: complete labyrith trial crypt level 2: get golden hand. portal to town. town: talk to yeena. take survival instincts. and book of regrets. waypoint to crossroads. crossroads: head left. find extrance to chamber of sins chamber of sins: go to level 2, kill fidelis. grab baleful gem. find labyrinth trial. portal back to town. town: talk to helena. talk to greust. take desecrate. talk to yeena. buy skitterbots. portal to wetlands. link: skitterbots + infernal legion link: skeletons + minino damage (link change) wetlands: poison the tree roots. vaal ruins: just run as fast as possible to exit. northern forest: find waypoint, don't go to town. find entrance to caverns. caverns: find waypoint. find entrance to ancient pyramid. ancient pryamid: kill boss
Act 3
city of sarn: save clarissa. find entrance to town. town: head straight to entrance to slums. slums: find the crematorium. crematorium: take the waypoint. complete labyrinth trial. find piety. take tolman's bracelet. portal to town. town: talk to clarissa. get sewer keys. buy wrath, elemental weakness. talk to maramoa. take convocation. go to the slums. the slums: find the sewer grating. unlock. the sewers: find waypoint. find 3 quest items. find entrance to marketplace. marketplace: find waypoint. find the entrance to catacombs. catacombs: complete labyrinth trial. portal to town. town: talk to hargan. take skill book. waypoint to marketplace. marketplace: find entrance to 'the battlefront' battlefront: find waypoint. find Blackguard chest. take ribbon spoon. find entrance to solaris temple level 1. solaris temple level 1: find waypoint. find entrance to level 2 solaris temple level 2: find waypoint. talk to dialla. take jade amulet (need dex). waypoint to the battlefront. battlefront: find the entrance to the docks. docks: find supple container. pick up thaumatic sulphite. find waypoint. waypoint to to solaris temple level 2. solaris temple level 2: talk to dialla. take infernal talc. waypoint to the sewers. sewers: clear the undying blockage. find entrance to ebony barracks ebony barracks: find waypoint. kill gravicius. find entrance to lunaris temple. lunaris temple: find waypoint. go to town town: talk to maramoa. take raise spectre. talk to clarissa. buy animate guardian. unlink: summon skeletons link: raise spectre + minion damage + elemental focus + concentrated effect way point to battlefront. battlefront:use desecrate to create corpses. look for 'flame sentinel'. raise two spectres. take waypoint to lunaris temple. lunaris temple: find portal. kill piety. take the tower key. portal to town. town: talk to grigor. take skill book. waypoint to ebony barracks. ebony barracks: find entrance to imperial gardens. imperial gardens: head to top of map to find waypoint. find the library. the library: find siosa and waypoint. find 'loose candle'. archives: find golden pages. return to siosa. library: talk to siosa. take feeding frenzy. link: raise zombies + minion damage + feeding frenzy waypoint to town. town: talk to clarissa. buy elemental army, generosity. waypoint to imperial gardens. imperial gardens: heard to top-left to find the labyrinth trial. complete trial. find 'locked door'. scepter of god: find waypoint. find entrance to upper scepter of god recommend: be level 32 before boss fight upper scepter: find entrance to tower roof top. kill dominus. enter act 4.
Act 4
recommend: get fire resistance before killing kaom boss. aqueduct: find the entrance to the town. town: go to dried lake entrance. dried lake: head to the bottom-right of map to find boss. kill boss. get deshret's banner. portal to town. town: open mines entrance. don't enter. talk to oyun. take stone golem. mines level 1: find entrance to level 2. mines level 2: find deshret's spirit. find entrance to crystal veins. crystal veins: find waypoint. talk to dialla. waypoint to town. town: talk to tasuni. take skill book. waypoint to crystal veins. crystal veins: enter daresso's dream. daresso's dream: find entrance to the grand arena. kill daresso. take 'eye of desire'. portal to town. town: waypoint to crystal veins. crystal veins: talk to dialla. enter kaom's dream. kaom's dream: find entrance to kaom's stronghold. kill kaom. take 'eye of fury'. portal to town. town: waypoint to crystal veins. crystal veins: talk to dialla. take waypoint to town. town: talk to dialla. take spell echo. talk to petarus and vanja. buy curse on hit. When you reach level 38: replace: concentrated effect with spell echo link: raise spectre + minion damage + spell echo + elemental focus crystal vein: enter belly of the beast. belly of the beast level 1 & 2: find entrance to bowels of the beast. bowels of the beast: defeat piety. enter the harvest. the harvest: find waypoint. find & kill doedre, maligaro & shavronne. talk to piety. enter the black core. the black core: fight malachai + piety. go into second boss room. defeat malachai. portal to town. town: exit town. the ascent: head top-left of map to find portal to oriath.
Act 5
the slave pens: find entrance to overseer's tower (town). town: talk to lani. take whichever ring helps you balance your resists. go to act 3 town act 3 town:talk to clarissa. buy armageddon brand. return to act 5 town. Start using Slave Driver Spectres. control blocks: desecrate corpses. look for 'Slave Driver'. raise 2 spectres. gem removal: holy flame totem, summon phantasms, infernal army unlinked: skitterbot link: wrath + generosity link: armageddon brand + curse on hit + elemental weakness + flame dash link: raise zombie + minion damage + stone golem + feeding frenzy You can do Labyrinth after getting Slave Drivers -> Ascend to Necromancer -> Mindless Aggression control blocks: find miasmeter. find entrance to oriath square. oriath square: get waypoint. waytpoint to town. town: talk to vilenta. take skill book. waypoint to oriath square. oriath square: head to top-right to find entrance to templar courts. templar courts: get waypoint. find entrance to chamber of innocence. chamber of innocence: find boss room. defeat avarius. talk to sin. exit boss room. enter torched courts. torched courts: find entrance to ruined square. ruined square: find the ossuary. get waypoint. ossuary: find sign of purity. exit to ruined square. ruined square: find reliquary. ignore utula. reliquary: get waypoint. find the 3 quest items. portal to town. town: talk to lani. take skill book. waypoint to ruined square. ruined square: find cathedral rooftop. cathedral rooftop: find and kill kitava. talk to sin. talk to lily roth.
Act 6
town: talk to lilly. go to twilight strand. twilight strand: kill all monsters. town: talk to lilly. take book of regrets. go to the coast. the coast: find the entrance to mud flats. get the waypoint. enter mud flats. the mud flats: find & kill boss. take quest item. find & talk to nessa. find entrance to karui fotress. karui fortress: find & kill boss. find entrance to the ridge. the ridge: waypoint to town. town: talk to tarkleigh. take skill book. talk to lilly. buy cast when damage taken, immortal call, phase run. the ridge: find entrance to lower prison. lower prison: grab waypoint. portal to town. town: talk to tarkleigh. take skill book. portal to lower prison lower prison: find labyrinth trial. find entrance to shavronne's tower. shavronne's tower: find entrance to prison rooftop. prison rooftop. kill shavronne and brutus. talk to sin. warden's chambers: find entrance to prisoner's gate. prisoner's gate: find entrance to valley of the fire drinker (top-right). valley of the fire drinker: kill abberath. talk to sin. return to prisoner's gate. prisoner's gate: find entrance to western forest western forest: follow path to top to find waypoint. grab waypoint. continue to find entrance to riverways. riverways: follow path upwards to find waypoint. grab waypoint. go left to find entrance to wetlands. wetlands: find entrance to spawning ground. spawning ground: kill rysratha. talk to sin. portal to town town: talk to bestel. take book of skill. talk to tarkleigh. take book of skill. waypoint to riverways riverways: find the entrance to southern forest. southern forest: find the entrance to caverns of anger. grab the waypoint. caverns of anger: open flag chest. take black flag. passage: find entrance to beacon. beacon: grab waypoint. complete 'refuel the beacon' escort puzzle. light the beacon. click on beacon. talk to weylam. brine king's reef: find the brine king's throne. brine king's throne: kill boss. talk to sin. talk to weylam to go to act 7.
Act 7
broken bridge: follow path to entrance to crossroads crossroads: follow path to the waypoint. grab waypoint. head to the right of the map. find entrance to fellshrine ruins. fellshrine ruins: follow the path to the crypt entrance. the crypt: grab waypoint. find labyrinth trial. find sarcophagus (entrance to next area). enter stairs. search map for 'container of sins'. take maligaro's map. portal to town. town: take waypoint to crossroads crossroads: find entrance to chamber of sins level 1. chamber of sins level 1: find silk. grab the waypoint. use 'maligaro's map' in the map device. enter portal to maligaro's sanctum maligaro's sanctum: find maligaro's workshop. kill maligaro. take black venom. portal to chamber of sins level 1 chamber of sins level 1: talk to silk. take obsidian key. find entrance to level 2. chamber of sins level 2: complete labyrinth trial. find entrance to the den. Can do labyrinth 2 now -> Unnatural Strength the den: grab the waypoint. find entrance to the ashen fields. the ashen fields: grab waypoint. follow path to find entrance to fortress encampment (boss room). boss room: kill greust. talk to sin. northern forest: find entrance to dread thicket. dread thicket: collect fireflies. find entrance to den of despair. den of despair: kill gruthkul. portal to town. town: talk to eramir. take skill books. waypoint to northern forest. northern forest: find the entrance to the causeway. the causeway: find waypoint. find kishara's star (close to vaal city entrance). vaal city: find waypoint. portal to town. town: talk to weylam. take book of skill. vaal city: talk to yeena. enter temple of decay level 1. temple of decay level 1 & 2: find entrance to arakaali's web. boss fight: kill arakaali. talk to sin. talk to yeena. enter sarn ramparts.
Act 8
sarn ramparts: grab waypoint. find entrance to town. town: enter toxic conduits. toxic conduits: find doedre's cesspool. doedre's cesspool: find boss room ('loose grate'). the cauldron: kill doedre. enter 'sewer outlet'. doedre's cesspool: find entrance to the quay. quay: find 'sealed casket'. open and take 'ankh of eternity'. find ressurection site. talk to clarissa. kill tolman. find grain gate. grain gate: grab waypoint. find & kill gemling legion. find the imperial fields. imperial fields: follow path. grab waypoint. find solaris temple. solaris temple level 1: find waypoint. waypoint to town. town: talk to maramoa. take skill book. talk to clarissa. take skill book). waypoint to solaris temple level 1. solaris temple level 1 & 2: find & kill boss. take sun orb. portal to town. town: waypoint to toxic conduits. toxic conduits: find the grand promenade. grand promenade: find the bath house. bath house: complete labyrinth trial. kill hector. take wings of vastiri. find high garden. high garden: kill yugul. portal to town. town: talk to hargan. take skill book. waypoint to bath house. bath house: find entrance to lunaris concourse. lunaris concourse: grab waypoint. find lunaris temple. lunaris temple level 1 & 2: find & kill boss. take moon orb. portal to town. town: waypoint to lunaris concourse. lunaris concourse: find the harbour bridge. harbour bridge: find the sky shrine. kill both bosses. talk to sin.
Act 9
blood aqueducts: find entrance to town. town: find the entrance to 'the descent' descent: find exits. vastiri desert: find the waypoint. find storm-weathered chest (yellow !). take storm blade. continue towards top of map. go to the right. find blocked entrance to 'the oasis'. find the entrance to the foothills. foothills:find the waypoint. near waypoint is the entrance to the boiling lake. boiling lake: find and kill boss. take basilisk acid. portal to town. town: talk to petarus and vanja. ignore items. talk to sin. talk to petarus and vanja again. take bottled storm. waypoint to vastiri desert. vastiri desert: go to entrance to the oasis. oasis: find and kill boss. portal to town. town: talk to irasha. take skill book. waypoint to foothills. foothills: find entrance to the tunnel. tunnel: complete labyrinth trial. find waypoint. find entrance to the quarry. quarry:find waypoint. find entrance to shrine of the winds. kill boss. talk to sin. return to quarry. quarry: find entrance to the refinery. refinery: find and kill boss. open theurgic precipitate machine. take trarthan powder. portal to town. town: talk to irasha. take skill book. talk to sin. waypoint to quarry. quarry: enter belly of the beast. belly of the beast: -> rotting core -> black core. black core: talk to sin. kill shavronne, maligaro and doedre. talk to sin. enter the black heart. black heart: kill depraved trinity. talk to lilly. sail to oriath.
Act 10 & Epilogue
town: enter cathedral rooftop. cathedra rooftop: enter cathedral apex. kill monsters. talk to bannon. return to town. town: talk to bannon. talk to lani. take quartz flask. go to cathedral rooftop. cathedra rooftop: find entrance to the ravaged square ravaged square: find entrance to the control blocks. control blocks: find waypoint. find arena. kill boss. portal to town. town: talk to lani. talk skill book. waypoint to control blocks. control blocks: enter ravaged square ravaged square: ignore reliquary entrance. find entrance to the ossuary. take waypoint. enter ossuary. ossuary: complete labyrinth trial. find sealed chest (yellow !). take elixir of aullure. portal to town. town: talk to weylam. waypoint to ravaged square. ravaged square: find entrance to the torched courts. torched courts: find entrance to desecrated chamber. desecrated chamber: take waypoint. find sanctum of innoncence. kill avarius. take staff of purity. portal to town. Can do labyrinth 3 now -> Bone Barrier town: talk to bannon. talk to innocence. waypoint to ravaged square. ravaged square: find and talk to innocence. enter the canals the canals & feeding trough: find and kill kitava. go to oriath. oriath: talk to lani. talk skill book. talk to kirac. do epilogue quests. 🔰🌀✨ Video guides on youtube! https://www.youtube.com/KayGaming ✨🌀🔰
🔶🔷🔶 Kay's Summoner build guide: https://www.pathofexile.com/forum/view-thread/3179145 🔶🔷🔶 |
|
|
Build guide at end of Metamorph league (10 March 2020). Second page.
--  
PASSIVE TREE & POB PASTEBIN
Path of Building Pastebin https://pastebin.com/ByTnGEq0 Passive Tree  Level 100 Ascendancy 1. Mindless Aggression 2. Unnatural Strength 3. Mistress of Sacrifice 4. Commander of Darkness Pantheon Soul of Lunaris / Arakaali Soul of Shakari
EQUIPMENT
Note: There are some required equipment for this build. Armour
Spoiler
Helmet: Devouring Diadem (required item) Sockets: 2-link: 1 red, 1 blue. Unlinked: 1 blue, 1 green. Devouring Diadem has reduced mana reserve to run 2 auras + skitters. It also has feast of flesh which consumes corpses to recover life and ES. 400life/400 ES per corpse. This is why spell cascade is in the trigger wand. Chest: Crafted delve body armour with +1 spectre number Sockets: 6-link: 6 blue. Delve chest with high life. Hunter's orb to get the offering mod. Bench craft is 10% life as ES. Gloves: Crafted gloves Sockets: 4-link: 3 blue, 1 green Boots: Fossil-crafted boots with +1 spectre gem level Sockets: 4-link: 3 blue, 1 red Weapons
Spoiler
This build uses two sets of wand & shield. Weapon set 1 is for all mapping. It sockets Bone Offering and uses a life and ES recovery shield. This is the same from the W&S Life (league starter) build. Weapon set 2 is for boss killing. It sockets Flesh Offering and uses Victario's Charity to generate frenzy charges. This will double the spectre's DPS at the cost of survivability. Use this if you know boss mechanics well. Wand & Shield (weapon set 1) Wand: Crafted Convoking wand or Temple wand with Trigger craft Sockets: 3-link: 2 blue, 1 green Shield: Crafted Shaper shield with 5%/5% life & ES recovery on block Sockets: unlinked: 2 blue, 1 red Wand & Shield (weapon set 2) Wand: Crafted Convoking wand or Temple wand with Trigger craft Sockets: 3-link: 2 blue, 1 green Shield: Victario's Charity Sockets: unlinked: 2 blue, 1 red Accessories
Spoiler
Belt: Stygian Vise Amulet: Citrine amulet with +1 to all intelligence gems with Death Attunement anointment (required item) Rings: 2x Vermillion rings with 15% life quality *15% quality will increase the implicit from 7% to 8% Jewels & Flasks
Spoiler
Jewels: Unique Jewels: Thread of Hope with medium ring Anatomical Knowledge with 8% increased maximum life Unending Hunger Watcher's Eyes with Phasing/Haste gives permanent phasing 2x Ghastly Eyes Thread of Hope will let you take Cruel Preparation and Ravenous Horde without travel passives! Recommended Flasks: Blood of the Karui - fast life recovery + instant life recovery Bubbling Divine Flask of Staunching - instant life flask & remove bleed Chemist's Quicksilver of Adrenaline - 70% increased movement speed Experimenters's Quartz Flask of Heat - 10% Dodge & remove freeze Rumi's Concoction - 20%/10% block & 3000 armour
IMPORTANT CRAFT
The single most important craft for this build is 'Gain 10% maximum life as extra maximum energy shield'. This will add 500-700 base ES, depending on your total life.
GEM LINKS
Body Armour - Spectres
Spoiler
This gem set up is for Slave Drivers. See Recommended Spectres section for more options. Boots - Support minions
Spoiler
See Animate Guardian section for equipment options. Helmet - Auras
Spoiler
2-link aura: Unlinked: Note: Haste must not be linked to Generosity as this build uses the Watcher's Eye and Haste aura to give permanent phasing. Gloves - EE & Curse, Phase Run
Spoiler
Note: Phase Run is used for a quick speed boost. It can be replaced. Wand & Shield - Weapon Set 1 (Survivability)
Spoiler
Wand: Note: Spell Cascade is used to create 10 corpses - 5 for Bone Offering and 5 for Feast of Flesh (from helmet). Shield: Note: Decoy Totem will pull agro from all monsters except Endgame bosses. Wand & Shield - Weapon Set 2 (DPS)
Spoiler
Wand: Note: Spell Cascade is used to create 10 corpses - 5 for Flesh Offering and 5 for Feast of Flesh (from helmet). Shield: Note: Holy Flame Totem has a rapid hit rate and work with Victario's Charity to general frenzy charges quickly.
RECOMMENDED ANOINTMENT
Death Attunement +1 to Maximum number of Spectres Minions have 8% increased Attack Speed Minions have 8% increased Cast Speed +1 to Maximum number of Raised Zombies +1 to Maximum number of Skeletons 
WHY USE IT?
You can use an AG for added utility. It can be equiped with armour and a weapon to get buffs and debuffs. But note that if your AG is killed, all the equipment will be lost! There are two main options for the AG based on the weapon: 1. Dying Breath 2. Kingmaker Dying Breath AG is cheap. Each piece of equipment should cost 1c each. The equipment will provide some damage buffs for your spectres and debuffs on the enemy. Kingmaker AG is expensive. It can cost around 4-5ex to equip. Kingmaker provides fortify (20% less damage taken) and culling strike (instantly kill enemies at 10% hp) for you and your spectres. NOTE: Never use AG in Hall of Grand Masters or in Delve 500+. The damage scaling can instantly kill it.
EQUIPMENT
For both Kingmaker and Dying Breath, I recommend a chest with 'nearby enemies are blinded'. This reduced enemies accuracy to 50%.  AG is in the yellow circle. Red circle shows how far the blind goes. Dying Breath AG: Kingmaker AG: You must have 10% life gained as ES crafted on your AG's body armour. It combines with the Mask of the Stitched Demon and Minion Life gem to give your AG about 17% life regen. This will keep it alive for most of the game content. NOT: delve 500+ or HoGM! - Gems: If you want more DPS, swap Raise Zombie and Meat Shield for Feeding Frenzy and Elemental Army - Video guide on how to summon and equip your AG: https://youtu.be/V5MSR9bARg4 
SLAVE DRIVER
Best for: All round mapping/bosser Damage type: Lightning spell Strength: High damage Area of Attack spell Weakness: Short-range Low health pool Runs into storms (sirus fight) Demo videos: T16 map: https://youtu.be/aaD5slUdtyE Sirus, AL8: https://youtu.be/VDL86ThQ8Wg Where: Act 5 - Control Blocks 6-link: Aura: EE trigger: Frenzy charges (with Vic's Charity):
SOLAR GUARD
Best for: Mapping Damage type: Fire spell Strength: Long-range projectiles Long-range AOE (long cooldown) High health pool Weakness: Mid range damage Requires white socket for gem swap (mapping -> bossing) Demo videos: T16 map: https://youtu.be/aaD5slUdtyE Sirus, AL8: https://youtu.be/VmsatHljnzg Where: Act 8 - Solaris Temple 6-link: Gem swap: You can swap LMP for Elemental Focus against bosses for more DPS. Aura: EE trigger: Frenzy charges (with Vic's Charity):
ENHANCED VAAL FALLEN
Best for: Boss killng Damage type: Elemental melee Strength: Extreme damage High health pool Weakness: Slow movement speed Slow attack speed Demo videos: T16 map: - Sirus, AL8: coming soon Where: Delve - Vaal Outpost Temple of Atzoatl 6-link: Aura: EE trigger: Frenzy charges (with Vic's Charity): 
HOW DOES ELEMENTAL EQUILIBRIUM WORK?
" https://pathofexile.gamepedia.com/Elemental_Equilibrium Any elemental spell you use will proc EE on all enemies that you hit. Your minions cannot proc EE, but they will benefit from its effects. Example: Slave Driver spectres use a lightning spell. So, you hit a boss with Armageddon Brand which is fire damage. It will proc EE: monsters will get +25% fire res and -50% lightning and cold res.  Elemental Equilibrium appears as pink circles under monsters.
WHY IS SPELL ECHO IN THE LINKS?
" https://pathofexile.gamepedia.com/Spell_Echo_Support This means that both the player and minions will benefit from the repeated cast, as well as the increased cast speed. Spell Echo will more than double your spectres' DPS. Note 1: Wand & Shield Build Spell Echo will cause Raise Spectre to repeat, so you need to remove it before raising spectres. Remember to put the gem back in when you are finished. Note 2: Pledge of Hands Build Spell Echo stacks with Greater Spell Echo. It will give a 3rd repeat with 105% more Damage and 150% increased area. See: official wiki for more details.
HOW DO I GET 4 OR 5 SPECTRES?
1. RAISE SPECTRE GEM LEVEL 1 spectre at level 1-12 2 spectres at levels 13-24 3 spectres at level 25+ Raise Spectre can be level 20 or 21. Unnatural Strength ascendancy passive gives +2 level to minion gems.  Hunter influence amulet can give +1 to all intelligence skill gems. Convoking Wand can give +1 or +2 to minion gems. Boots can give +1 spectre skill gem. 2. DEATH ATTUNEMENT PASSIVE SKILL  Death Attunement gives +1 spectre. It can be found at the top left of the passive tree. 3. +1 MAXIMUM NUMBER OF SPECTRES DELVE BODY ARMOUR Note: +1 chest is a rare delve drop; it cannot be crafted.
HOW ABOUT 6 SPECTRES?
You need to use Midnight Bargain to get +1 spectre. But it takes away 30% of your life. Another option is Queen's Decree, but it is a 2h sword so you can't use a shield and trigger wand for easy Bone Offering.
CAN I DO ELEMENTAL REFLECT MAPS?
You cannot do reflect maps.  All useful spectres will die quickly because they do elemental damage and their DPS is much higher than their regen/leech.
WHY DID YOU PUT * NEXT TO UBER ATZIRI?
The Slave Drivers will instaphase Atziri, but they will also instantly die if they hit the mirror clone. So you need to be very quick and careful with positioning your spectres. Here's a full run from 3.7: https://youtu.be/gRaieNyJgRg?t=150 At 2:50, one spectre hit the mirror clone and died instantly.
CAN YOU CHECK MY GEAR? WHAT SHOULD I UPGRADE?
There are 3 things you need to do: 1. Check the gear sections in the Wand & Shield and Pledge builds for suggested items. 2. Make sure your spectres are in a 6-link. 3. Stack life on all your gear. You should have a minimum of 100 life on your gloves, belt, rings. Other items will vary depending on whether you are using uniques or rares. That's basically it.
THE BUILD GUIDE HAS CHANGED! WHERE CAN I FIND THE OLD VERSION?
Previous build versions can be found in the build archive. https://www.pathofexile.com/forum/view-thread/2581892
CHANGELOG
W&S build updated with player feedback. - Raise Zombie replaces Animale Guardian in 4L - Feeding Freezy moved to Spectre 6L - Minion Damage replaces Feeding Frenzing in 4L PoB:https://pastebin.com/UUz1EdjT 13 DEC: Screenshots of levelling trees: https://imgur.com/a/FYLPyDM All levelling trees in W&S PoB converted to 3.9 tree. 11 DEC: Wand & Shield build updated for 3.9 Changes to the build are described on page 738. Pledge of Hand / EB & MoM build updated for 3.9 Changes to the build are described on page 740. New Awakened Gems have not been added to the build yet. Please note that there may be several tweaks to the build guide until the servers go live![/url] 🔰🌀✨ Video guides on youtube! https://www.youtube.com/KayGaming ✨🌀🔰
🔶🔷🔶 Kay's Summoner build guide: https://www.pathofexile.com/forum/view-thread/3179145 🔶🔷🔶 |
|
|
you can easily do hallf of grandmasters after switching to spiders.
"You have great power. You're right to be proud. It's unfortunate you have to die now, but I will honor you with 45% of my strength." Last edited by Rupenus#5905 on Mar 9, 2020, 2:19:03 PM
|
|
|
Hi, Thanks for your wonderful build. Just have a (noob) question on your levelling trees. https://imgur.com/a/fNsDpC1 How do you refund the rest of the connecting nodes while leaving the Death Attunement still intact? Sorry, I am new to the game, just wondering what has to be done between level 80 and level 90. Thank you. |
|
|
3.10 archive. First page. 16 June.
If you have found this page, the main guide is: https://www.pathofexile.com/forum/edit-thread/2181275
Spoiler
  Welcome to my build guide! This is a 'pure' spectre summoner build that uses spectres as the main damage dealers. Spectres are 'ghosts' of monsters in the game. You can find hard hitting melee spectres, fast map clearing spectres and everything in between. This gives a spectre summoner a lot of flexibility depending on what you want to focus on. This build guide starts with a cheap and easy league starter and also provides several build options for endgame customisation. Each build option has a detailed breakdown on passives/equipment/gems. There is also a crafting guide, spectre guide and a full levelling guide with walkthrough. These builds are based on my own character as well as the contributions, suggestions and theorycrafting of many other players. Feel free to use the build as a starting point for your own customised version! I recommend using Path of Building Community Fork. https://github.com/PathOfBuildingCommunity/PathOfBuilding/ If you have a question about the build, please post it here in the build guide? I cannot always answer questions in-game.  There will be a build guide update after patch notes are released. Also new build guide video on my youtube channel! 9 JUN 3.11 prep: Updated Levelling Guide for Act 1 - 4.  1. Introduction & Summary 2. Updates & Announcements 3. Showcase Videos 4. Base Build: League Starter / SSF 5. Build Option: Eldritch Battery & Mind over Matter 6. Build Option: Pledge of Hands 7. Build Option: Spectres & Spiders 8. Recommended Spectres 9. Animate Guardian 10. Crafting Guide 11. Levelling Guide 12. Frequently Asked Questions  PoE 3.10 - EB & MoM - Scale of Esh vs Sirus (@Crafterlynx1) PoE 3.10 - Spectres & Spiders - Redemption Sentry vs Simulacrum PoE 3.10 - EB & MoM - Redemption Sentry vs T16 Delirium, Simulacrum and Sirus + new cluster jewels and gem links PoE 3.10 - Build Guide - League Starter Spectre Summoner PoE 3.10 - Build Guide - Build Option: EB & MoM PoE 3.10 - Build Guide - Build Option: Spectres & Spiders PoE 3.10 - Build Guide - Build Option: Spectres & Spiders build update More videos at https://www.youtube.com/KayGaming My twitch stream: https://www.twitch.tv/kayellapoe 
About this build
League Starter / SSF This build is designed as a league starter and SSF build. It will take you from a fresh league start all the way to endgame bossing on cheap or self-crafted gear. It is focused on having high survivability while still having good DPS. Required Uniques: none.
Passive Tree, Ascendancy, Pantheon and PoB Pastebin
Path of Building Pastebin https://pastebin.com/JJ1VEGjn (includes levelling trees) Passive Skill Tree  Level 100 Bandits Kill all
Equipment
Note: Always look for highest total life and any resists you need. See: Crafting section below for how to craft your gear. Armour
Spoiler
Helmet: Crafted +1 helmet -> life helmet -> Crafted +3 helmet Chest: 5L rare -> Tabula Rasa or 6L rare -> 6L +1 spectre. NOTE: +1 spectre body armour is drop only (mod cannot be crafted) Gloves: Crafted gloves Boots: Fossil-crafted boots Weapons
Spoiler
One-hander from Atzoatl or Convoking wand with +1 minion gem or Convoking wand with +1/+1 minion/spell gems NOTE: must not have 'adds x lighting damage to spells' Shield: Any shield with high life -> Crafted Shaper shield with 'recover 5% life when block' Accessories
Spoiler
Belt: Stygian Vise or Leather Belt Jewellery: Amulet: Rare amulet or Amulet with +1 int gems Rings: any ring; vermillion recommended. Jewels & Flasks
Spoiler
Jewels: You can craft or buy ghastly eyes. Mod priorities: #1: life #2: increased minion attack/cast speed or increased minion damage #3: Taunt Highly recommend for Sirus fight 'Corrupted Blood cannot be inflicted on you' Recommended Unique Jewels: Anatomical Knowledge: +flat life & 8% increased maximum life Unending Hunger: 50% chance for minion to gain Soul Eater Recommended Flasks: Bubbling Divine Flask of Staunching - instant life flask & remove bleed Quicksilver of Adrenaline - increased movement speed Granite of Iron Skin - phys damage reduction Quartz Flask of Heat - 10% Dodge, phasing & remove freeze Jade Flask of Reflexes - evasion
Gem Links
Body Armour
For Slave Drivers: 6 blue sockets. Please see Recommended Spectres section below for Awakened Gems and gems for other spectres.
Helmet, Boots & Gloves
Helmet: 1 red & 3 blue. 1. Stone Golem gives life regen. 2. Golem and Zombies can proc Feeding Frenzy buff that give spectres more damage and attack/cast speed. 3. Golem and Zombies can proc exposure from Elemental Army for -10% lightning res. Boots: 3 blue, 1 red. 1. Wrath + Generosity gives minions more lightning damage. 2. Skitterbots chill and shock enemies. 3. Convocation teleports your minions to you and heals them. Gloves: 4 blue. 1. Armageddon Brand is used to apply Elemental Equilibrium (-50% lightning res). 2. Armageddon Brand applies Elemental Weakness curse (-50% elemental res). 3. Flame Dash to teleport away from danger or over terrain. It can also be used to apply Elemental Equilibrium and Elemental Weakness. NOTE: Arma Brand is not needed for damage, so level 1 is enough.
Weapon & Shield
Weapon: 1 green, 2 blue. 1. Desecrate spawns corpses. 2. Bone Offering consumes corpses to increase block chance for minions and necro, as well as some life recovery. 3. Skeletons add extra minions for pulling agro (and taunt if you have it on a cluster or ghastly jewel). NOTE: You can use Vaal Skeletons to body block bosses with a mass of skeletons! NOTE: Keep Desecrate at level 1. Shield: 2 red, 1 green 1. Cast When Damage Taken + Immortal Call will reduced damage taken by 28%. 2. Phase Run gives +40% movement speed, phasing (run through monsters) and reduced visibility (monsters won't attack you). NOTE: Phase Run must be unlinked. This will allow you to manually cast it when you need the speed boost. NOTE: Cast When Damage Taken should be level 15. NOTE: Immortal Call should be level 16.
Amulet Anointment
Death Attunement +1 to Maximum number of Spectres Minions have 8% increased Attack Speed Minions have 8% increased Cast Speed +1 to Maximum number of Raised Zombies +1 to Maximum number of Skeletons
Double the DPS with Weapon Swap
For mapping, the standand gem and equipment set up has enough DPS. But you might want a DPS boost for boss fights. You can do this when the boss's attacks are easy to dodge and it's safe enough that you don't need max block. The easiest way to do this is to have a second weapon set using Victario's Charity with Holy Flame Totem, and Flesh Offering instead of Bone Offering in a second trigger wand. Your mapping weapon set will be the same as in the guide. Your DPS weapon set will look like this: Note that you need Holy Flame Totem to generate frenzy charges. Arma Brand doesn't hit quickly enough. This combination can give double your DPS. 
Why use this build option?
EB & MoM This build option is the easiest upgrade option to the base build and will give your necro more survivability, and also give your spectres about 30% more DPS. The build uses Devouring Diadem unique helmet, which gives Eldritch Battery and Feast of Flesh. Eldritch Battery uses ES instead of Mana which allows you to reserve 100% mana for Skitters and TWO damage auras (Wrath and Zealotry). Feast of Flesh consumes up to 10 corpses every 5 seconds. Each corpse gives 400 life and ES. So, this will give up to 4000 life and ES every time it procs. I’ve also including cluster jewels to give a balance of DPS and survivability.
Passive Tree, Ascendancy, Pantheon and PoB Pastebin
Path of Building Pastebin https://pastebin.com/bG2uhnBn Passive Tree  Level 100
Equipment
Note: Required items are marked in yellow. Changes to base build marked in white. See spectre section for Redemption Sentries configuration. Armour
Spoiler
Helmet: Devouring Diadem (required item) Sockets: 1 red, 3 blue. Body: Crafted delve body armour with +1 spectre number Sockets: 6 blue Delve chest with high life. Hunter's orb to get the offering mod. Bench craft is 10% life as ES. Gloves: Crafted gloves Sockets: 4 blue Boots: Fossil-crafted boots with +1 spectre gem level Sockets: 3 blue, 1 red Weapons
Spoiler
This build uses two sets of wand & shield. Weapon set 1 is for all mapping. It sockets Bone Offering and uses a life and ES recovery shield. This is the same as the base build. Weapon set 2 is for boss killing. It sockets Flesh Offering and uses Victario's Charity to generate frenzy charges. This will double the spectre's DPS at the cost of survivability. Use this if you know boss mechanics well. Wand & Shield (weapon set 1) Wand: Crafted Convoking wand or Temple wand with Trigger craft Sockets: 1 green, 2 blue Shield: Crafted Shaper shield with 5% life on block. Sockets: linked: 2 red. Unlinked: 1 green Wand & Shield (weapon set 2) Wand: Crafted Convoking wand or Temple wand with Trigger craft Sockets: 2 blue, 1 green Shield: Victario's Charity Sockets: linked: 1 green, 2 red Accessories
Spoiler
Belt: Stygian Vise Amulet: Citrine amulet with +1 to all intelligence gems with Death Attunement anointment (required item) Rings: 2x Vermillion rings Jewels & Flasks
Spoiler
Jewels: You can craft or buy ghastly eyes. Mod priorities: #1: life #2: increased minion attack/cast speed or increased minion damage #3: Taunt Highly recommend for Sirus fight 'Corrupted Blood cannot be inflicted on you' Recommended Unique Jewels: Anatomical Knowledge: +flat life & 8% increased maximum life Unending Hunger: 50% chance for minion to gain Soul Eater Recommended Flasks: Bubbling Divine Flask of Staunching - instant life flask & remove bleed Quicksilver of Adrenaline - increased movement speed Rumi's Concoction - 20% attack & 10% spell block Quartz Flask of Heat - 10% Dodge, phasing & remove freeze Jade Flask of Reflexes - evasion Cluster Jewels
Spoiler
Socket these near Hex Master. 1x Large cluster with Renewal, Feasting Fields, 2 sockets 2x Medium cluster with Vengeful Commander, First Among Equals, 1 socket 1x Small cluster with Surging Vitality 1x Kitava's Teachings
Gem Links
Note: Changes to base build marked in white. Body Armour - Spectres
Spoiler
This gem set up is for Slave Drivers. See Recommended Spectres section for more options. Boots - Support minions
Spoiler
Support minions moved to boots. Elemental Army replaced by Convocation. Helmet - Auras
Spoiler
Auras moved to helmet. Zealotry added. Gloves - EE & Curse
Spoiler
Wand & Shield - Weapon Set 1 (mapping)
Spoiler
Wand: Note: Spell Cascade is used to create 10 corpses - 5 for Bone Offering and 5 for Feast of Flesh / Kitava's Teachings. Shield: 1. Cast When Damage Taken + Immortal Call will reduced damage taken by 28%. 2. Phase Run gives +40% movement speed, phasing (run through monsters) and reduced visibility (monsters won't attack you). NOTE: Phase Run must be unlinked. This will allow you to manually cast it when you need the speed boost. NOTE: Cast When Damage Taken should be level 15. NOTE: Immortal Call should be level 16. Wand & Shield - Weapon Set 2 (DPS)
Spoiler
Wand: Note: Spell Cascade is used to create 10 corpses - 5 for Bone Offering and 5 for Feast of Flesh / Kitava's Teachings. Shield: Note: Holy Flame Totem has a rapid hit rate and work with Victario's Charity to generate frenzy charges quickly. 
Why use this build option?
Pledge of Hands This build is focused on having massive DPS. It uses Devouring Diadem and Pledge of Hands to boost spectre DPS, aoe range and clear speed. It does, however, have less survivability compared to the base build and EB & MoM build. Required Uniques: Pledge of Hands, Devouring Diadem.
Build Guide Video
Passive Tree, Ascendancy, Pantheon and PoB Pastebin
Path of Building Pastebin https://pastebin.com/mkEh23nU Passive Tree Level 100 Ascendancy 1. Commander of Darkness 2. Mindless Aggression 3. Unnatural Strength 4. Plaguebringer Pantheon Soul of Lunaris Soul of Shakari
Equipment
Weapon, Armour & Accessories
Spoiler
Weapon: Pledge of Hands. 6-link: 6 blue. Stats are not important (they do not scale minion damage). Chest: Rare +1 Spectre number delve chest. 6-link: 5 blue, 1 red. Helmet: Devouring Diadem. 2-link: 1 blue + 1 red. Unlinked: 1 green, 1 blue. Gloves: Rare crafted gloves. 3-link: 3 blue. Unlinked: 1 green. Boots: Rare crafted +1 spectre level boots. 2-link: 2 red. Unlinked: 2x 1 blue. Belt: Stygian Vise. Jewellery: Amulet: Rare with +1 Intelligence skill gems Rings: 1x Unset ring, 1x Vermillion ring. Jewels & Flasks
Spoiler
Jewels: You can craft or buy ghastly eyes. Mod priorities: #1: life #2: increased minion attack/cast speed or increased minion damage #3: Taunt Highly recommend for Sirus fight 'Corrupted Blood cannot be inflicted on you' Unique Jewels: Anatomical Knowledge: +flat life & 8% increased maximum life Unending Hunger: 50% chance for minion to gain Soul Eater Watcher's Eye with 'Phasing while affected by Haste' Recommended Flasks:
Gem Links
Weapon
Spoiler
Note: This gem set up is for Slave Drivers. See minion section for other gem configurations. Body Armour
Spoiler
Support minions. They will provide feeding frenzy buff to your spectres and -10% lightning res on monsters. Note: Minion Life can be left off if you only have a 5-link. Note: You can replace Stone Golem with Animate Guardian. Helmet
Spoiler
2-link aura: Unlinked: Note: Haste must not be linked to Generosity as this build uses the Watcher's Eye and Haste aura to give permanent phasing. Boots
Spoiler
2-link cwdt: Unlinked: Note: You can level up CWDT to trigger at about 30% of your eHP. Gloves
Spoiler
3-link curse: Unlinked: Unset Ring
Spoiler
Regular mapping: Endgame bossing: Note: Swap Decoy Totem for Desecrate against endgame bosses because they will not target the decoy. Also, Devouring Diadem (helmet) consumes corpses to regain life and energy shield. This means that desecrate is like a life flask against bosses that don't have adds to give you flask charges.
How to summon spectres while using PoH
There is a trick to summoning your spectres one by one even though you have greater spell echo built into Pledge (repeat cast 2 times). You will need an offhand weapon with +1 to socketed gem. You must have level 20 raise spectre in your +1 offhand. The gem must be in the same socket as your PoH. Example: Raise Spectre 21 in socket 2 in PoH & Raise Spectre 20 in socket 2 in +1 offhand. Now you can desecrate & summon with your offhand, then swap back to PoH without spectres despawning. Demonstration video: https://youtu.be/45L0xTzSjCQ 
Why use this build option?
Spectres & Spiders This build combines big DPS and fast clear speed. It uses the Enhanced Vaal Fallen to delete bosses and super agressive spiders. It can also be played with a mapping focus by using Redemption Sentries. It has a slightly more complicated playstyle compared to the other build options, so please read the 'how this build works' section. Required Uniques: Arakaali's Dagger, Speaker's Wreath, Victario's Charity
Build Guide Video
How this build works / How to play the build
HOW THIS BUILD IS DIFERENT TO OTHER SPIDER BUILDS No Writhing Jar! HOW THE BUILD WORKS This build option uses Arakaali’s Fang, Speaker’s Wreath and Victario’s Charity. Arakaali’s Fang raises spiders, which have high movement speed and are extremely aggressive. They hit with physical and chaos damage, and proc poison. They are also immune to damage. Speaker’s Wreath stops our minion’s hits from killing monsters when they are not ignited from fire damage. So, most of the time, monsters will only die from the spider’s poison. This counts as a player kill. So, spiders poison can proc any ‘on kill’ effects, such as: raising spiders, life and ES recovery, charges or even explosions! For bossing, we can use the hard-hitting, tanky spectres that are a bit slow for fast mapping. I recommend Enhanced Vaal Fallen, but Baranite Thaumaturges also work well with spiders. You can even be the spider queen by using Scale of Esh! HOW TO PLAY Mapping To start mapping, you just need to cast desecrate on the nearest pack of monsters. The spectres won’t be able to kill them because of speaker’s wreath, so desecrate will get the kill and spawn spiders. From here, the spiders can spawn more spiders on their own and self-sustain. Don’t forget legion and delirium monsters don’t leave corpses, so remember to occasionally cast desecrate to create corpses for the spiders to spawn from. Boss killing For endgame bosses, I like to use a second weapon set that boosts spectre DPS by about 25% , as well as provide culling strike. This will de-spawn your spiders, though. So, you might want to experiment and see if you like that.
Passive Tree, Ascendancy, Pantheon and PoB Pastebin
Path of Building Pastebin https://pastebin.com/Vj4fxaRK Passive Tree  Level 100 Kill all bandits for the 2 passive points. Ascendancy 1. Mindless Aggression 2. Unnatural Strength 3. Mistress of Sacrifice 4. Commander of Darkness Pantheon Soul of Arakaali Soul of Shakari
Equipment
Note: There are some required equipment for this build. Armour
Spoiler
Helmet: Speaker's Wreath (required) This helmet makes enemy monsters only die from the spider’s poison because there is no source of ignite. Poison kills count as a player kill, so the spider poison will spawn more spiders and self-sustain. Sockets: 2-link: 1 red, 1 green. Unlinked: 2 green Chest: Sockets: 6-link: 4 blue, 2 red Crafted delve body armour with +1 spectre number Use a Hunter's orb to get the offering mod. Bench craft is 10% life as ES. or Crafted Crusader body armour with 'explosion' mod. Gloves: Crafted gloves Sockets: 4-link: 4 blue Boots: Fossil-crafted boots with +1 spectre gem level Sockets: 4-link: 1 red, 3 blue Weapons
Spoiler
Weapon: Arakaali's Fang (required) This dagger summons the spiders. Stats are not important (they do not scale minion damage). Sockets: 1 blue, 2 red Shield: Victario's Charity Poison from spiders count as player kills. This will proc power charges for minions during mapping. Lightning Orb can be cast to proc frenzy charges as well. Sockets: 1 red, 1 green, 1 blue For endgame bosses, it is actually better to de-spawn the spiders because they will body block the EVFs and prevent them from hitting the boss. So, you can use a second pair of wand and shield to give the EVFs more DPS. Wand & Shield (weapon set 2) Wand: Crafted Convoking wand Sockets: 1 green, 2 blue Shield: Victario's Charity #2 Sockets: 1 green, 2 red Accessories
Spoiler
Belt: Stygian Vise Amulet: Amulet with +1 to all intelligence gems. Anoint with Death Attunement (required item) Rings: 2x Vermillion rings Jewels & Flasks
Spoiler
Jewels: Cluster Jewels: The build uses 4 cluster jewels. Large Cluster Jewel with Renewal, Feasting Fiends, 2 passive sockets Medium Cluster Jewel with Renewal, 1 passive socket Small Cluster Jewel with Cold-blooded killer Kitava's Teachings Small Cluster Jewel Anatomical Knowledge with 8% increased maximum life Watcher's Eyes with Phasing/Haste gives permanent phasing (and Onslaught/Haste) Ghastly Eye with Blind on hit Recommended Flasks: Bubbling Eternal life of staunching for instant life recovery and bleed removal. Experimenter’s quicksilver of adrenaline for big speed boost. Cinderswallow Urn. This recovers life and ES when you kill a monster or a monster dies from poison. Damage taken leeched as life is the recommended craft. Enduring Eternal Mana of Warding for curse immunity. Jade flask of reflexes for evasion. This can combine with AG with blind aura to give you 65% chance to evade hits.
Gem Links
Body Armour - Spectres
Spoiler
Boots - Support minions
Spoiler
Can replace Zombies with AG Helmet - Auras
Spoiler
Linked: Unlinked: Note: Haste must not be linked to Generosity as this build uses the Watcher's Eye and Haste aura to give permanent phasing. Gloves - EE & Curse, Desecrate
Spoiler
Arakaali's Dagger - Spiders
Spoiler
Note: gems don't need to be linked Shield - Offering
Spoiler
Note: Gems must be exactly thesese levels. Optional Wand & Shield - Weapon Set 2
Spoiler
Wand: Note: Trigger craft will auto-cast the socketed spells when you use other spells. Shield: Note: The two totems quickly generate frenzy charges for your spectres, and will cull the boss when it reaches 10% life. 🔰🌀✨ Video guides on youtube! https://www.youtube.com/KayGaming ✨🌀🔰
🔶🔷🔶 Kay's Summoner build guide: https://www.pathofexile.com/forum/view-thread/3179145 🔶🔷🔶 |
|
|
3.10 archive. Second page. 16 June.
If you have found this page, the main guide is: https://www.pathofexile.com/forum/edit-thread/2181275
Spoiler

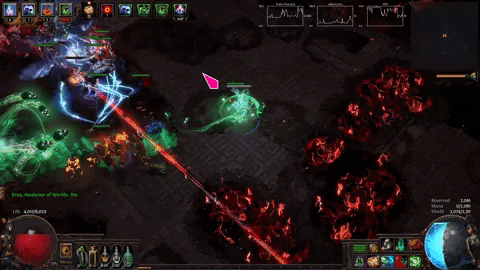
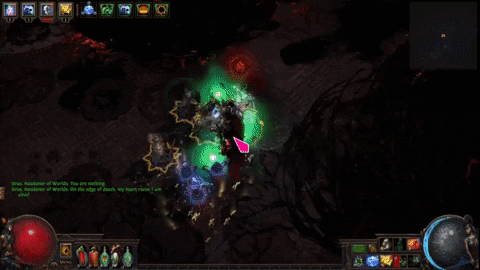
Slave Driver (SD) - Ranged spell
Bossing: 4.5/5 Mapping: 3.5/5 Damage type: Lightning spell Strength: High damage Area of Attack spell Weakness: Short-range Very low HP (dies easily) Demo videos: T16 map: https://youtu.be/aaD5slUdtyE Sirus, AL8: https://youtu.be/VDL86ThQ8Wg Where: Act 5 - Control Blocks 6-link: Aura: EE trigger:
Scale of Esh (SoE) - Ranged spell
Bossing: 5/5 Mapping: 3/5 Damage type: Lightning spells Strength: High damage High HP Mini me Weakness: AI is passive (must use Deathmark) Big spider & mini spiders (not good for arachnophobia) Demo videos: T16 map: https://youtu.be/UivMAnAPuKM Sirus, AL8: https://youtu.be/TWFHeoAohbs (@Crafterlynx1) Where: Esh's Domain Esh Breach 6-link: Aura: EE trigger:
Redemption Sentry (RS) - Ranged attack
Bossing: 4/5 Mapping: 4.5/5 Damage type: Cold and physical ranged attack (not spell) Strength: Good damage Long range High HP Weakness: Needs gem swap for mapping and endgame bossing Slow base attack speed Demo videos: PoE 3.10 - Spectre Showcase: Redemption Sentry vs T16 Delirium, Simulacrum and Sirus | EB & MoM PoE 3.10 - Spectre Showcase: Redemption Sentry vs Uber Elder | EB & MoM PoE 3.10 - Delirium League - Spectres & Spiders, Simulacrum and Explosions! Where: Redemption influence map when Veritania talks to you. First spectre must be raised from killed monster. PoB: https://pastebin.com/cHNqg2bg 6-link (bossing): 6-link (mapping): Aura: EE trigger: Recommended unique (replaces rare gloves):
Enhanced Vaal Fallen (EVF) - Melee
Bossing: 5/5 Mapping: 1/5 Damage type: Elemental melee (PoB is wrong, they do no physical damage) Strength: Extreme damage High HP Weakness: Extremely slow movement speed (best used with Spiders) Slow attack speed Melee range Demo videos: T16 map: - Sirus, AL8: https://youtu.be/sZuug8R_OZo?t=385 (watch the background video of the build guide) Where: Delve - Vaal Outpost Temple of Atzoatl 6-link: Aura: EE trigger:
Redemption Knight (RK) - Melee
Bossing: 4/5 Mapping: 4/5 Damage type: Cold melee Strength: High damage High HP High movement speed Weakness: Melee range Demo videos: T16 map: https://youtu.be/FUO7ZdqEQTw Sirus, AL8: - Where: Redemption influence map when Veritania talks to you. First spectre must be raised from killed monster. 6-link (endgame bosses): 6-link (mapping): Aura: EE trigger: Recommended unique (replaces rare gloves): NOTE: RK are not in POB. See FAQ for how to add them yourself. 
Why use it?
You can use an AG for added utility. It can be equiped with armour and a weapon to get buffs and debuffs. But note that if your AG is killed, all the equipment will be lost! There are two main options for the AG based on the weapon: 1. Dying Breath 2. Kingmaker Dying Breath AG is cheap. Each piece of equipment should cost 1c each. The equipment will provide some damage buffs for your spectres and debuffs on the enemy. Kingmaker AG is expensive. It can cost around 4-5ex to equip. Kingmaker provides fortify (20% less damage taken) and culling strike (instantly kill enemies at 10% hp) for you and your spectres. NOTE: Never use AG in Hall of Grand Masters or in Delve 500+. The damage scaling can instantly kill it.
Equipment
For both Kingmaker and Dying Breath, I recommend a chest with 'nearby enemies are blinded'. This reduced enemies accuracy to 50%. AG is in the yellow circle. Red circle shows how far the blind goes. Dying Breath AG: Kingmaker AG: You must have 10% life gained as ES crafted on your AG's body armour. It combines with the Mask of the Stitched Demon and Minion Life gem to give your AG about 17% life regen. This will keep it alive for most of the game content. NOT: delve 500+ or HoGM! - Gems: If you want more DPS, swap Raise Zombie and Meat Shield for Feeding Frenzy and Elemental Army - Video guide on how to summon and equip your AG: https://youtu.be/V5MSR9bARg4 
General Notes and Warning
Crafting in PoE is random, so you may need to repeat the craft many times to get the required mods. Some mods have a very low chance of rolling and the crafting mats can be extremely expensive.
Keep these points in mind before you start crafting!
Cheap 5-link/6-link chest
Look for a 5-link/6-link chest with INT base & Screaming Essence of Greed. SSF: Farm 6 Dapper Prodigy cards.
Trigger Wand
Trigger will auto-cast any gems in your wand when you use another skill. You will need: wand with 1 free suffix. Bench craft 'trigger' (3c). Note: This craft comes from syndicate encounters and is rare.
+1 Minion Wand
You will need: Convoking Wand Bound fossil 1-socket resonator Note: +1 minion gem has a very low chance. You may need to use many bound fossils to get the mod. The craft for +2 minion wand has a higher chance to get the mod, but will cost more.
+2 Minion Wand
You will need: Convoking Wand 4-socket resonator Jagged, Shuddering, Corroded, Metallic fossils Notes: These 4 fossils will block all many unwanted mods.
+1 Spectre Gem Level Boots
You will need: Boots with Elder influence 3-socket resonator Bound, Shuddering, Pristine fossils You can save some currency by only using 2-socket resonator and bound + shuddering. Note: you need i86 boots to get 35% ms.
+2/+3 Minion Helmet
This will give your support minions more survivability. You will need: item level 86 Bone helmet 1-socket resonator Bound fossil
6-link helmet for RK/RS
Step 1: Create Base i86+ Elder or Shaper Bone Helmet. Awakener Orb Elder or Shaper 'other' helmet. Click on Awakener Orb -> click on other helmet -> click on Bone Helmet. This will make a Shaper/Elder Bone Helmet. Step 2: Fossil Craft 3-socket resonator bound fossil (minion mod: minion damage, +3 minion level) frigid fossil (cold mod: hypothermia) aetheric fossil (spell mod: +3% to Critical Strike Chance) Step 3: Keep rolling until you get good mods. (missing crit) 
Intro and Early Levelling Notes
For Act 1 - 10, your necro will have a 'flame army' with many minions. This will make levelling easy and fast. When you reach maps, you will switch to spectre focus and can change to lightning or cold spectres or stay with fire. Pro tip: Always check vendors when you are in town for 3-link items! Act 1: Main skills: Summon Raging Spirit, Holy Flame Totem. Totem has good dps, pull agro, give 6% heal. Don't use Zombie yet (just level up gem). Sell unid rare and magic items to get transmute orb to buy gems. Act 2: Main skills: SRS, HFT. New minion: Skitterbot. Still don't use zombies. Sell id rares to get alteration orb to buy gems. Act 3: Main skills: SRS, HFT, Skitters. New minion: Spectres (use Cannibal Fire-Eater). Still don't use zombies. Pro tip: Craft flask animation to keep minions alive Pro tip: Craft +1 minion helmet (4L only) Act 4: Main skills: SRS, HFT, Skitters, Spectres. Can start using zombies. New minion: Stone Golem.
Useful Crafting for Levelling
Craft 10% ms boots
Sell to town vendor: white boots + augmentation orb + quicksilver flask. Socket links and colours do not change.
Craft Flask of Animation (heals minions)
Keep your minions alive in Acts 1 - 5. Sell to vendor: Orb of Transmutation + Any life flask + Bone Spirit Shield.
Craft +1 minion gem helmet
Increase minion damage in Acts 3+. Only do this craft if you find a 4-link helmet. Sell to vendor: Orb of Alteration + Flask of Animation + blue helmet.
Gem Checklist for Each Act
Make sure you have these gems at the end of each Act.
End of Act 1
Linked: 1. Summon Raging Spirit + Minion Damage + Infernal Legion (BBB) 2. Holy Flame Totem + Summon Phantasm + Minion Damage (BBR) Unlinked: Flame Dash, Flesh Offering Levelling (can be in weapon swap): Raise Zombie, Bone Offering
End of Act 2
Linked: 1. Summon Raging Spirit + Minion Damage + Melee Phys (BBR) 2. Holy Flame Totem + Summon Phantasm + Minion Damage (BBB) 3. Summon Skitterbots + Infernal Legion (BB) Unlinked: Flame Dash, Flesh Offering, Desecrate Levelling (can be in weapon swap): Bone Offering, Raise Zombie, Deathmark, Controlled Destruction, Elemental Focus
End of Act 3
Linked: 1. Raise Spectre + Minion Damage + Controlled Destruction + Elemental Focus (BBBB) 2. Raise Zombie + Minion Damage + Feeding Frenzy + Deathmark (BBBB) 3. Summon Raging Spirit + Minion Damage + Melee Phys (BBR) 4. Holy Flame Totem + Summon Phantasm + Combustion (BR) 4. Summon Skitterbots + Infernal Legion (BB) Unlinked: Flame Dash, Flesh Offering, Desecrate, Elemental Weakness Levelling (can be in weapon swap): Bone Offering, Controlled Destruction, Wrath, Elemental Army, Generosity, Animate Gurardian
End of Act 4
Linked: 1. Raise Spectre + Minion Damage + Elemental Focus + Spell Echo (+ Deathmark if 5L) (BBBBB) 2. Raise Zombie + Minion Damage + Feeding Frenzy + Summon Stone Golem {BBRR) 3. Holy Flame Totem + Summon Phantasm + Combustion (BBR) 4. Summon Skitterbots + Infernal Legion (BB) Unlinked: Flame Dash, Flesh Offering, Desecrate, Elemental Weakness Levelling (can be in weapon swap): Bone Offering, Controlled Destruction, Wrath, Elemental Army, Generosity, Curse on Hit, Animate Gurardian, (Elemental Focus if not linked)
End of Act 5
Linked: 1. Raise Spectre + Minion Damage + Elemental Focus + Spell Echo (+ Deathmark if 5L) (BBBBB) 2. Raise Zombie + Minion Damage + Feeding Frenzy + Summon Stone Golem {BBRR) 3. Holy Flame Totem + Summon Phantasm + Combustion (BBR) 4. Summon Skitterbots + Infernal Legion (BB) Unlinked: Flesh Offering, Desecrate, Summon Skitterbots, Convocation Levelling (can be in weapon swap): Bone Offering, Controlled Destruction, Elemental Army, Animate Gurardian, (Elemental Focus if not linked)
Buy all remaining gems in Act 6
Phase Run, Cast When Damage Taken, Immortal Call
Passive Trees
Levelling trees are at my imgur account: https://imgur.com/a/fNsDpC1. The level ranges are labelled below the image. The level ranges are based on my own playthrough which included doing the side quests for extra passive points. You might be slightly ahead or behind. Note that the trees are not designed for Cluster Jewels.
Full Walkthrough for Acts 1 - 10
Act 1
Needed links: 1x blue, blue, blue (BBB) 1x blue, blue, red (BBR) starting zone: link: fireball + arcane surge. kill hillock. go: town. town: take: freezing pulse buy: raise zombie link: freezing pulse + arcane surge the coast -> mud flats -> submerged passage -> coast -> tidal island tidal island: kill hailrake. take medicine chest. go: town. town: take: Summon Raging Spirits, Summon Phantasms, Frostblink, Quicksilver flask. buy: Holy Flame Totem link: holy flame totem + phantasms go: submerged passage. submerged passage -> ledge -> climb -> lower prison -> submerged passage -> flooded depths flooded depths: kill deep dweller. go: town. town: take: skill book, infernal legion buy: minion damage x2 link: summon raging spirits + minion damage + infernal legion holy flame totem + summon phantasm + minion damage go: lower prison. lower prison: labyrith trial -> upper prison upper prison: kill boss. go: town. town: take: flame dash. go: prisoner's gate. prisoner's gate -> ship graveyard -> ship graveyard cave ship graveyard cave: get the allflame. find canvern of wrath. cavern of wrath: go: ship graveyard. ship graveyard: kill fairgraves. go: town. town: take: skill book, flesh offering. Pro tip: use 2x sapphire ring for Merveil fight (act 1 final boss) buy: iron ring x2 sell: fireball + iron ring sell: freezing pulse + iron ring go: cavern of wrath. cavern of wrath -> cavern of anger cavern of anger: kill boss.
Act 2
Needed links: 1x BBB 1x BBR 1x BB southern forest -> forest encampment -> old fields -> crossroads -> broken bridge broken bridge: find & kill kraitlyn. go: town. town -> riverways -> find waypoint -> go: left -> wetlands wetlands: find & kill oak. find waypoint. go: riverways. riverways -> western forest western forest: kill blackguard. pick up thaumetic emblem, open path. find & kill alira. find weaver's chamber. weaver's chamber: kill weaver and get maligaro's spike. go: town. town: talk: eramir (2 passive points) take: death mark. buy: melee physical damage, (controlled destruction, elemental focus) link: zombies + minino damage + deathmark go: act 1 town. act 1 town: take skill book. go: crossroads. crossroads -> felshrine ruins -> crypt crypt level 1: labyrith trial level 2: find & kill geofri. get golden hand. go: town go: crossroads crossroads -> go left -> chamber of sins chamber of sins: level 2: labyrinth trial,kill fidelis -> baleful gem. go: town. town: take: desecrate buy: summon skitterbots, melee physical damage link: skitterbots + infernal legion holy flame totem + phatasms + minion damage summon raging spirits + mininon damage + melee physical damage go: wetlands. wetlands -> poison the tree roots -> vaal ruins -> northern forest -> caverns -> ancient pyramid ancient pryamid: kill boss
Act 3
Needed links: 2x BBBB 1x BR 1x BB city of sarn: talk to clarissa. go: town. town -> slums -> crematorium crematorium: labyrinth trial. find & kill piety. take tolman's bracelet. go: town. town: take: sewer keys, convocation. buy: wrath, elemental weakness. go: slums. the slums -> the sewers the sewers: find 3 quest items. marketplace -> catacombs catacombs: labyrinth trial. go: town. town: take skill book. go: marketplace. marketplace -> battlefront battlefront: find Blackguard chest -> ribbon spoon. go: solaris temple. solaris temple level 2: find dialla. take jade amulet. go: battlefront. battlefront -> docks docks: find container -> thaumatic sulphite. go: solaris temple level 2. solaris temple level 2: dialla -> infernal talc. go: the sewers. sewers: clear the undying blockage. find ebony barracks. ebony barracks: find & kill gravicius. go: lunaris temple. lunaris temple: find waypoint. go: town. town: take: raise spectre buy: animate guardian link: raise spectre + minion damage + elemental focus + controlled destruction go: the ledge the ledge:use desecrate to create corpses. look for 'cannibal fire-eater'. raise two spectres. go: lunaris temple. lunaris temple: find & kill piety. take the tower key. go: town. town: take: skill book. go: ebony barracks. ebony barracks -> imperial gardens imperial gardens: labyrinth trial. go: library. the library & archives: find siosa. find 'loose candle'. find golden pages. return to siosa. take feeding frenzy. link: raise zombies + minion damage + deathmark + feeding frenzy go: imperial gardens. imperial gardens -> find 'locked door' -> scepter of god upper scepter: find & kill dominus.
Act 4
Needed links: 2x BBBB 1x BR 1x BB aqueduct -> town -> dried lake dried lake: find & kill boss. get deshret's banner. go: town. town: go: act 3 town. act 3 town: buy: elemental army, generosity. go: act 4 town open mines entrance. don't enter. talk to oyun. take stone golem. go: mines mines: level 2: find deshret's spirit. go: crystal veins. crystal veins: find dialla. go: town. town: take skill book. go: crystal veins. crystal veins: 1. daresso's dream -> grand arena find & kill daresso. take 'eye of desire'. 2. kaom's dream -> kaom's stronghold find & kill kaom. take 'eye of fury'. go: crystal veins. crystal veins: talk to dialla. go: town. town: talk to dialla. take spell echo. talk to petarus and vanja. buy curse on hit. link: raise spectre + minion damage + spell echo + elemental focus go: crystal veins. crystal vein -> belly of the beast -> bowels of the beast bowels of the beast: defeat piety. go: harvest. the harvest: find & kill doedre, maligaro & shavronne. talk to piety. go: black core. the black core: kill boss. portal to town. town -> the ascent the ascent: find portal to oriath.
Act 5
the slave pens: find entrance to overseer's tower (town). town: talk to lani. take whichever ring helps you balance your resists. go to act 3 town act 3 town:talk to clarissa. buy armageddon brand. return to act 5 town. Start using Slave Driver Spectres. control blocks: desecrate corpses. look for 'Slave Driver'. raise 2 spectres. gem removal: holy flame totem, summon phantasms, infernal army unlinked: skitterbot link: wrath + generosity link: armageddon brand + curse on hit + elemental weakness + flame dash link: raise zombie + minion damage + stone golem + feeding frenzy You can do Labyrinth after getting Slave Drivers -> Ascend to Necromancer -> Mindless Aggression control blocks: find miasmeter. find entrance to oriath square. oriath square: get waypoint. waytpoint to town. town: talk to vilenta. take skill book. waypoint to oriath square. oriath square: head to top-right to find entrance to templar courts. templar courts: get waypoint. find entrance to chamber of innocence. chamber of innocence: find boss room. defeat avarius. talk to sin. exit boss room. enter torched courts. torched courts: find entrance to ruined square. ruined square: find the ossuary. get waypoint. ossuary: find sign of purity. exit to ruined square. ruined square: find reliquary. ignore utula. reliquary: get waypoint. find the 3 quest items. portal to town. town: talk to lani. take skill book. waypoint to ruined square. ruined square: find cathedral rooftop. cathedral rooftop: find and kill kitava. talk to sin. talk to lily roth.
Act 6
town: talk to lilly. go to twilight strand. twilight strand: kill all monsters. town: talk to lilly. take book of regrets. go to the coast. the coast: find the entrance to mud flats. get the waypoint. enter mud flats. the mud flats: find & kill boss. take quest item. find & talk to nessa. find entrance to karui fotress. karui fortress: find & kill boss. find entrance to the ridge. the ridge: waypoint to town. town: talk to tarkleigh. take skill book. talk to lilly. buy cast when damage taken, immortal call, phase run. the ridge: find entrance to lower prison. lower prison: grab waypoint. portal to town. town: talk to tarkleigh. take skill book. portal to lower prison lower prison: find labyrinth trial. find entrance to shavronne's tower. shavronne's tower: find entrance to prison rooftop. prison rooftop. kill shavronne and brutus. talk to sin. warden's chambers: find entrance to prisoner's gate. prisoner's gate: find entrance to valley of the fire drinker (top-right). valley of the fire drinker: kill abberath. talk to sin. return to prisoner's gate. prisoner's gate: find entrance to western forest western forest: follow path to top to find waypoint. grab waypoint. continue to find entrance to riverways. riverways: follow path upwards to find waypoint. grab waypoint. go left to find entrance to wetlands. wetlands: find entrance to spawning ground. spawning ground: kill rysratha. talk to sin. portal to town town: talk to bestel. take book of skill. talk to tarkleigh. take book of skill. waypoint to riverways riverways: find the entrance to southern forest. southern forest: find the entrance to caverns of anger. grab the waypoint. caverns of anger: open flag chest. take black flag. passage: find entrance to beacon. beacon: grab waypoint. complete 'refuel the beacon' escort puzzle. light the beacon. click on beacon. talk to weylam. brine king's reef: find the brine king's throne. brine king's throne: kill boss. talk to sin. talk to weylam to go to act 7.
Act 7
broken bridge: follow path to entrance to crossroads crossroads: follow path to the waypoint. grab waypoint. head to the right of the map. find entrance to fellshrine ruins. fellshrine ruins: follow the path to the crypt entrance. the crypt: grab waypoint. find labyrinth trial. find sarcophagus (entrance to next area). enter stairs. search map for 'container of sins'. take maligaro's map. portal to town. town: take waypoint to crossroads crossroads: find entrance to chamber of sins level 1. chamber of sins level 1: find silk. grab the waypoint. use 'maligaro's map' in the map device. enter portal to maligaro's sanctum maligaro's sanctum: find maligaro's workshop. kill maligaro. take black venom. portal to chamber of sins level 1 chamber of sins level 1: talk to silk. take obsidian key. find entrance to level 2. chamber of sins level 2: complete labyrinth trial. find entrance to the den. Can do labyrinth 2 now -> Unnatural Strength the den: grab the waypoint. find entrance to the ashen fields. the ashen fields: grab waypoint. follow path to find entrance to fortress encampment (boss room). boss room: kill greust. talk to sin. northern forest: find entrance to dread thicket. dread thicket: collect fireflies. find entrance to den of despair. den of despair: kill gruthkul. portal to town. town: talk to eramir. take skill books. waypoint to northern forest. northern forest: find the entrance to the causeway. the causeway: find waypoint. find kishara's star (close to vaal city entrance). vaal city: find waypoint. portal to town. town: talk to weylam. take book of skill. vaal city: talk to yeena. enter temple of decay level 1. temple of decay level 1 & 2: find entrance to arakaali's web. boss fight: kill arakaali. talk to sin. talk to yeena. enter sarn ramparts.
Act 8
Your Raise Spectre gem will hit level 13 in Act 8. Remember to get your 3rd spectre! sarn ramparts: grab waypoint. find entrance to town. town: enter toxic conduits. toxic conduits: find doedre's cesspool. doedre's cesspool: find boss room ('loose grate'). the cauldron: kill doedre. enter 'sewer outlet'. doedre's cesspool: find entrance to the quay. quay: find 'sealed casket'. open and take 'ankh of eternity'. find ressurection site. talk to clarissa. kill tolman. find grain gate. grain gate: grab waypoint. find & kill gemling legion. find the imperial fields. imperial fields: follow path. grab waypoint. find solaris temple. solaris temple level 1: find waypoint. waypoint to town. town: talk to maramoa. take skill book. talk to clarissa. take skill book). waypoint to solaris temple level 1. solaris temple level 1 & 2: find & kill boss. take sun orb. portal to town. town: waypoint to toxic conduits. toxic conduits: find the grand promenade. grand promenade: find the bath house. bath house: complete labyrinth trial. kill hector. take wings of vastiri. find high garden. high garden: kill yugul. portal to town. town: talk to hargan. take skill book. waypoint to bath house. bath house: find entrance to lunaris concourse. lunaris concourse: grab waypoint. find lunaris temple. lunaris temple level 1 & 2: find & kill boss. take moon orb. portal to town. town: waypoint to lunaris concourse. lunaris concourse: find the harbour bridge. harbour bridge: find the sky shrine. kill both bosses. talk to sin.
Act 9
blood aqueducts: find entrance to town. town: find the entrance to 'the descent' descent: find exits. vastiri desert: find the waypoint. find storm-weathered chest (yellow !). take storm blade. continue towards top of map. go to the right. find blocked entrance to 'the oasis'. find the entrance to the foothills. foothills:find the waypoint. near waypoint is the entrance to the boiling lake. boiling lake: find and kill boss. take basilisk acid. portal to town. town: talk to petarus and vanja. ignore items. talk to sin. talk to petarus and vanja again. take bottled storm. waypoint to vastiri desert. vastiri desert: go to entrance to the oasis. oasis: find and kill boss. portal to town. town: talk to irasha. take skill book. waypoint to foothills. foothills: find entrance to the tunnel. tunnel: complete labyrinth trial. find waypoint. find entrance to the quarry. quarry:find waypoint. find entrance to shrine of the winds. kill boss. talk to sin. return to quarry. quarry: find entrance to the refinery. refinery: find and kill boss. open theurgic precipitate machine. take trarthan powder. portal to town. town: talk to irasha. take skill book. talk to sin. waypoint to quarry. quarry: enter belly of the beast. belly of the beast: -> rotting core -> black core. black core: talk to sin. kill shavronne, maligaro and doedre. talk to sin. enter the black heart. black heart: kill depraved trinity. talk to lilly. sail to oriath.
Act 10 & Epilogue
town: enter cathedral rooftop. cathedra rooftop: enter cathedral apex. kill monsters. talk to bannon. return to town. town: talk to bannon. talk to lani. take quartz flask. go to cathedral rooftop. cathedra rooftop: find entrance to the ravaged square ravaged square: find entrance to the control blocks. control blocks: find waypoint. find arena. kill boss. portal to town. town: talk to lani. talk skill book. waypoint to control blocks. control blocks: enter ravaged square ravaged square: ignore reliquary entrance. find entrance to the ossuary. take waypoint. enter ossuary. ossuary: complete labyrinth trial. find sealed chest (yellow !). take elixir of aullure. portal to town. town: talk to weylam. waypoint to ravaged square. ravaged square: find entrance to the torched courts. torched courts: find entrance to desecrated chamber. desecrated chamber: take waypoint. find sanctum of innoncence. kill avarius. take staff of purity. portal to town. Can do labyrinth 3 now -> Mistress of Sacrifice town: talk to bannon. talk to innocence. waypoint to ravaged square. ravaged square: find and talk to innocence. enter the canals the canals & feeding trough: find and kill kitava. go to oriath. oriath: talk to lani. talk skill book. talk to kirac. do epilogue quests. 
How can I edit POB for Redemption Knights?
POB doesn't have any info for RKs, but their default attack has the same stats as Redemption Sentries. So you can edit POB to add them. Step 1: Find the spectre list file: Path of Building\Data\3_0\Spectres.lua Add this to the bottom of the file:
RK spectre listing
-- Redemption Knight minions["Metadata/Monsters/AtlasExiles/EyrieInfluenceMonsters/EyrieSeraphFighter"] = { name = "Redemption Knight", life = 4.05, fireResist = 0, coldResist = 75, lightningResist = 0, chaosResist = 0, damage = 1.5, damageSpread = 0.2, attackTime = 1.17, attackRange = 14, accuracy = 1, weaponType1 = "One Handed Sword", skillList = { "MeleeCold", "AtlasEyrieFighterSlash", "EmptyActionAttackEyrieFighter", }, modList = { }, } Step 2: Find the spectre skill file: Path of Building\Data\3_0\Skills\spectre.lua Add this to the bottom of the file:
RK spectre skill
skills["MeleeCold"] = { name = "Default Attack", hidden = true, color = 4, description = "Strike your foes down with a powerful blow.", skillTypes = { [SkillType.Attack] = true, [SkillType.ProjectileAttack] = true, [SkillType.SkillCanMirageArcher] = true, [SkillType.Projectile] = true, [SkillType.MeleeSingleTarget] = true, [SkillType.AttackCanRepeat] = true, [SkillType.Melee] = true, [SkillType.SkillCanVolley] = true, }, statDescriptionScope = "skill_stat_descriptions", castTime = 1, baseFlags = { attack = true, melee = true, }, baseMods = { }, qualityStats = { }, stats = { "skill_physical_damage_%_to_convert_to_cold", "active_skill_damage_+%_final", "arrow_projectile_variation", "skill_can_fire_arrows", "skill_can_fire_wand_projectiles", "use_scaled_contact_offset", "projectile_uses_contact_position", }, levels = { [1] = { 75, 0, 25, baseMultiplier = 0.75, levelRequirement = 1, statInterpolation = { 1, 2, 1, }, }, [2] = { 75, 0, 25, baseMultiplier = 0.75, levelRequirement = 19, statInterpolation = { 1, 2, 1, }, }, [3] = { 75, 1, 25, baseMultiplier = 0.75, levelRequirement = 20, statInterpolation = { 1, 2, 1, }, }, [4] = { 75, 200, 25, baseMultiplier = 0.75, levelRequirement = 84, statInterpolation = { 1, 2, 1, }, }, }, } Note: The special attack has the same damage stats, so I didn't include it here. Note: When you open POB, it will say 'update ready'. Do not update. It will delete the added info.
HOW DOES ELEMENTAL EQUILIBRIUM WORK?
" https://pathofexile.gamepedia.com/Elemental_Equilibrium Any elemental spell you use will proc EE on all enemies that you hit. Your minions cannot proc EE, but they will benefit from its effects. Example: Slave Driver spectres use a lightning spell. So, you hit a boss with Armageddon Brand which is fire damage. It will proc EE: monsters will get +25% fire res and -50% lightning and cold res. Elemental Equilibrium appears as pink circles under monsters.
WHY IS SPELL ECHO IN THE LINKS?
" https://pathofexile.gamepedia.com/Spell_Echo_Support This means that both the player and minions will benefit from the repeated cast, as well as the increased cast speed. Spell Echo will more than double your spectres' DPS. Note 1: Wand & Shield Build Spell Echo will cause Raise Spectre to repeat, so you need to remove it before raising spectres. Remember to put the gem back in when you are finished. Note 2: Pledge of Hands Build Spell Echo stacks with Greater Spell Echo. It will give a 3rd repeat with 105% more Damage and 150% increased area. See: official wiki for more details.
HOW DO I GET 4 OR 5 SPECTRES?
1. RAISE SPECTRE GEM LEVEL 1 spectre at level 1-12 2 spectres at levels 13-24 3 spectres at level 25+ Raise Spectre can be level 20 or 21. Unnatural Strength ascendancy passive gives +2 level to minion gems. Hunter influence amulet can give +1 to all intelligence skill gems. Convoking Wand can give +1 or +2 to minion gems. Boots can give +1 spectre skill gem. 2. DEATH ATTUNEMENT PASSIVE SKILL Death Attunement gives +1 spectre. It can be found at the top left of the passive tree. 3. +1 MAXIMUM NUMBER OF SPECTRES DELVE BODY ARMOUR Note: +1 chest is a rare delve drop; it cannot be crafted.
HOW ABOUT 6 SPECTRES?
You need to use Midnight Bargain to get +1 spectre. But it takes away 30% of your life. Another option is Queen's Decree, but it is a 2h sword so you can't use a shield and trigger wand for easy Bone Offering.
CAN I DO ELEMENTAL REFLECT MAPS?
You cannot do reflect maps. All useful spectres will die quickly because they do elemental damage and their DPS is much higher than their regen/leech.
WHY DID YOU PUT * NEXT TO UBER ATZIRI?
The Slave Drivers will instaphase Atziri, but they will also instantly die if they hit the mirror clone. So you need to be very quick and careful with positioning your spectres. Here's a full run from 3.7: https://youtu.be/gRaieNyJgRg?t=150 At 2:50, one spectre hit the mirror clone and died instantly.
CAN YOU CHECK MY GEAR? WHAT SHOULD I UPGRADE?
There are 3 things you need to do: 1. Check the gear sections in the Wand & Shield and Pledge builds for suggested items. 2. Make sure your spectres are in a 6-link. 3. Stack life on all your gear. You should have a minimum of 100 life on your gloves, belt, rings. Other items will vary depending on whether you are using uniques or rares. That's basically it.
THE BUILD GUIDE HAS CHANGED! WHERE CAN I FIND THE OLD VERSION?
Previous build versions can be found in the build archive. https://www.pathofexile.com/forum/view-thread/2581892
CHANGELOG
17 APR New video on Youtube: PoE 3.10 - Spectre Showcase: Redemption Knight vs T16 & Minotaur | EB & MoM 13 APR New video on Youtube: PoE 3.10 - Spectre Showcase: Redemption Sentry vs T16 Delirium, Simulacrum and Sirus | EB & MoM 7 APR Added Redemption Sentry and Scale of Esh to Recommended Spectre section with gem links (finally!) 5 APR New video on Youtube: PoE 3.10 - Spectre Showcase: Redemption Sentry vs Uber Elder | EB & MoM 2 APR New video on Youtube: PoE 3.10 - Delirium League - Spectres & Spiders, Simulacrum and Explosions! Comments on page 968 🔰🌀✨ Video guides on youtube! https://www.youtube.com/KayGaming ✨🌀🔰
🔶🔷🔶 Kay's Summoner build guide: https://www.pathofexile.com/forum/view-thread/3179145 🔶🔷🔶 |
|


