


[3.5] Guffin's Rain of Hope (Shredder) | All Bosses Down | Fast and Safe Mapping | Skillchoices
|
UPDATED VIDEOS: Deathless Uber Elder Run (~2 Minutes) T16 Haunted Mansion Clear (32 Packsize, 4 Sextants, Beyond) T16 HC Version Survivability Showcase Deathless Shaper Run
Old Videos with pre Buff Hopeshredder (3.3)
OLD VIDEOS WITH PRE-BUFF HOPESHREDDER: Hopeshredder had no Attack Speed, and twice as strong of a Degen. That meant way less Damage innately, but also having to build around max Cold Res with a Purity etc., which resulsts in less Damage than these Days thanks to offensive Auras. Uber Elder Run (1 Death, very sloppy. First time on a Bow Character for me) T16 Haunted Mansion Clear (27 Packsize, 4 added Monsters Sextants, Beyond) Deathless Shaper Run Ever wanted to feel special and shred the Endgame Content with a completely "shit" Unique? Then try out the amazing Hopeshredder! This is a Rain of Arrows pure Cold Elemental Build using the Elder-Only Bow. While Building around its unique Downside (a strong Cold Degen) we gain some nice Benefits and are capable of clearing all Content on a pretty low Budget as Slayer/Raider. If you want to skip the explanations, there is a PoB link at the Bottom of this Post. Be sure to check the second Post, which contains the FAQ, Build Variations and some Tips for Deep Delves. PROS: - Fast and brainless Map Clear (180%+ Movespeed without QotF/Devotos) - Very good Boss Damage (Uber Elder no Problem) with an uncomplicated Playstyle - Pretty safe due to a high HP pool, Overleech and Dodge - Very Budget Friendly, using undesired non-meta Uniques and Rares - Super Safe Variant with tons of Phys Mitigation, Kaoms, etc. possible - Easy to gear for thanks to lots of passive Allres - Runs all Mapmods except "Cannot Leech" CONS: - No Phys Mitigation-/CI-/Maxblock-/etc. Tank. You need to dodge sometimes during Bosses - RoA will never clear as fast as QOTF TS/KB Builds or Autobombers - Loses in DPS against Builds like my BF Cold Conversion - Harder Maneuvering during Endgame Bosses than Whirling/Leapslam Offensives: - 99% cold Damage, scaling with Penetration and Crit - Enough to kill all Content in the Game, but no record Time Uber Elders are possible Defensives: - Evasion and Dodge based (56% Attack- and 30% Spell Dodge while mapping w/o Flasks) - 10% Chance to avoid Elemental Damage on Hit - 200% to 216% Life from the Tree (+ Kaoms) = Big HP Pool - Overleech Carries Hard - Maim, Chill, Freeze and Shatter reliably - Always out of Range of Mobs - Endurance Charges, Vaal Grace possible for HC - Good Phys Mitigation through "Phys taken as Cold" possible These are assuming an Endgame Character at Level 95. Levelling Paths are further down.
Ascendancies
We go Slayer/Raider and take the Ranger Start. Both of these Ascendancies are required to counter Hopeshredders Downside, while capitalizing on its Benefits to the maximum. Slayer is a super popular Scion choice for one basic reasons: You get Overleech. Overleech is great. It basically means your life leech doesn't stop when you are at full life, it keeps running in the background. As opposed to any "normal" build with leech, you are always at Max Leech Rate while playing. While they have to attack to build up Leech Rate every time they lose life, yours is always running. It keeps you topped off from many small hits without a dent in your HP Bar, and even 5k Hits get healed back up in a second. Importantly, this is one of our Mechanisms to deal with Hopeshredders Degen as well as enabling us to stand in Uber Elder degen grounds at full Life. The free 10% Culling strike is also super noticeable for Boss Fights and Mapping. 20% increased AoE after we killed something is great for mapping with Rain of Arrows. Raider is used to bolster our DPS and Speed in various ways: Whenever we are fighting Bosses we generate Frenzy Charges by hitting them, granting us 4% more Damage and Attack Speed per Charge. Frenzy Charge Generation is important to gain all the Benefits Hopeshredder offers us (Movement Speed, Elemental Avoidance, Flat Cold Damage). While we have full Frenzy Charges, we have Onslaught (even if it's not displayed in the buff bar). This gives us 20% Attack Speed and is up 100% of the time while mapping and on any Bossfight that lasts more than a few seconds. 10% Movement Speed helps clear and dodging in General. The 4% Dodge Chance is a nice Freebie, and builds well into our Defenses. Path of the Ranger enables us to start from a second Point on the Skilltree, saving us a lot of Skillpoints compared to the Levelling Trees.
Trees
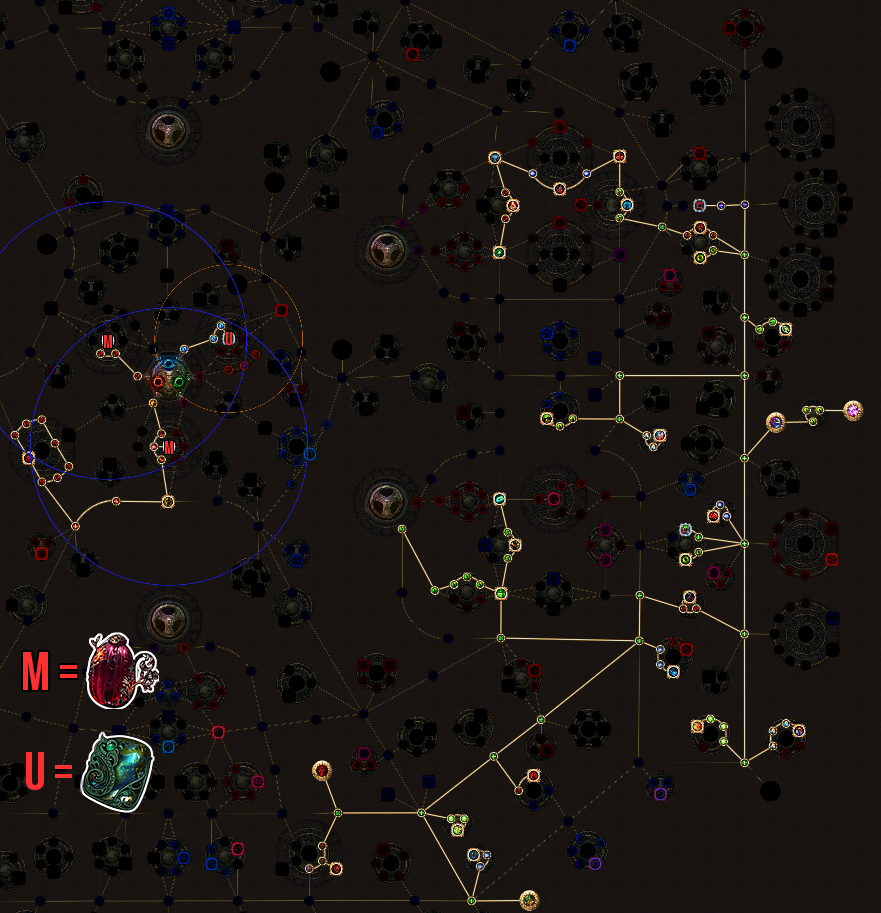
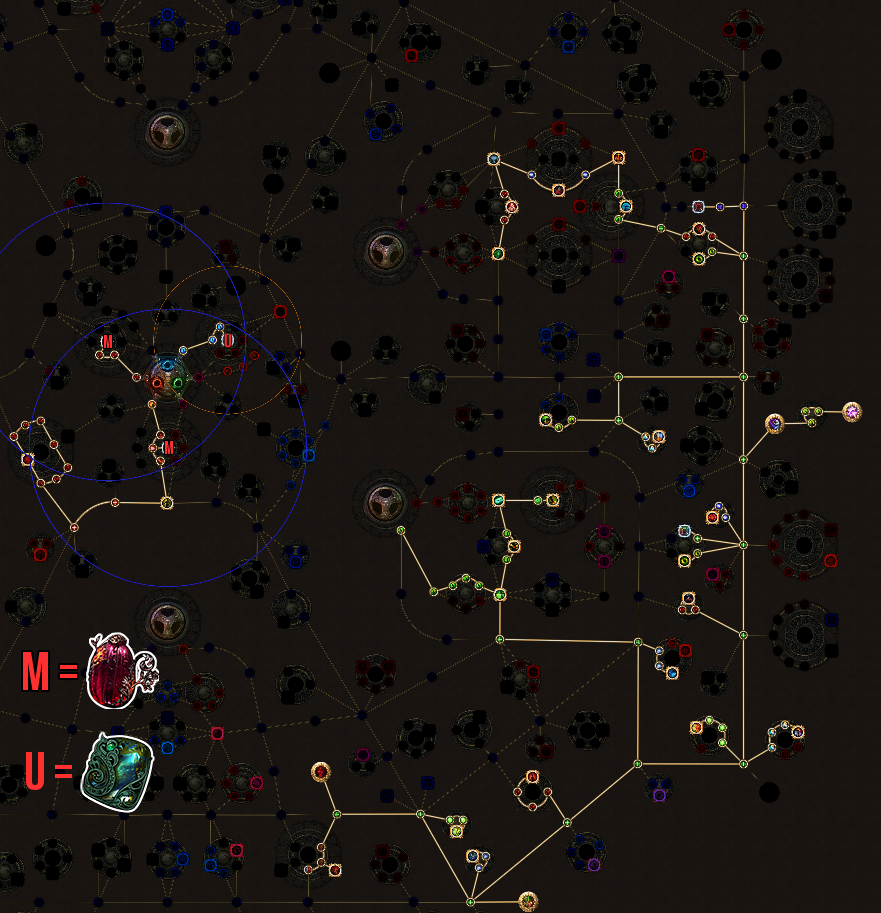
SC Tree (200% inc Life):
Image Version
PoE Planner PoE Website HC Tree (216% inc Life):
Image Version
PoE Planner PoE Website The Trees above are with 2 Might of the Meeks Jewels and 1 Unnatural Instincts Jewel. These work great in conjunction, as the Boni gained from Unnatural Instincts get amplified by the Meeks. The Meeks give us additional 23% Max Life, 8% Allres, 25 Flat Life (or 10 INT) and another 10 Flat Life. Unnatural Instincts grants 26% Attack Speed, 82% Crit Multi, 8% max Life, 16% Movement Speed and 10 INT (Values already amplified by the Meeks). These Jewels can cost a lot tho, and until we get them here are our Alternatives:
Non/2 Meek Trees
No Meek Tree (185% inc Life):
Image Version
PoE Planner PoE Website 2 Meek Tree (192% inc Life):
Image Version
PoE Planner PoE Website As a general Rule we pick up Life, Attack Speed, Crit Chance and Crit Multi, Ele Penetration and some minor Accuracy. Projectile Speed Nodes also help reduce the Delay between shooting an Arrow, and the actual Rain of Arrows falling down. This is important for the general feel of the Character. Elemental Penetration Nodes act as a kind of More Multiplier against high Resistance Targets. Vitality Void is important to increase the Strength of our Leech even more, giving us more Safety in every Situation. Survivalist is the main Difference between the "HC" and SC Trees. We wear a Kaoms in HC and stack more Cold Res (more than Loreweave allows) for more Tankyness through Life and Phys Mitigation through "Phys taken as Cold". Acrobatics, Phase Acrobatics and Vaal Pact are all huge boni to our survivability, and non negotiable. Look at Vaal Pact as a 100.000.000% increase to your Leech :D Point Blank is a significant Damage increase for Bossfights, where you will want to stand kinda close to the Boss. Check the Videos for a Reference. As with most Builds, these are just guidelines. If you find you need more Life, or maybe you have some gg Jewels: grab Life and Jewel Sockets :) If PoB tells you Accuracy is worth more for you than Crit Multi, go for it!
Bandits and Pantheon
Bandits: We help Alira. 20% Crit Multiplier is a nice DPS Boost since we are a crit based build, and 15% to all elemental Resistances makes gearing a lot easier. The Mana Regen is noticeable while levelling. Pantheon: Is extremely impactful for us while Mapping and on Bosses. Make sure to upgrade the relevant ones quickly.
Bossing
Major - Arakaali LvL 2 "50% increased Recovery of Life and Energy Shield if you've stopped taking Damage Over Time Recently" is triggered whenever we stop walking, as the Cold Degen from Hopeshredder stops. This is a huge Survivability Boost, as it makes our Leech incredibly fast, healing 5k Hits in a second and allowing for even safer facetanking of Degen. Alternatively, Cast When Damage taken linked to Immortal Call can proc this, which stops us taking damage from Blood Rage for a split Second. This adds additional consistency for this Buff during Endgame Bossfights. Minor - Yugul LvL 2 Yugul grants 25% reduced reflected ele damage taken and 5% reduced cold damage taken if you have been hit recently. Especially the latter part helps us deal with Hopeshredders Degen a bit, and also offers Defensives against the many Sources of Cold Damge in the Uber Elder Fight.
Mapping
Major - Arakaali LvL 2 OR Solaris LvL 3 Arakaali is explained in the Bossing Segment. Solaris' 8% reduced Elemental Damage taken if you haven't been Hit Recently is another way to reduce the Degen we get from Hopeshredder. Take no Extra Damage from Critical Strikes if you have taken a Critical Strike Recently is huge as well. While mapping you receive quite some hits, and chances are you have like 80% uptime on Crit immunity like this. Minor - Yugul LvL 2 5% reduced cold damage taken if you have been hit recently helps us deal with Hopeshredders Degen a bit more. This is the centerpiece of the Build, and obviously non negotiable :P It is extremely cheap to get, as people consider it worthless and it drops from very low Elder levels. Hopeshredder offers some nice Benefits in conjunction with Frenzy Charges tho, which for us would be: 20% increased Movement Speed, 60 to 70 global Added Cold (works for Heralds etc. as well), 10% Chance to avoid Elemental Damage (from Hits) and 2.5% of Damage leeched as Life. On the Flipside, we take 1000 Cold Damage per Second while moving, which gets countered by our Overleech and 80 to 87% maximum Cold Resistance. Don't forget to check the Trade Links for the Items, and adapt them to your needs :)
Gem Links
The links are sorted in descending order of importance. So the last gem in a chain should be the last one you slot in when you upgrade your amount of links. The colour of the Text implies the colour of the Gem. Do NOT use Damage on full Life until you have the Slayer Ascendancy, as you will not be always on full Life until then. Vaal Rain of Arrows + Elemental Damage with Attacks + Damage on Full Life + Concentrated Effect OR Inc Crit Strikes + Added Cold + Mirage Archer Rain of Arrows is our Clear and Singletarget Skill at once. EdWA, DoFL and Added Cold are no-brainers, as we deal 99% Cold Damage and are practically always on full Life. While Mirage Archer adds no Damage by itself, it copies our Skill and attacks independantly. This is practically a more Multiplier and helps keep up Damage on Bosses while dodging and cleans Packs while mapping passively. Inc Crit Strikes should be chosen for mapping, where more reliable Crits and Shatters matter. Conc Effect is the best Choice for Bosses, as it is a huge more Multiplier and narrows down the Area in which our Arrows strike. This makes more hit the Boss, increasing our Damage even further. In case you feel your Damage is shitty while mapping, you can try out Conc Effect there as well until you get better Gear. Just note that clear will be a bit slower, and less safe. On that topic, Rain of Arrows gets some of the craziest Damage in the Game on either really big Targets (Sunken City Boss e.g.) or in very close Quarters, as the Arrows will all strike the same Target. Herald of Ice + Curse on Hit + Assasins Mark This is our Curse Setup. While Mapping, your Herald of Ice explosions will Curse enemies and killing them generates you Power Charges and Mana. This is generally the best for Mapping Speed. If you want more passive tankyness you can choose Warlord's Mark instead of Assassin's Mark, generating Endurance Charges instead which will provide security against Physical Damage. Blink Arrow + Faster Attacks + Faster Proj Blink Arrow is our "oh shit" Escape Button, and this Setup provides the fastest Escape there is from sticky Situations. That said, Blink Arrow performs just fine without any links. But since we generally have the Sockets, this is a luxury we can afford. IF you struggle with Socket Amounts, simply drop the supports for Blink Arrow. Hatred OR Wrath, Blood Rage, Frostbomb (Lvl 1), Ice Golem These go anywhere you have Space and don't need any links. Wrath should be taken until you have your Hatred Watchers Eye. Once you got that, Hatred is stronger. Both of these are essential and huge DPS Boosts tho. Blood Rage grants us a lot of Attack Speed and generates Frenzy Charges while killing. The Health Degen is a non matter, as our Overleech keeps us at Full Life. This Skill should be kept up at all times. Frost Bomb lowers the enemies Cold Resistance significantly, resulting in a huge Damage increase. Ice Golem boosts our Accuracy and Crit Chance, and will survive more on this Build than on others. Cast When Damage Taken (Lvl 1) + Immortal Call (Lvl 3) The CWDT triggers our Arakaali Buff for a huge Survivability Boost. Check the Pantheon part for more information. The gem levels are important as CWDT won't trigger the gems otherwise. Note that this is generally only impactful on Endgame Bosses, as we can trigger our Arakaali Buff while mapping simply by stopping Movement. So if you struggle with your Socket Amount, drop this for now. Quality and Levels can be good DPS upgrades. It is worth noting however that, unlike Spell Builds, we don't benefit from a Level 21 gem hugely. This makes investing into them usually a thing left for the very Endgame. 20 Quality on all your Gems that Support RoA and your HoI is essentially an easy low budget upgrade for late maps though! Adding quality to Blood Rage is also worth it. You can see what the increased Quality does in the Wiki Pages I linked. Purity of Ice (LvL 21) + Empower (LvL 3) This Setup is for the Survivability/HC Version only. These are essential, as they boost our Max Cold Res to 81% passively without a Loreweave. This greatly reduces the Degen we receive from Hopeshredder, while also adding Cold Res to make gearing easier and offering Phys Mititgation through "Phys taken as Cold". The Purity replaces Wrath/Hatred from the SC Setup. To get to 81% max res, your Choices are either 20 Purity + 4 Empower or 21 + 3. 21 + 3 is usually way cheaper tho.
Gear and Stat Priority
Gear Overview
This is a rough Stat priority for Rares (which are very important for us) from most- to least important in each Category: Defenses: - Life - Resistances until 80% (and 81% for Cold in HC) - Evasion>Armour>>>ES Offenses: - %increased Elemental Damage with Attacks/%inc Cold Damage - Global Crit Multi, Attack Speed - Flat Cold Damage (also on Abyss Jewels) - Accuracy (also on Abyss Jewels) - Proj Speed - Exactly 19 INT to level Gems (or 39 in HC) Just keep in mind to always compare Item options in PoB before making a Purchase, to get 100% accurate results on what is an Upgrade, and how big that one is. Hopeshredder. Non negotiable. Trade Link, 6 Linked Link
Early League Alternative
The Tempest or probably rather it's downgrade Stormcloud can be taken until you get your Hopeshredder. Simply drop the Survivalist Node until then.
Tempest Link, Stormcloud Link Loreweave is a great Chest for the SC Loadout. The 80% max Res allows us to deal with Hopeshredders Degen more easily and offers Survivability against Elemental Damage in general. Increased Ele Damage and Crit Chance are great offensive Additions as well. Trade Link
Alternatives
Belly or Kaom's Heart are our best Options while we can't afford a Loreweave. Please note that you SHOULD run a Purity of Ice instead of Wrath/Hatred with any of these Options. It is possible without it, but way less safe. If you like Kaoms and the Purity playstyle, you also might as well go for the super safe Options explained further down :) Alternatively, a rare Chest with a lot of Life and maybe crafted WED is a possibility. Belly Link, Rare Link A rare Quiver with Life, Crit Chance, Crit Multi and WED. Proj Speed could be a nice addition as well. Keep in mind that the most "meta" mods, like additional arrows or %phys as extra Ele, are wasted on us. Trade Link, Low Budget Link Starkonja's is the best allround Helmet to get. Huge Supply, low Price, Tons of Life and some decent offensive Value, as well as being one of the most commonly enchanted Bases make this very desirable. Our best Enchant is "15% Chance to fire another Sequence of Arrows" Trade Link, Enchanted Link
Alternatives
A rare Helmet with -x% Cold Res to nearby Enemies is a great offensive Benefit for us, but pretty situational. Standing Close to Enemies is not always recommend or possible, especially on Uber Elder. That said, these Helmets can roll great Life Levels, Res and Accuracy. You would need to buy an already enchanted Base, and craft it with these: Base Trade Link, Already crafted Trade Link Lightpoacher with 2 Abyssal Sockets will offer Nice Res, upwards of 80 Life and lots of Damage with the right Jewels. Just keep in mind that one with the right Enchant costs more than a Starkonjas, the Jewels will drain your wallet as well, and the lack of Gem Sockets makes this option impossible for the HC Setup. Trade Link, Enchanted Link Hale Negator with 2 Abyssal Sockets will offer more Life than a Lightpoacher, and includes a great Life Recovery Mechanic that builds well into our Survivability. That said, I personally found the loss of Res to be a bit rough at times and the INT Requirement is hard to meet. Trade Link, Enchanted Link You could also take any Rare Helmet, ideally with crafted WED. Trade Link Tombfists are usually the best Gloves for any Attack Build. Not only do they offer a ton of Life and damage inherently, the Intimidate you get from socketing a Murderous Eye Jewel is effectively a 10% more Multiplier for our Damage. The best Corruptions would be flat Crit Chance to Attacks or an additional Frenzy. 1 Socket Link, 2 Socket Link Bubonics are a decent Choice that offer the most Damage and a lot of Life as well. 30% Movement Speed is nice as well. Our best Enchants are "10% ele Pen if you haven't killed recently" or "1 to 160 Lightning Damage if you haven't killed recently". Trade Link, Enchanted Link
Alternatives
Going for 2 Socket Bubonics is a big Life and DPS increase, but a very costly one and thus should be left for the very Endgame. Also, if we're using a Kaoms the lack of Gemsockets might make this Option not worth pursuing. Trade Link, Enchanted Link You could also take any rare Boots, maybe even with some INT to get that covered. Trade Link A rare Amulet with Life, WED, Crit Multi, Accuracy and maybe Crit Chance on top. Trade Link, Low Budget Link
Alternatives
Pandemonius is a very strong Option for DPS and Survivabiliy alike. 30% Increased Cold Damage and 20% Cold Penetration are huge for us, and free Blind on Hit is incredible for Surviving against Attacks (not Spells). That said, a rare Amulet offers Life (which is invaluable), Resists and maybe even Stats we need. And it can still beat Pandemonius in terms of Damage. I recommend Pandemonius for deep Delves tho, to avoid getting Hit from Mobs that one shot you regardless of your HP Levels :P Trade Link A rare Ring with Life, WED or Cold Damage, Accuracy and maybe flat added Cold Damage to Attacks. Opals are technically the best base, but the implicit can be easily countered on "weaker" bases with better Explicits. Trade Link, Low Budget Link A rare Stygian Vise with Life, WED and Resistances. Some Flask Effect or Duration could be a nice bonus. Trade Link
Alternatives
Until you can afford a Stygian, your best bet is to use a Leather Belt with the same Mods.
Trade Link Abyss Jewels with Life and maybe some offensive Stats. Keep in mind you need one Murderous Eye Jewel for your Tombfists. You should prioritize Cold Damage over other flat Elemental Damage on these. Trade Link Normal Jewels with Life and some offensive Stats can be the Stand In for Might of the Meeks until you get those. Abyss Jewels might be better offensively tho, please compare your Options in PoB. Trade Link, Budget Link These are our general Flasks for SC for all Situations. A Quicksilver of Adrenaline (ideally Alchemsists) is required for fast Map Clears and Dodging. A Quartz Flask is a great Defensive Benefit in all Situations. A Diamond Flask is a tremendous increase to our DPS, as we are a Crit based Build. A Wise Oak will offer even more penetration for Cold Resistance, as long as your cold Res is the highest or equal to the others, resulting in a big DPS Boost. An Atziri's Promise offers Damage, Leech and Chaos Res. The only important Roll is the "ele Damage to Chaos" one. Remember to add 20% Quality to your Flasks for more Duration, and roll 2 of them with Bleed and Curse Immunity. You should have all of them from Levelling, except: Atziri's Link Link, Wise Oak Link A Hatred Watchers Eye will offer a significant DPS increase. Generally our best one is "+1.x% Crit Chance to Attacks", but "xx to xx Cold Damage to Attacks" is very close behind, followed by "xx% Cold Penetration". "xx% increased Cold Damage" is pretty weak. I recommend comparing all Options in PoB. Trade Link for all 3 Remember to upgrade your Rares as you go along! Aim for higher Life, WED/Cold Damage, Accuracy, Crit Multi, etc. Rings, Amulet, Quiver and Belt are a very important part of this Build, and it is important to keep them up to par with the Content we're doing.
Mapping Specific
Just remember to use Inc Crit Strikes instead of Conc Effect for mapping! If you feel your Damage sucks, trying out Conc Effect for a few maps is worth it tho. Shatters are less reliable like that, and the Area of RoA is smaller (resulting in slightly slower Clearspeed), but it might carry your DPS until you get better Gear. Rare Boots with Dodge or Atziri's Step can be taken to get more Survivability, as you probably don't need the Damage from Bubonics for general Map Farming. Rare Link, Atziri's Link Devoto's or Rat's Nest are Options to get even more Movement Speed, and thus faster Map Clears. Just note that your Survivability will suffer. Devoto's Link, Rat's Link
Bossing Specific
Just remember to use the CWDT Setup and Conc Effect! Ralakesh's: can help you reach completely full Charges before a boss fight. Equip them, wait to get full Charges, equip your other Boots -> Blink Arrow to the Boss. Re-equip Ralakeshs if there is some Dialogue, like on Shaper, and then get your real Boots again before the fight starts. Trade Link Jaws of Agony: in a weaponswap can be used to generate Power Charges inbetween Phases of Fights. Just use these Links and keep them at LvL 1: Ice Trap + Multiple Traps + Cluster Trap Trade Link
HC/Survivability Choices
If you ever feel you lack Survivability, or want to give this Build a shot in HC, try out these Options. The main Focus is stacking more Life and max Cold Res to achieve general Tankyness and Phys Mitigation through "Phys taken as Cold". While these Options result in less DPS please note that the "old" Version of this Build, before Hopeshredder Buffs, used exactly this Gear and cleared all the content in the Game effortlessly. The "old" Videos up top are representative of this HC Version. Kaom's Heart is simply our Best Chest. The Defensives it offers are unbeatable, and the more max Life we have the stronger our Leech is. Since we don't wear a Loreweave anymore, we use the Purity + Empower Setup from the Gemlink Section to boost our max Cold Res. Trade Link A well rolled Defensive Flask can replace one of your DPS Flasks, if your Damage is good enough without them. A Sapphire Flask OR Taste of Hate can be taken to boost our max Cold Res even further. ToH offers Physical Mitigation through our 87% Cold Res, but whether or not you can take it depends on if you can fit in your Curse/Bleed/Freeze Immunity like that. Maybe drop some Movement Speed from your Quicksilver to maintain all Immunities. ToH Link Rare Boots with Dodge or Atziri's Step can be taken to get more Survivability, as you probably don't need the Damage from Bubonics for general Map Farming. Rare Link, Atziri's Link A rare elder Belt with %inc Life Recovery Rate is insane, since it boosts your survivability through Leech by tons. They come at a hefty pricepoint tho, if you want other good rolls like Life, Res and WED. And you do. Trade Link A rare elder Amulet with % of max Life to max Life Leech Rate is a similar boost to our Leech, albeit less impactful than the Belt. These Amulets usually are pretty rare and hard to come by, especially with decent Stats. Trade Link A PoI Watchers Eye with Freeze Immunity and Phys taken as Cold will offer significant Phys Mitigation. If you decide to run with a magic Defensive Flask, you can run Freeze Immunity on it and drop the Freeze Immunity from the Watcher's Eye. Taken as Cold Link, + Freeze Immune Vaal Grace is an Option for even more Survivability. CoH + Warlords- instead of Assassins Mark is also a Choice. It will add additional tankyness in a passive way. You could also just run an Enduring Cry, which needs to be maintained tho. I recommend Levelling with Sunder, which you can buy from Nessa after The Siren's Cadence, until Maps. Yes, even Bow Builds level good with Sunder and require minimal respeccing. Alternatively, you can just level with Rain of Arrows itself, which performs similarily and might be easier for a new Player. You can pick this up after the same Quest as Sunder.
Sunder Levelling
Ascendancy and Skilltrees
Ascendancy Progression: Slayer into Raider into Ranger Start Normal: +20 Dex/Strength and Passive Point Cruel: Take Slayer and +40 Dex Merciless: Take Raider Uber: Take the Ranger Start
Uber Lab Tips
General Recommendations: If it is your very first time doing this Lab, check out this detailed Guide. Carry 2 Life Flasks with you, at least one being instant. If you happen to have it, Blood of the Karui is an excellent Flask for this. Other Flasks should be a Diamond, an Atziri's and a Basalt. With our Overleech, we will be generally safe during Trap Sequences if there is something to kill before. Run the CWDT+IC Setup from the gemlinks section along with an upgraded Arakaali Pantheon (check the Pantheon section) for even more Safety. Along that, go for Ryslatha to get passive Refills for your Life Flasks. These are very general trees, since I don't know your particular levelling Situation. Do you have levelling Uniques? Do you play SC or HC? Do you need some Stats for your Skills? Try to adapt it to your needs: if you need more Life, go for the Scion Life wheel (the biggest Life Cluster in the game) earlier. Level 30/After Normal Lab Tree: PoE Planner PoE Website Level 52/After Cruel Lab Tree: PoE Planner PoE Website Level 68/After Merc Lab Tree: PoE Planner PoE Website Level 75/After Uber Lab Tree: PoE Planner PoE Website Grab one of the 0.4% Mana Leech Nodes if you need them, until you get Soul Raker. Only take Vaal Pact once you are High Level and have some amount of Leech. Make sure to get Acro early on. Use Bloodrage during Levelling. If you struggle with INT, keep in mind Aspect of the Lynx, Coordination, Trickery are nice Sources for it. Coupled with Int on one Ring or Ammy (or both with very low Rolls), you are set. You can take a +30 INT Node until you manage to fix it with gear. After that, progress towards the Endgame Tree however you see fit.
Levelling Gear and Gems
RaizQT made an awesome Guide about levelling with Elemental Sunder, which suits our purposes extremely well: Check it out! I really recommend watching through it, as most people can learn a ton from it and this is the most efficient way to level for us. That said, here is a guide for Sunder levelling: Below are some Uniques that are useful while levelling. You probably won't have access to them if the Char is a League Starter, they are mostly for second Characters. None of these are needed, they just speed up the process. Armour: Tabula, Goldrim, Wanderlust, Lochtonial, Ondar's, Haemophilia Weapons: 2x Screaming Eagle, Offhand Princess, MH Brightbeak, OH Tempestuous Steel, MH Flesheater Jewellry: Heup, Blackheart, Meginord's, Deceiver, Carnage Heart, Praxis, Thief's Torment All sorted in Ascending order of Lvl Requirement. Replace Brightbeak with Flesheater if DMG becomes a problem. Keep in mind to not use too many at once, as some of them lack life. Keep some Rares around to get some flat life.
Rain of Arrows Levelling
Ascendancy and Skilltrees
Ascendancy Progression: Slayer into Raider into Ranger Start Normal: +20 Dex/Strength and Passive Point Cruel: Take Slayer and +40 Dex Merciless: Take Raider Uber: Take the Ranger Start
Uber Lab Tips
General Recommendations: If it is your very first time doing this Lab, check out this detailed Guide. Carry 2 Life Flasks with you, at least one being instant. If you happen to have it, Blood of the Karui is an excellent Flask for this. Other Flasks should be a Diamond, an Atziri's and a Basalt. With our Overleech, we will be generally safe during Trap Sequences if there is something to kill before. Run the CWDT+IC Setup from the gemlinks section along with an upgraded Arakaali Pantheon (check the Pantheon section) for even more Safety. Along that, go for Ryslatha to get passive Refills for your Life Flasks. These are very general trees, since I don't know your particular levelling Situation. Do you have levelling Uniques? Do you play SC or HC? Do you need some Stats for your Skills? Try to adapt it to your needs: if you need more Life, go for the Scion Life wheel (the biggest Life Cluster in the game) earlier. Level 30/After Normal Lab Tree: PoE Planner PoE Website Level 52/After Cruel Lab Tree: PoE Planner PoE Website Level 68/After Merc Lab Tree: PoE Planner PoE Website Level 75/After Uber Lab Tree: PoE Planner PoE Website Only take Vaal Pact once you are High Level and have some amount of Leech. Use Bloodrage during Levelling. If you struggle with INT, keep in mind Aspect of the Lynx, Coordination, Trickery are nice Sources for it. Coupled with Int on one Ring or Ammy (or both with very low Rolls), you are set. You can take a +30 INT Node until you manage to fix it with gear. After that, progress towards the Endgame Tree however you see fit.
Levelling Gear and Gems
Bashtart made a good beginner Guide for levelling with Rain of Arrows. Check it out here! It applies to us very well. This is a really in depth explanation of how to level RoA, including Unique Choices, gemlink Progression etc.
General Mapping and Bossing
We run around the Map at a fast Pace thanks to Hopeshredders Movement Speed Bonus, Frenzies, and a Quicksilver Flask. From time to time we fire a Rain of Arrows in the general Direction of Enemies, and Mirage Archer helps clean up the Rest passively. Activate Bloodrage at the start of the Map and recast it if necessary. Don't forget to keep all your Flasks active almost 100% of the Time. Use Vaal RoA for Map Bosses and Abyss Cracks. Don't forget to place Frostbomb below a Map Boss for a huge DPS increase. Always stand kinda close to important Bosses, to get the huge Damage increase from Point Blank! Make sure to use the Attack in Place Feature on your RoA, Frostbomb and Blink Arrow. If you click out of your reach with a Skill the character will walk a distance before he is "in range" to use the skill, which makes you lose control and can lead to deaths. This new feature will make you always "attack in place", so that you actually perform an action when you want. If you lack Space on your Actionbar, put Ice Golem on Left Click. It will work just like the normal Left Click (walking around, picking things up) until you hold Shift+LClick to cast the Golem.
Map Mods
Ele Reflect: You can run it without problems, even though the vast majority of your Damage is Elemental. For these maps you need to: Pick Yugul + Solaris. Make sure your left Ring has no important resists or Stats (that loosing would brick your gear) on it. You Equip Sibyl's Lament here. All together, you have 80 to 83% reflect Reduction, since we deal 99% Cold Damage. 40% from Sibyl's Lament + 25% from Yugul + 10% from Primeval Force + 8% from Solaris if you haven't been hit recently OR 5% from Yugul if you have been hit recently. Add on top the fact that we have 87% max cold Res, as well as our Overleech, and we will be topped of most of the time. This turns instantly rippy if the map has -Max Resists as well as Ele Reflect though, since the reflected damage will hit you way harder. Also, I don't recommend running T16s with ele Reflect. Chance to avoid Elemental Ailments: Is totally doable, but you loose a bit of safety cause you will rarely chill/freeze/shatter enemies. Also makes your Curse on Hit work less often. The main turn off is, that you won't hear those juiiiiicy Shattering sounds tho :D Less Recovery Rate of Life/Energy Shield: Is a tough one, since the Degen from Hopeshredder will be harder to mitigate through our Leech. Lower Rolls don't matter too much, but a 60% less Recovery T16 Map can be kinda rippy.
Uber Elder
These are your Friends. You take the same Setup as for all other Endgame Bosses, but swap out Bubonic Trail for Kaoms. Kaoms Roots prevent you from being slowed during Elders Cone, which makes dodging things a breeze. It also prevents you from getting stunned by Shaper's Balls, so you don't tank two. Add on top of that the huge HP Boost, and these are a must have. Try to get some with either "1 to X Lightning Damage if you haven't killed recently" or "10% Ele Pen if you haven't killed recently". The Pen offers more DPS, but not by a lot. Trade Link If you run the HC Version with Kaoms, you need to counter the loss of Gemsockets. So replace your Kaoms with a: to move some Stuff into that one. Obviously 6 links are not needed. All in all this would be a HP loss, but you will still have enough. If you consider that too bad, you can just stick with Kaoms Heart and Roots, but sacrifice the Ice Golem, Frost Bomb and Blood Rage for the CWDT Setup.
Uber Atziri
For Atziri, keep your Flask Charges for the split Phases and focus down the Spear one. With the correct timing you can prefire some (Vaal) Rains of Arrows for a quicker kill on these. Remember to position yourself away from the Mirror Add, as the reflected Damage will kill you. These PoBs were made with my personal Character, and decent but far from optimized Rares. Swap out Conc Effect for Inc Crit Strikes to see the mapping DPS. SC PoB (7.1k Life, 80% Allres, 10% reduced Ele Damage taken, 380k Shaper DPS per Arrow) HC PoB (8.4k Life, 87% Cold Res, 30% of Phys taken as Cold, 260k Shaper DPS per Arrow) If you don't know what PoB is, I strongly recommend picking this insanely powerful tool up here and checking out this video guide or its written form. . Last edited by Guffinn#6759 on Dec 7, 2018, 9:43:00 AM Last bumped on Sep 9, 2019, 6:13:18 PM
|
|
|
3.5 brought no Changes for the Build. Everything Functions as always, no nerfs no Buffs. Hyrris Ire was changed to provide a shit ton more Cold Damage to (Bow) Attacks. This would be a huge offensive Upgrade, at the loss of a lot of Survivability. While the Dodge might be nice, the loss of Life is big. Not only does that reduce our ability to withstand one-shots, a lower Life Total also reduces the Strength of our Overleech. You can use it in Softcore, but I don't think I'll recommend it. Veiled Mods and new Uniques will offer a little bit of Powercreep one way or another. In what ways that applies to us remains to be seen, since nothing definitive is known of these yet.  Bow Builds have historically been able to chose a variety of different, almost equal, Skillsetups. I will showcase some of them here. Everything that's not mentioned will be the same as in the "main" Guide.
Barrage + TS/LA/Ice Shot
Barrage and the "old" bow Clearskills still remain a staple of Bow Builds, but don't offer that much of an Advantage for us. Here are the Pros and Cons compared to the "Main Build": PROS: - Better Boss Damage - Extremely slightly faster Clear CONS: - Costs a lot more to Gear (2 6l, Dying Sun, Additional Proj Quiver etc.)
Trees
These are assuming an Endgame Character at Level 95. SC Tree (192% inc Life):
Image Version
 PoE Planner PoE Website Clearing with TS/LA/Ice Shot requires picking up Pierce one way or another, otherwise mapping will feel horrible. We drop a Jewel Socket for that, the rest stays exactly the same as the "main" Tree. For a HC Tree, simply pick up the remaining Life Nodes and drop your weakest DPS ones.
Gear
The Stat Priority exactly the same, but you make some Minor Changes in terms of Uniques: 2 six Links are required, as we will use 2 different Skills: Barrage for Bosses and one of the Clear Skills for Trash. A Dying Sun is not only a significant Clearspeed increase for all of the Clearskills, but also a big DPS Boost for Barrage. Trade Link A Quiver with +1 Arrows is a significant Upgrade for the same Reasons as Dying Sun. Trade Link A Helmet with +1 Barrage Projectiles or any Enchant for the Clearskills can be choses if you want either more Boss Damage, or faster Clear. Note that all of these come at a hefty Price Point tho. Especially since you want it on a good Rare or Unique (Starkjonja, Lightpoacher) Base. Barrage Link, TS Link, LA Link, Ice Shot Link Voidwalkers can be chosen for mapping if you want Pierce without taking the Nodes on the Tree. Just note that your Survivability will suffer greatly, as they have no Life. Just make sure you use a Quartz Flask for mapping. At that Point you can just use the same Tree as for the main Build. Trade Link
Gemlinks
Gems are, as always, sorted in the descending Order of DPS they provide. The Colours indicate the Gem Colour. The only thing that changes from the "main" Build is your 6 Link: Barrage + Damage on full Life + Elemental Damage with Attacks + Elemental Focus + Added Cold + Slower Projectiles Our Singletarget Skill. Same Scaling and Colours as RoA in the Main Guide. Tornado Shot/Lightning Arrow/Ice Shot + GMP + Damage on full Life + Elemental Damage with Attacks + Added Cold + Mirage Archer Our Choices of Clearskills linked to the usual Suspects. GMP and Mirage Archer are required for smooth Clearing. Note that you can exchange Added Cold for Ice Bite, to generate Frenzy Charges without Bloodrage if you want. It will have worse Damage by quite a lot, but also offers more Freeze Chance which can be significant during Delves.
Playstyle
The playstyle stays vastly the same as with the "main" Build, albeit a bit more complicated. During Mapping you run around and fire your Clearskill in the general Direction of Enemies, and let Mirage Archer clean up any Stragglers. For Map (and Endgame) Bosses, make sure you stand in Melee Range of the Boss and unload your Barrage onto him.
PoB
I will only include one PoB (the SC Bossing one) for my Build Variations as everything else is covered by the main Guide already. SC Bossing PoB If you don't know what PoB is, I strongly recommend picking this insanely powerful tool up here and checking out this video guide or its written form.
Scourge Arrow
The new Scourge Arrow with it's charge up Mechanic is pretty busted at the moment, and offers great Boss Damage. Here are the Pros and Cons compared to the "Main Build": PROS: - Slightly better Boss Damage CONS: - Way worse Mapping
Trees
These are assuming an Endgame Character at Level 95. SC Tree (200% inc Life):
Image Version
 PoE Planner PoE Website
Gear
Everything stays exactly the same, except: A Helmet with an SA Enchant will obviously be the best Option. The Additional Pod is not required, but the best minmaxing Option. Starkonja's Link, Lightpoacher Link, Crafting Base Link
Gemlinks
Gems are, as always, sorted in the descending Order of DPS they provide. The Colours indicate the Gem Colour. The only thing that changes from the "main" Build is your 6 Link: Scourge Arrow + Damage on full Life + Elemental Damage with Attacks + Elemental Focus + Added Cold + Mirage Archer Same Colours and generic Scaling as RoA. For Mapping, swap in Inc Crit Strikes instead of Ele Focus, as you want to be able to freeze Stuff :P If you use SA as a 2nd 6link for Singletarget Purposes, replace Mirage Archer with Cold Penetration since you can't have a Mirage for 2 Skills active.
Playstyle
The playstyle stays vastly the same as with the "main" Build, albeit a bit more complicated. During Mapping you run around and charge 2 Charges or so of Scourge Arrow in the general Direction of Mobs. On Bosses, especially Endgame, you try to reach 5 Stacks in between Dodging.
PoB
I will only include one PoB (the SC Bossing one) for my Build Variations as everything else is covered by the main Guide already. SC Bossing PoB If you don't know what PoB is, I strongly recommend picking this insanely powerful tool up here and checking out this video guide or its written form. Here are some generic Tips once you get to really deep Levels: Consider the HC Setup. The added Survivability is essential. Use Conc Effect for everything. In deeper Levels the Damage will matter more, and you don't need crazy Area like during mapping Speedclears. Especially since the corridors are so narrow. Drop the Quicksilver if you encounter survivability Problems. A Stibnite or Basalt will go a long way. Use Pandemonius. While I don't recommend it for general Gameplay, in very deep Delves the Damage scales so high, that a loss of Life is negligible as Monsters will one Shot us even through 10k HP. The Blind on Hit is great for avoiding any Hits. Consider a Blasphemy Setup. You can drop your Herald of Ice for a Blasphemy Temp Chains or Enfeeble for added Security. Get Crit Mitigation through Belt of the Deceiver or a Chest Corruption for 500+ Depths. Set up an Ichimonji Weaponswap with Vigilante Strike and a "Vigil" Jewel on your Tree for 36+ Second Fortify. Get more Freeze Chance. Freeze is insane in Delves, and there are a couple ways to get it more reliably: Pathing on the lower Arm of the Primeval Force Cluster, Grabbing Fingers of Frost, using a Taming Ring, exchanging Added Cold for Ice Bite, using a Doryanis Invitation. Not all of these are equally viable, but all worth considering. Frost Wall can be an invaluable Survival Mechanism, if you happen to get overwhelmed. Linking this in a CWDT Setup is great. Conversion Trap can be similarily used to thin down Packs. That way you have to deal with less Mobs at a time. Maybe link it to Increased Duration if you can. Q: Why the fuck would you play with Hopeshredder? A: Why not? It can clear all Content and got a bit of a Unique flavour. It was fun taking this underused Unique through everything the Game threw at me. I can really recommend this Build, even tho stronger ones (like my BF/Reave Cold Conversion) exist. Not everything is about 100% optimal setups. At least not for everyone. Q: I heard Hopeshedder used to be shit? A: No, I cleared all Content with it before the Buff, as you can see in the Videos. That said, here are my thoughts on it before said Buffs:
Spoiler
Q:
What are your overall thoughts on the Weapon? A: It does not deserve the total neglect it receives, in a sense. It performs just fine and has some cool Quality of Life Benefits if you can build around it's downside. That said: for being such a uniquely designed, high level, Boss specific Item with a strong Downside, you'd expect it to outperform similar weapons without downsides. More Crit Chance or, if the Property Text would get too long like that, simply stronger Benefits per Frenzy Charge would make it actually worthwile. Q: Namely? Which ones outperform Hopeshredder, without Downsides? A: For whatever reason, Windripper busts it out of the water. Even an average rolled one beats Hopeshredder on this Build, with exactly the same Gear and Tree. If you roll it a bit above average, and adapt the Tree, Skills and Watchers Eye (drop Survivalist and Purity of Ice, add Wrath and a Wrath Crit Jewel) it completely outperforms Hopeshredder DPS wise (PoB is here). Yes, Hopeshredder clears faster due to movespeed (and maybe stronger Heralds) and has some defensive Benefits, but that kinda gets countered by the Degen. And yes, Windripper costs more and is rarer. But a Weapon that has extra juice in the form of Quantity on it shouldn't straight up beat one that requires building around such Unique downsides. Q: What about Elemetal Overload (EO)? Since this a low Crit Bow. A: It is very much not worth it. Q: What about Lioneye's Fall? A: I don't consider it as worth it.
Explanation
It's only a marginal Damage gain, going from 331k Shaper DPS per arrow to 337k, 340k or 345k depending on what Notes we drop, compared to the Current Tree. Dropping Forces of Nature is the bigger Damage Hit, but dropping Heartseeker with its 2 crit Nodes before makes the Crit feel worse. Dropping Flash Freeze is the smallest DPS loss, but will feel really bad because you also lose the Proj Speed. Regardless of which 3 pointer you drop, you also drop Ballistic Mastery, which adds a lot of QoL/makes the Build play smoother, and Vitality Void. So for a very Marginal DPS gain for a couple of EX, you'd lose a decent chunk of QoL from Proj Speed, have less reliable Crit (which feels bad), and most of all lose the stronger Leech from Vitality Void. Vitality Void offers +3% of max Life to max Life Leech Rate, which is a significant Boost to the strength of our Overleech. Which in turn makes dealing with Hopeshredder Degen easier, and also adds more Security overall. So no, I don't consider it worth it at all. Q: Have you considered pathing from the Duelist Start? A: Yes, but I don't go for it due to these Reasons:
Spoiler
Pathing from the Duelist Start is a Life and DPS increase, but a small one. I gain about 100 Life and 15k Shaper DPS per Arrow, which is okay, but loose a lot of Crit Chance and Proj Speed. Now, while the DPS is technically better the lower Crit Chance is definitely noticeable while Mapping and on Bosses alike. Together with the slower Proj Speed (more Delay between firing RoA and the Arrows landing) and stronger Degen from Hopeshredder due to 1 more Frenzy Charge, this makes for a very suboptimal "improvement" that feels worse in every area of the Game. If you wanna test it out yourself, here is the PoB posted in the Guide with a Duelist Start: https://pastebin.com/u2Ze0UnM From newest added to oldest: - Ready for 3.5 - Added Hale Negator and an (almost) perfect Delve Rare to the Helmets (ty Eaglecent) - Removed Ralakeshs Uber Elder disclaimer, as it became irrelevant with buffed Hopeshredder - Added 2 socket Bubonics to the Gear Discussion - Added a rare Elder Amulet (max Life Leech Rate) to the HC Choices - Updated PoB Links - Updated Videos for 3.4 - Added Ichimonji Setup and Crit Mitigation to the Delve Tips - More emphasis on the second Post in the Introduction - Added Scourge Arrow Enchant Trade Links to the Gear Section - Swapped "Build Variations" (now first) and "Delve Tips" in the 2nd Post - Added a Scourge Arrow Setup - Added a Note about taking the Duelist Start to the FAQ - Added a Barrage+XYZ Setup - Updated Movespeed and HP Numbers - Reworked Belt Trade Links to accomodate new Delve Mods - Removed the 3.4 Notes from the 1st Post, been there long enough - Added Lioneye's Fall to the FAQ - Expanded on the Delve Notes a bit - Added Pandemonius and a -x% to Cold Res Helmet to Gear - Reworked Trees for Unnatural Instincts - Added Disclaimer to keep Rares updated - Updated all Hopeshredders to a newly divined one (for the new buffed Version) - Added Tips for very deep Delves - Shortened every Link, was at the maximum (50k) Char Limit before - Some Typo and Structure Changes - Added a lazy RoA levelling Segment - Updated everything for 3.4 and the huge Buffs - Added Gem recommendations to the Mapping Gear segment. - Added low Budget Alternatives to Trade Links (tho you can adjust that yourself actually) - Added thoughts about the Weapon, EO and Loreweave to the FAQ - Added the Purity + Empower Setup to Gemlinks, forgot about that too :D - Added Ralakeshs and Jaws of Agony to the Bossing Gear - Added "Added Cold" as a Link, actually only Had 5 links posted :D - Minor Typo fixes From earliest ETA to latest: - Farruls Fur Variation - PSA about mr fuckface - Trade Link for good Quicksilver - Add Doryanis Delusion - Update Build Variations PoB (and Images?) - Add Depp Delve Pushng PoB  Lastly, thanks for taking interest in my Guide :) While this is not the strongest Bow Build in existence, it was fun building around a completely neglected Unique and taking it through all Content. Maybe you share that Fun with me! I'm always down to hear constructive Criticism and answer questions. Hope you have a nice day everyone :) . Last edited by Guffinn#6759 on Dec 7, 2018, 9:45:00 AM
|
|
|
Oooookay, all done. Build Guide is finished now :)
.
|
|
|
You are probably one of my favourite PoE "builders" simply because your posts are always so well designed. Definitely trying this build!
|
|
" Haha, ty man :D Lets hope the Builds are as good as the Guides look :P At this point I have a rough outline/structure I can use and adapt per Build. Just gotta remake Banners and the Tree Image. And obviously write the Guide itself. Gonna wait for the Patchnotes before doing another Build tho, wanna see what happens. As a Note for this Build: it's certainly a cool one IMO. Always fun to build around non-meta/"trash" Stuff, especially when it turns out good. Obviously you could go ele hit and have more DPS etc., but this is a fun playstyle and Hopeshredder etc. is dirt cheap :P If you really decide to play it and need some help along the way, drop me a reply here. .
|
|
|
Hi Dude,
iam Glad to see someone else playing Hopeshredder. I play it last league. For counterdegen it helps a lot if you have "1% Life Reg then Moving" in Abyss Jewels. But nice build ! :) |
|
" Ty man, its a fun weapon :) That method wont Work for this Build, as we Take Vaalpact and have no Regen. But yeah, you can counter the Degen by Just stacking Tons of Regen, but I prefer to get more offensively useful stuff on my abyss Jewels personally. Its Always cool to hear from Others doing similar builds tho :) . Last edited by Guffinn#6759 on Aug 18, 2018, 4:57:48 PM
|
|
|
Hey cool build.
Deciding between this and Cyclone for my 3.4 build. Also thinking Craiceann's Carapace instead of Kaom's Heart. Think a setup like this would make it one of the stronger builds for the Delve mines. Last edited by Eathb#4744 on Aug 19, 2018, 4:27:15 AM
|
|
" Hey man, ty for the kind words :) Personally I think RoA will perform nice for Delve, as the corridors are kinda narrow. That means the radius gets drastically reduced, and more Arrows hit the same target. And you basically hit everything there is to hit at once :P Using any of the Beast things depend on the availability of the Cards that grant them. Maybe they turn out to be super rare. And the Crab Barrier playstyle only really works out in conjunction with the other Craiceanns Items. The Helmet is kinda counter intuitive as this is not a block Build. Boots can be easily fit in tho, and offer some much needed consistency for the Barriers. The Gloves are cool, but the damage and Life from Tombfist can't be beaten. Would be a huge Damage hit to use them. That said, it's a cool thought to add more Tankyness. Gonna see how it works out :) Keep me updated if you decide to play the Build for Delve. . Last edited by Guffinn#6759 on Aug 19, 2018, 10:50:54 AM
|
|
|
Hey so I'm trying this build in Standard as I have some of the gear for it. Waiting for the Incursion merger as I have no currency to buy Might of the Meek jewels. Character is WRRRRYYYYY
I'm only lvl 71 but my thoughts so far are: - When Frenzies are up and RoA is destroying the entire area, then this is amazing. Good for gotta go fast, good for safe mapping, having Hopeshredder go HAM is nice. - Sustaining the cold res flask gets used to as I'm not running any life flasks - I have no idea how I'm going to fill the INT requirements. - Not sure if I'm doing something wrong but I'm having mana issues. I'm used to spamming my attacks and maybe I'm missing something but I don't think you can do that with this build. - Plan is to 6L the Hopeshredder when Incursion merges, I'd like to put in another 6L for supplementary damage. I wonder if a 6L blink arrow is a thing. |
|


