


An extensive guide on Chaos-DoT Spells ft. ED, Bane & Co [3.14 rdy]

Recent-Updates
14.04.21 Patchnotes 3.14 section
12.01. 3.13. Updates are in. Curse section updated. Weapons section expanded, renamed to Gear, has more affix-info and shield-info. Minor improvements. 16.-10.-17.09. Updated all available 3.12 news. Updated many things Bane related due to the unexpted nerf :( 03.09. 3.12 section added (infos still scarce though), updated example trees, added arcanist brand analysis, condensed trap/mine-analysis and general polish/condensing 13.08. Support Gem section condensed while having actually more information. 17.06. Added 3.11 changes. Added Unnerve to stuff that doesn't help us. 17.03. Added 3.10-section, polished Wither and Hinder section 20.01.20 Expanded Wither Section 6 (Withering Step is nice). Deleted Leech-Section (wiki explains it better than I did) 11.12. added 3.9 changes
To-Do-List
1. Alternate Gem quality
2. Cluster Jewel section 2. Add Influence-Affix section (maybe a whole new section on highest-end-gear...) 3. Write up more of my chars to example builds This guide condenses all the infos you need for any chaos-DoT-caster, so that you know what you are getting yourself into and what to look out for. It can also serve as a point of reference whenever you reconsider things in your build. Or maybe you just want to finally understand how this character you copied from a build guide actually functions ;) I keep the guide beginner-friendly explaining the main Chaos-Damage-over-time mechanics (CDoTs) before diving deeper. I try to keep the tone light and link items for visuals whenever possible. Nevertheless you will occasionally run into a wall of text. About me: I fell in love with my Bane-Occultist in 3.6, took a break from real life, played way too much, tried out quite a lot of stuff and continued playing CDoTs ever since. Most importantly I made several mistakes along the way, which you don't need to repeat and I spent a while comparing numbers which you might want to skip, too. So here is my knowledge condensed into this guide. I don't claim to be an expert, I just sank my share of hours into PoE, the Wiki and Path of Building and I believe I learned something worth sharing along the way. I read all comments and every question, praise or constructive criticism is much appreciated :) Your input is what keeps me motivated to update this guide since 2+ years. Table of Contents 0. Prelude and Patch Analysis 1. Basics 2. Gear 3. Active Skill Gems 4. Support Gems First reply post: Specifics P. Passive Tree Example 5. Curses 6. Wither and Hinder 7. Example Builds Very specific topics 8. Spectral Spirits: The ultimate hipster option 9. Ascendancy Overview 10. Totems 11. Brands, Traps and Mines and Chaos DoTs, a stupid idea Second reply post: (F)aQ and older patch changes 0. Prelude
What's-only-in-this-guide-and-what's-not-in-this-guide
Most information in the guide can be found elsewhere but in a less structured, all-in-one-place-style. These are the topics that afaik have not been covered anywhere else:
A deepdive on pure Blight vs Blight + Cast while Channeling + Soulrend vs Soulrend (Section 3) An indepth analysis of Bane (Section 3) and Empower (Section 4) ALL viable options to apply the curses a chaos-caster needs (Section 5) This is not in the guide: a) Chaos attacks. I'll focus on spells only. b) Very basic game principles (more vs increased, resistances, ...) c) ES vs Life vs Hybrid (CI, MoM, LL, EB, Dodge,...) Too build specific and this is not a build guide. d) Soulrend-Builds with focus on flat projectile damage. If anything I say in this guide also applies to those builds: It's a coincidence :) e) Grammar that is free of mistakes as I'm not a native speaker. Brace you'reselfs
3.14-changes
Vaal Blight has 7s (from 8s) Soul Gain Prevention. Besides Fireball and Spark it is the only effectively unbuffed Vaal Skill :(
Nothing else happened for us. One could say that is a good thing in this nerf-heavy patch. For example the nerf to Frost Bomb and Wave of Conviction means an easy 10% less damage on most elemental builds. Furthermore 100% Exposure uptime is more difficult with the Trigger-Wand-Cooldown-Increase. So yay, all remains intact.
3.13-changes
Trickster finally stopped dodging nerfs. 50% incr. damage on Patient Reaper is gone as well as spell dodge chance on Escape Artist. Other minor changes and a Ghost Dance rework (slight nerf?) also happened. No devastating changes but definetely nerfs.
Update: Ritual is probably the most Trickster-ED-Contagion-friendly content ever released. Occultist got an immense undercover buff. All the numerical / obvious changes are minor imptovements(e.g. DoT multiplier replaced by more damage). What's insane is that you can now skip Profane Bloom and go directly for Malediction. Exploding some corpses and ignoring hexproof is nice, but now other ascendancy nodes are viable alternatives. Occultist got slight buffs when MANY Ascendencies got nerfed. This makes 3.13 an even bigger buff if you compare Occultist to overall Ascendancy power. Hierophant lost 6% increased Damage per Enemy Killed by you or your Totems Recently of Pursuit of Faith. Hiero always was a niche option for a CDoT caster that wanted to include powerful Blight/Soulrend-Totems. There are still MoM-EB-Shenanigans available (EB+Arcane Surge is nice), but overall this will be a suboptimal choice in most cases. Contagion's radius is reduced from 20 to 17. This means 15% less radius and is a signifikant nerf. It's cool that Essence Drain remained unchanged. Imo GGG precisely hit ED+Contagion where it was overperforming (area coverage, clearspeed) while leaving ED intact as a main or supplementary single target skill. Alternate Quality was changed/nerfed on an abundance of gems, especially auras. Efficacy can be used on level 8 already and scales slightly slower per gemlevel but (thank god!) has the same lv20 damage. No other skills, items or affixes used by us got touched. We unfortunately dodged all skillgem buffs. I would have liked a buff on Bane after it got hit in the crossfire of 3.12's curse rework. Hexblast got buffs in case you want to take a break from CDoT but stay true to chaos :) Conclusion: I am 100% biased and I like the Ascendancy changes because in the past Occultist (my personal favourite) often felt inferior to Trickster. Now both are more on par and top tier choices for CDoT Casters. ED+Contagion as one of the best leveling / mapping skills got nerfed and is less powerful than before.
3.12-changes
Afaik no new builds popped up combining flat chaos damage with DoTs.
The whole curse rework (hexes, marks, doom) has no effect on overall power levels, just on game mechanics. Curses are either Hexes or Marks (and ofc still Curses). Marks change significantly and will only ever apply to one target. No enemy can have multiple marks ever. Self-casting hexes grants Doom and thus increased curse effect. Self-Casting remains clunky and even self-casting a single curse should still be avoided. Bane is caught in the crossfire of some of the curse changes as it only has a hex tag. Nothing essential is hit but several options are removed (e.g. Vixen's Entrapment). Spellslinger has 30% Mana Reservation Override at gem level 1, down to 25% at gem level 20 (from 20% at all gem levels) and slight increase in cooldown. Enfeeble no longer causes cursed enemies to have reduced critical strike chance or critical strike multiplier. This is a huge and rather unexpected nerf. The passive tree changes are significant and for all the details I recommend checking out the patch notes. It's quite a list. Our overall power level seems unaffected but tree locations changed and skills were added. The north part of the tree (which was sometimes skipped) is now even more expendable since it no longer harbours the +1 curse notable. A lot of notables had Doom-related stuff added. 1. Basics for all Chaos-DoTs 1.1 General mechanic-info
Bulletpoints
Since you only need to cast a skill once every few seconds, Chaos-DoT-builts can be honest self-casters and still spend a lot of time dodging enemy attacks.
Most chaos spells deal DoT and some deal flat chaos damage in addition. The flat damage is insignificant DPS-wise for most DoT-builds, but: Chaos DoTs do not hit, so they don't trigger any on hit effects like leech, blind or curse on hit (unless they also deal flat chaos damage, in which case only the flat damage part will hit). Forget everything you know about poisons. They are chaos DoTs but they use very different mechanics than chaos DoT spells. Applying the same Chaos-DoT twice does not increase the damage, Chaos-DoTs do not stack. But applying two or more different chaos-DoTs can be a very effective way to scale your damage against bosses. The exception to the rule is Blight, since the gems description explicitly allows it to stack. Examples: Chaos-DoTs don't stack (Contagion) unless stated othwerise (Blight). Poisons are entirely different as stated before. Other points: a) No chaos-caster ever worries about reflected damage. There is no chaos-reflect in the game. Wohoo! b) Our damage over time is unaffected by crits (if your chosen spell can crit at all). There is no workaround for that in the game. c) There will be Purple. Lot's of purple. I like purple. You like purple. This is a chaos-spell-guide. If you don't like purple, you came to the wrong place. This point is not up for debate. 1.2 Damage scaling (and how not to scale)
The-most-effective-stuff
Chaos DoTs do profit from increased Damage, increased Chaos Damage and increased (Chaos-)Damage over time.
All spell gems that deal chaos-DoT actually have the line "modifiers to spell damage apply to this skills damage over time effect" This line is absolutely crucial because "damage over time" is actually a different damage source than "spell". So bottom line: Increased (spell-)damage is nice as usual. Chaos Damage over time multiplier (CDoTM) is a great damage scaler, basically one nice more-ish multiplier. I've elaborated on this in Section 1.3 but the jist of it is: 30 CDoTM + 15 CDoTM + 40 CDoTM on your char = 85% more Damage, nice. The most common sources of CDoTM are the passive tree, affixes on wands/staves/rune daggers or June crafting it on any weapon. Withered is a debuff that makes enemies take 6% increased chaos damage and can be stacked up to 15 times. That means 90% increased Damage taken! While you usually will have some additional sources of increased damage taken (Despair curse usually), this is an immense damage buff. All "decreased/increased damage taken" is added up and forms one damage multiplier during damage calculation. It's a very valuable stat. Because stacking Withered debuffs takes a moment, it's usually only relevant against rare mobs and bosses, the rest dies too fast anyways. Section 6 deals with Withered in greater detail. Usual sources are the Occultist ascendency Withering Presence or the skills Wither or Blight (+Spreading Rot jewel), often accompanied by Spell Totem Support. Withering Step can also be used to apply lots of withered fast, but you need to get close. Our lack of ele/phys damage eliminates many auras/curses, but Despair and Malevolence are auto includes in most builds and Zealotry can be considered (but just for the 15% more spell damage, not because of the crits). While several ascendancies can be used, Occultist and Trickster are the mainstream ones. For more details on ascendancies check section 9. Recap: We scale DPS mainly with a) increased (spell-) damage b) CDoTM c) Withered d) The usual caster stuff (Arcane Surge, Support Gems, sometimes a "Spiritual Aid" notable, ...)
WARNING-these-things-do-not-work
Chaos DoTs do NOT profit from Area Damage and Projectile Damage, even if the gem has those tags. These will only buff the flat damage which contributes very little to our total damage output.
Projectile Speed, additional Projectiles and Area of Effect work if the gem has Area / Projectile tags. Example: The following support gems all have an effect on Soulrend but they do not affect Soulrends damage over time:
???
Your projectile / area effect will apply a debuff. This debuff applies damage over time. Not the projectile, not the area effect.
Unnerve (a debuff that makes enemies take 10% increased spell damage) does nothing for us, because we deal damage over time. DoT is not spell damage (although all our gems say "this skills damage over time is affected by spell damage). "Adds x damage to spells" and critical strikes also do not affect our damage output.
Increasing-flat-damage-is-useless
„Huh, this item is not good for my DoT but it still helps my flat chaos damage.“ NOOO!
In lategame less than 10% of your total damage will come from flat damage. "Adds x damage to spells" is basically useless, added elemental / physical damage might even be dangerous, because it enables taking reflected damage. (Some niche build might break this rule, 99% of chaos casters won't.) Added damage has literally no effect if your spell doesn't hit.
Critical-Strikes-are-mostly-useless
First of all: No hit = no crit.
Soulrend and Essence Drain are the only chaos DoT spells that do hit, see Section 4. Second: Crits affect only the flat damage of Soulrend and Essence Drain. And our flat damage is borderline useless. 1.3 Our best friend: Chaos damage over time multiplier
CDoTM
Since 3.6 (with an update in 3.8) we have Chaos Damage over time Multiplier (CDoTM). Since 3.9 weapons can have a general Damage over Time Multiplier on a suffix. DoTM works just like CDoTM.
All applicable damage over time multipliers are added together and form one kinda more-multiplier. This will lead to minor diminishing returns, but CDoTM is absolutely great, grab it if you can! Let's assume we have 40% CDoTM on our weapon, 20% CDoTM through the Occultist ascendancy Withering Presence and 8% CDoTM on the notable Corruption in the skilltree. This will result in 68% CDoTM and thus in 68% more Damage. Which is great. As I said, different sources of CDoTM add up instead of multiplying. WOULD they multiply, this example would result in 81% more damage (1.4*1.2*1.08=1.81).
Rule-of-thumb
If you are at 0% / 100% / 200% CDoTM, each added % CDoTM
will give you it's full / half / one-third value as a %more multiplier. 0% CDoTM -> add 1% CDoTM = 1% more damage 50% CDoTM -> add 1% CDoTM = 0.67% more damage 100% CDoTM -> add 1% CDoTM = 0.50% more damage 200% CDoTM -> add 1% CDoTM = 0.33% more damage 300% CDoTM -> add 1% CDoTM = 0.25% more damage 0% CDoTM -> 1% more Damage = add 1% CDoTM 50% CDoTM -> 1% more Damage = add 1.5% CDoTM 100% CDoTM -> 1% more Damage = add 2.0% CDoTM 200% CDoTM -> 1% more Damage = add 3.0% CDoTM 300% CDoTM -> 1% more Damage = add 4.0% CDoTM
This-sounds-a-lot-like-"increased"-damage?
It's the same formula.
But: Since CDoTM is much rarer (and consequently has lower total values on your char), it is much more effecive than increased damage. Example: A level 90 character might have 300% increased Damage and 100% CDoTM. This would lead to: 10%more = 20% CDoTM = 40% increased Damage You are evaluating different gear/passive tree options for your character? I definitely recommend to look at your exact values in your PoB and adapt the equation above accordingly. Depending on your tree, gear and ascendancy, your final CDoTM value will vary. But: ---- No chaos-DoT built shall ever leave it's hideout without CDoTM ---- You can get CDoTM from skilltree passives and from weapons. Only Wands, Rune Daggers and Staves can roll a CDoTM Prefix. Jun can craft CDoTM on any weapon at a lower but decent value. Other sources of CDoTM are some influenced rares (hunter amuletts, shaper gloves, ... you should only consider these for min-maxing) and the occultist ascendancy.
One-image-explaining-all-about-passive-tree-CDoTM
Picture is from 3.6, the overall route is the same and I'm too lazy to update this, sry.

Do-I-need-all-those-nodes?
 You don't have to, but it's recommended. Giving up the least effective CDoTM-cluster results usually in at least 10% less damage. Method to the Madness is the most skippable cluster. 2. Gear
Weapon-bases
(Good wand with some useless affixes, more examples in the next section)
You have a lot of room for adapting to your personal preferences when it comes to weapon choices in Chaos-DoT builds. This overview is kinda in-depth. Tl,dr: Get a wand, two wands or a staff. These options can roll a CDoTM-Prefix: Wands: Spell Damage implicits (or cast speed, which I don't recommend), can roll CDoTM, have all the caster-stuff and even have a slim chance to get you +1lv to all chaos spell skill gems (global, not socketed!). My personal favourite. Ignore all passive tree wand nodes. Dual wielding Wands: We get some block chance and are relatively unaffected by the other dual wield bonuses. We get the double increased Spell Damage implicits and twice the wand affixes. Dual wield tree nodes are optional and ok. They often buff cast speed, which is QoL but doesn't scale your damage. This is a high damage option with some drawbacks in defense. Wand+Shield grants a significant health pool boost (life or ES), high block chance and some nice passive tree nodes (for shields, not for wands). Great if you like surviving. Sacrifices some DPS but clear speed remains intact. You can use Shield Slam and consequently Fortify Support (must have). Intelligence shields also can roll spell damage or even +1 to chaos spell gems, but that is not budget friendly alongside a good life roll. If you're life based, look for decent armor or useful implicits. There are some really nice influence mods. Top-end-example with a bad implicit: Staff for a second 6L, allowing you to combine 2 Chaos-DoTs for maximum Damage output at the cost of survivability. Higher CDoTM-values than Wand+Shield. Can have up to +3lv to all chaos spell skill gems (global!), but that's super rare. Has access to Fortify since it's a a melee weapon. Shaper staff can have a "supported by cast while channeling"-prefix, allowing a pseudo-7-link in such a setup (preferably with Blight and Soulrend). This is an aggressive option. By going staff you are deciding againt high defenses, since your off-hand will be empty (one slot less for expanding health pool and defenses). The block chance from the staff implicit does not compensate for this (although it is nice). These options get CDoTM only through the crafting bench. But they have other advantages: Bows have almost no access to spell damage affixes, but can have +1 to all socketed gems (and then you multimod from there -> not a budget option). Bows allow high additional gemlevels on one 6-link skillgem. Comes with a Quiver for defenses but does not have block chance. If you're life based, consider dodge. Brings a second six-link to the character at the cost of some defenses. Melee weapons (dual wield or with shield) have access to Fortify Support (20% less damage taken from hits) and to movement skills like Whirling Blades. Melee weapons will need a Jun craft for CDoTM. This is rarely the best option. Most melee weapon implicits are useless for us, so for bases you'll want to look at: Sai Dagger for 6% additional block chance or Tiger Hook for 6% chance to Dodge Attack Hits. Rune Daggers can have wand affixes, Implicits are crap though (crit chance). Some melee weapon corruptions are nice (Runedagger/Dagger 50-60% increased Damage over time, stuff with charges), but fishing for a specific corruption is kinda insane.
Weapon-Affixes-featuring-Shaper-Wands
These are your top priority affixes:
1. CDoTM: Craftable, but T1 or T2 natural rolls are a huge DPS-boosts. 2. +x to chaos spells: Only +1 on wands, not on budget gear but great. 3. Increased spell/chaos damage: Craftable. High values possible :) Too rare to care (usually): +1 to spell skill gems: Obviously great but ridiculously rare. Damage over time Multiplier: The only good damage-suffix, which can give you an easy 10% more effective damage. Realisticly it's never rolled alongside the more important affixes above. Good wand with maximum CDoTM roll: Almost mirror-tier harvest wand from 3.11 (Unnerve doesn't do anything): Shaper wands allow you to fit soo many pseudo-gems in, it's amazing, especially since we are always socket starved. Wands can roll all these affixes: Controlled Destruction + 40-60% Spell Damage; Faster Casting + 10-16% cast speed; Spell Cascade + 6-15% AoE; (consider the +2 of socketed support gems craft and lv4 Empower) Some examples (first one is unrealistically well rolled):
Rare-or-unique-weapons?
Rares are better.
Breath of the Council is a trap since it's high increased spell damage does not compensate the lack of CDoT and a useful implicit. Cerberus Limbs with a high armor shield will be cheaper but worse than a good wand with a high ES-Shield, unless you do something crazy with it (see my Hierophant in the build section 7). Dark Seer is an almost decent defensive option. Cane of Unravelling is good on a budget but should be replaced at some time. The +2lv is nice, CDoTM is good and increased Damage is lacking. The Power Charge stuff doesn't do much for chaos casters. 3. Active Skill Gems
Cheatsheet:The-Ultimate-Overview
The details are in the following section, here is a quick overview of lv20 gems.
3.7: Bane Damage should be 895.6. 
Active-Gems-DPS-and-all-their-features
While the chaos skills are quite different in how they work and what they bring to the table, they will ALL share a lot of mechanics. This makes the base numbers very useful to compare the skills, because all skills will get the same 400% increased, 350% more, 100% CDoTM, 100 % increased damage taken, +x levels shenanigans that the lategame and one to one hundred exalts provide.
So here is a list sorted by lv20 DPS + significant side effects + indepth details in the spoilers. 1994.3 DoT Soulrend Does Hit. Pierces all targets. Projectile. Homing shots. 4% ES-Leech. Best DoT-DPS at the cost of really (!) short Duration
Details
Each pierced enemy counts as one hit and will proc leech and stuff.
The projectile can't be intercepted since it pierces. Quite nice off-screen range. Has a high mana cost. Includes 4% ES-leech. Homing shots: You don't need to click the enemy, just his direction. Moving enemies rarely escape the projectile. Can shoot around corners, which is rarely useful and always fun :) The piercing helps in clearing and with at least 3 projectiles this is a good clearskill. Dying Sun is a very elegant solution but not budget friendly. It maintains a high DPS since you won't need to replace %more-gems with Greater Multiple Projectiles (or something similar). (Note that GMP's %less projectile damage modifier does not apply to the DoT though). The DoT has a very short base Duration of 0.6s. Also quite a high mana cost added on top of the fact that you need to recast this very regulary. Even given a little skill effect duration and Temporal Chains, you will end up with less than 1s effective duration (+ the time the projectile aoe hitbox needs to leave the target). Increasing Duration speed helps (tree, gems, Malevolence). Blight + Cast while channeling Support + Soulrend is kind of a workaround. Avoid increased projectile speed whenever possible unless you are fine with perma-casting! Juns craft "Trigger socketed spells when you use a skill" is NOT a viable way to maintain the DoT, since it comes with a 4s cooldown (and there isn't enough cooldown recovery speed in the game to fix that). Conclusion: Best DPS and free ES-Leech but the very short Duration requires frequent casting. Shooting homing projectiles feels great. 1503.2 DoT Essence Drain Does Hit. Tiny AoE. Projectile. Provides significant life regen. Single target, can be transformed to mob clearer.
Details
Great single target damage and 8s duration on bosses without any investment (given Malevolence and Temporal Chains). Allows smooth cast-once-then-focus-on-dodging-playstyle against bosses.
Can be easily intercepted by mobs or miss a moving target. Can be made into a mob clear skill with Contagion. If this is viable / clunky / great depends on the content you are running and is the center of many debates. See the Contagion skillgem section below for more info.
How-the-life-regen-works
The life regen works in an interesting way, but it is a significant amount nevertheless. I will lazily quote the wiki here: "The amount of life regenerated from the debuff damage caused by Essence Drain is calculated solely off the final amount of outbound damage dealt by the skill, not the damage inflicted on an enemy. An easy way to calculate the amount of regen provided is to multiply the tooltip amount of debuff damage by 0.5%. This will give you the amount of regen that Essence Drain will grant you per target effected. This means that using methods to increase the enemies received damage from sources such as Despair, Wither, or the Occultist Void Beacon notable does not influence the amount of regen provided by Essence Drain." 500 life regen per enemy affected is totally doable. Pretty nice. Don't forget to pick up the Zealoth's Oath Keystone if you are not life based to gain a sweet energy shield regen. (I don't recommend The Sorrow of the Divine, my chars tend to leave the consecrated ground within 0.3 seconds.) Note that the regen works "per target effected", meaning one Essence Drain will trigger multiple regens if applied to multiple enemies (hi Contagion). Conclusion: Great mob clear especially in densely populated areas if used with Contagion. Great single target skill to supplement other chaos spells (Bane, Soulrend). The very juicy duration allows you to spent your time dodging attacks but comes at the cost of 25% less damage compared to Soulrend. 1100.8 DoT at least: Blight + Cast while Channeling + Soulrend, up to 3546.1 DoT Channeling Spell. Requires being stationary on occasion. Loves Spreading Rot Jewel. ES-Leech. It's complicated.
Deepdive
Why-Soulrend-is-the-best-CwC-option
Soulrend has the highest DPS AND great utility (piercing, hitting, ES-leech). It's drawbacks of cast time, mana cost and short duration are compensated or eliminated by the mana-free and fast trigger intervalls of CwC.
Bane or ED don't come close.
How-I-came-up-with-these-Damage-numbers
It's Blight plus Soulrends DMG divided by 2, because:
You will use 3 Sockets instead of 1 to set the skill up. Thus you will loose your two weakest %more-multipliers from support Gems because you don't have an 8-link. You loose round about 100% more-multipliers this way, e.g. Void Manipulation and Swift Affliction. So to compensate for not multiplying by 1.44*1.4 we have to divide our tooltip-damage by roughly 2. Damage loss is higher if you have to cut Empower lv4 or Efficacy. Btw Empower Support on one skill will result in the same %more-multilpier as supporting Blight+Soulrend. Damage Blight (9.5 stacks) = Damage BcwcS (9.5 stacks) = Damage Soulrend DMG startup speed: Soulrend > BcwcS > Blight Max. Damage: Soulrend < BcwcS < Blight Soulrend will deal it's full damage on first hit, while Blight needs time to stack up. 10 Blight stacks are the breaking point at which Blight is superior. The CwC-setup takes the middle way of both worlds. Staves can roll "socketed gems are supported by cast while channeling". This will increase the damage potential of this setup, but you'd have to go for a very offensive weapon while being stationary a lot. The Cast while Channeling Gem excludes totem use. Soulrend DoT will be up permanently if you don't stop channeling due to the fast trigger intervall. It will stop pretty quickly though if you have to start dodging attacks. Adding Soulrend comes with the advantage of having ES-leech. CwC+ Soulrend will apply a good amounts of hits (remember: Blight itself does not hit) enabling stuff like a curse on hit ring. Soulrend has insane range while Blight has microscopic range, so now you can actually apply some long-distance-DMG while selfcasting Blight. The CwC-setup is less mana-hungry than a pure blight setup. Adding the CwC+Soulrend will reduce the effect of cast speed on your DPS, since only the Blight-portion of your damage profits from that. Infused channeling support is less effective in an CwC+Soulrend-setup since it does not buff Soulrend directly. Conclusion: Blight + Cast while Channeling + Soulrend does more damage if and only if you stack less than 10 Blight stacks. If Blight has 10+ stacks, pure Blight would deal more damage. The CwC-setup adds a lot utility though (range, leech, lower mana cost) and can be on a 7link with the right Staff. 895.6 DoT Bane Does not hit. Will apply linked curses. Linked curses increase Duration significantly and function as %more-DoT multiplier. Kinda has a curse tag.
Details
Bane is a great way to clear packs and apply one or multiple curses through self-casting. This has the advantage to apply the curses at long range and to be very uncomplicated (no exotic gear needed to apply curses, no mana reservation for Blasphemy Support).
The top 3 curses usually are: Despair, Temporal Chains, Enfeeble, but more on that in the curse section 5. Linked curses must not exceed curse limit (Bane itself does not count). Linking a lot of curses (3+) will result in diminishing returns on damage. Bane works even as a 3-link-clearskill in a onehand weapon, given some pseudo-gems in a wand. Banes tooltip-duration is very misleading. A linked Temporal Chains and one more curse will result in 15+ seconds duration (10s+ on bosses), which is basically forever. Great AoE, especially if linked to Spell Cascade Support. Then it will kill every trash mob between your target location and you (+ half a screen behind that + some area behind you and everything in between). Reduces damage but still clears trashmobs quickly. For single-target (bosses), you'll usually want to include a second skill. Bane with Essence Drain added vs Bosses is nice, since it has good damage while still leaving you with a lot of free time to dodge attacks. Bane as your only damage skill can work, but: For endgame bosses you'll need good gear, you won't kill Bosses fast and you might need to do some gemswapping. Enhance on Bane for increased effect of applied curses sounds great. The effect just isn't big enough and it is even smaller on bosses ("less" curse effect). Don't do this. Conclusion: Excellent mob-clear spell, even on a 4L. Great to apply curses. Will take quite a while to take Bosses down, usually you'll want to add a single target spell on top. Bonus round / Deepdive (I just love this spell): a) Banes curse tag = Curse ?!
Spoiler
This requires a surprisingly long answer.
Bane will profit from curse cast speed, increased area of effect of curse skills and increased curse duration thanks to it's curse tag. Increased curse effect will not affect Banes DoT directly. It's still nice for all your other curses in your built though. Grab it as often as you can. Blasphemy Support as well as Doedre's Skin will simply disable Bane. No second Death Aura through Bane-Blasphemy :( Bane does not count towards the curse limit. E.g. Curse limit = 2, Bane+Despair+TempChains works. As mentioned before, casting Bane will trigger all curses in Vixen's Entrapment.
Spoiler
Bane is a slot-efficient way to apply curses through self-casting. These curses also buff Banes damage, but additional curses have diminishing returns. 47% more: First linked curse 32% more: Second linked curse?!?!?!
Spoiler
These things add up instead of multiplying seperately, which means we have a %more multiplier with diminishing returns. Run for cover, math incoming:
Base Damage * 1.94 (94% more, 2 curses linked) = Base Damage * 1.47 (1st linked curse) * 1.32 (2nd curse brings this to the table). 24% more: Third linked curse
Spoiler
Base Damage * 2,41 (141% more, 3 curses linked) = Base Damage * 1.94 (1st and 2nd curse) * 1.24 (3rd curse brings this to the table). 19,5% more: Fourth linked curse, you see where this is going... The major point to consider here: I could have a higher %more Damage on Bane, but: a) It will cost gemslots for the now unapplied curse (let's call him Enfeeble for now) b) You'll need a way to apply Enfeeble (self-casting won't do imo) c) Enfeeble will loose the increased curse effect that is Banes quality-stat d) Enfeeble might loose support gems that were meant for Bane but also profited the curse (Empower, Enhance, ...) Curse 1 should always be linked to Bane. Curse 2 should usually be too (my opinion, this IS controversial) Curse 3 and beyond sould be applied through other means, unless you are willing to take the damage hit. 257.4 DoT-DPS Blight, can stack 20 times for 5148 DoT-DPS!!! Does not hit. Channeling Spell. Requires being stationary on occasion. Loves Spreading Rot Jewel. Has a Vaal version.
Spoiler
Blight is rarely played as a selfcast skill since it requires too much stationary time and has the shortest range of all our chaos-DoT-spells. Totems are often the way to go. But:
Selfcasting Blight can be used for massive single target damage. And Vaal-Blight-Mapper are a thing. IF you can apply 20 stacks, this is Soulrend on steroids. Usually you will apply less than 20 DoT-stacks though. Blight applies withered with the Spreading Rot jewel. If you use Blight, that threshold jewel is an auto-include. Duration is once again longer than the tooltip would make you think, given you use Temporal Chains and Malevolence: 6s on Bosses with 2.5s Hinder, 9s and 4s on mobs. Further investment into increased skill effect duration will influence this. Hindering for 80% is insane. Blight is the only chaos DoT that kinda scales it's damage with cast speed since you will be able to stack the DoTs faster to maximum. There are useful channel-nodes on the tree and the Unshattered Will unique shield should be considered. Blight is hard to apply, since it needs a more stationary and less dodgy playstyle and has limited range. Stacking 20 times on my current character will need 4 seconds of stationary casting. There are four ways to handle this. Some form of d) is usually the way to go, but I suspect all options are viable: a) Scale cast speed b) Somehow become a facetank-built c) Don't apply the max. DoT and focus more on DoT->Dodge->DoT->Dodge... d) Do a little bit of all those. Also adapt to the situation (e.g. map has -max resistance -> more dodging). Spell Totem Support and Multiple Totem Support are very viable options with Blight. See Section 10 and especially the Blight-Totem-Spoiler in Section 10 for all the Details. Conclusion: Channeling makes this a very unique Chaos-DoT and will need a fitting playstyle. Potential damage output and 80% hinder makes the hassle worth it. 235.9 DoT Contagion Does not hit. Upgrades Essence Drain from single target to mob clear. Loves increased AoE.
Spoiler
Useful only in combination with Essence Drain! Utility, low DMG.
Loves increased AoE. Intensity Support does not affect Damage but provides biggest AoE-bonus. Do not link to Spell Cascade Support; Cascades only the initial cast and not the spreading. Not worth the less AoE. Essence Drain + Contagion works as a mob clear but you'll need to cast twice as many spells as most builds. Like... 2... This feels clunky in areas with low mob density. And it feels amazing on dense areas or on certain league mechanics (best Legion clear imo, nice in Delves, ...). Tarke Cat explains why he considers Contagion a great skill, feel free to form your own opinion: https://www.youtube.com/watch?v=z3RVohQ4NEM Honorable Mentions: Death Aura is a Chaos-DoT-Aura granted from the Death Oath body armor.It allows you to clear mobs simply by walking around. DoT is 562.5, but support gems and damage scaling is interesting because the DoT does not scale with spell damage but does scale with aura effect. Definetely a cool and unique choice imo. For more info I'd recommend checking a build guide (this skill has been covered extensively by others, thus I'll skip it here). I found this guide by GhazzyTV to be very comprehensive and the intro is really entertaining :) https://www.youtube.com/watch?v=pPW4RjkNAHE Withering Step is not a damage spell but will be covered in my Withered spoiler (section 6). Desecrate: Utility rather than clear/damage, fits somewhere else rather than here. Summon Chaos Golem: I like him. Will grant up to 5% physical damage reduction. Basically no damage output without investing into a Summoner Build. Herald of Agony: Remember, I told you Poisons are something totally different. On a serious note: This thing needs lots of hits to work and we apply some few low-damage hits if we hit at all.
Which-Skill-Gem-should-I-use-while-leveling?
Bane or ED+Contagion.
Before-level-24?
Whatever you want. I used just what I felt like.
Ghazzy TV has a guide (https://www.youtube.com/watch?v=1yQhV2hLOuk&t=32s) in which he recommends: Start with Freezing Pulse until you get Essence Drain and Contagion or Blade Vortex or Storm Brand 4. Support Gems Tier List Recently reworked this section to be much more condensed while keeping all the information.
Tier-List
These are our top 5 support gems for damage in any 6link (with two gems excluded for now) with the strongest on the left and the weakest on the right:
Efficacy provides a whopping 48,4% more damage (the two more-multipliers give compound interest) and skill effect duration, making it our best choice. Swift Affliction is the only gem here with drawbacks: The reduced duration can hurt and the dexterity requirement is high-ish. Consequently you might prefer Void Manipultion in your 4link despite it missing 5% more damage. The "drawbacks" on all gems except Swift Affliction are 100% irrelevant on chaos casters. Energy Leech is significantly weaker than the others. Avoid whenever possible.
Details
There is currently no overleech for ES leech in the game (Slayer leech can not be transferred to ES leech). This means if you are at full ES you will not gain the 39% more but only the 24% more. Soulrend rarely benefits from even more % of dmg leeched. Bane and Blight don't hit. Essence Drain applies very few hits.
Don't use this gem, unless you use Soulrend and some other shenanigan supporting this (e.g. Eldritch Battery or Blood Rage while being a life based char).
Soul-Tether?
From the wiki: "[...]Soul Tether causes Life Leech instances to recover Energy Shield while remaining Life Leech." So this does not activate the "while leeching" energy shield bonus. If you have actual ES-leech on top, it will leech a lot but also end when reaching full ES since the Soul-Tether-Overleech is not real ES-leech.
26%-to-75+%-more-damage?!
The exact %more-numbers this support gem provides vary because +x lv on your active skill does not come with a fixed %more-damage. +1lv = 13% to 14% more damage kinda works.
A lv3 Empower is around 28% more damage and rather cheap (but also rather bad). It sometimes beats out an Energy Leech Support. A lv4 Empower is around 42% more damage, which is nice but also costs several exalts. Empower massiveley profits from +lv to socketed gems. Bows, influenced chests and Junes/Catarinas craft +2lv to socketed support Gems for weapons are common sources. Empower beats out every support gem for damage by a large margin if you can get it to an effective level of 5+. A lv6 Empower is around 75% more damage (lv4 and +2lv to socketed support gems from Catarina).
Which-skill-profits-most-from-Empower?
This is the order of usefulness of Empower per skill:
Blight << Vaal Blight < Essence Drain < Soulrend << Bane < Bane + Curses Blight scales significantly less damage per level (but gets additional AoE). Banes base DoT scales a better than all others. Bane overall scales a lot better if it is linked to curses, since these will also get bonus levels and since the multiplier-per-curse increases.  The differences between Vaal Blight, ED and Soulrend are minor and could be neglected.
Is-Empower-only-about-damage?
Mostly yes.
Bane, Blight and Vaal Blight scale AoE with levels so Empower will add AoE on certain levels. If you use Bane, you will also scale the level of any linked curses.
31%-or-39%-or-53%-more-damage
Two more-Multiplier amplifying each other, wow. Less chaos damage taken while channeling, ok. Infusion grants 10% more Chaos Damage for all your skills, yehaa.
52.9% more: Blight selfcast (compound interest of two more multipliers) 39.0% more: Blight + Spell Totem (you won't get Infusion, this equals Void Manipulation Support) 31.4% more*: Blight + Cast while Channeling + Soulrend (bad on it's own but Infusion will grand 10%more damage for all your other chaos skills) *52,9%more on Blight and 10%more on Soulrend averages at 31.45%more. 20% quality does not buff the damage but reduces the time until you get Infusion by 0.4 seconds. Note that this support gem will not affect Vaal Blight. This covers all you need for your 4link or 6link damage-wise. Now let's get to the bad ones, the pitfalls and the utility gems. Tier 3: Bad, don't use! 10% more: Arcane Surge Support (could give up to 42,8% more, but it won't)
Spoiler
If something gives you Arcane Surge (there are a lot of sources) it will apply the lv1 Arcane Surge Support effect. This grants 10% more spell damage for all your spells.
Level 20 Arcane Surge Support would grant an effective 42,8% more multiplier to the supported spell (among the other benefits of the support gem) but would basically require you to spend 400 Mana on said skill every 4 seconds. Few builds can realistically keep this up, especially since Chaos-DoT-caster often spend little mana or do not cast repeatedly. Selfcast Soulrend can consider this option though. Blood Magic or Eldritch Battery don't work with this. Blights "upkeep" mana cost while channeling doesn't count either. Bane and ED have a long duration and won't be casted repeatedly. Any caster profits from having Arcane Surge, you should find a why to include it in your setup. Linking it to a gem that cares about damage is usually not the way to go.
Spoiler
This mechanic... gosh... It looks like it adds roughly 50% more base damage to any chaos-dot. But it doesn't, because Decay does not scale with spell damage. This will include stuff like Controlled Destruction Support (44% more spell damage), stripping Decay off several more-multipliers.
You need to hit (ED, Soulrend). Decay has a looooong Duration, which is nice. Decay will not be spread by ED+Contagion as it is a seperate debuff. On a budget Decay might not be an awfule option, but with increasingly good gear (->increased spell damage), this gem will fall off hard. Maybe it can be tier 1-2 on a char that specifically specs into chaos damage instead of spell damage. Don't put Decay on a skill that is not one of your main damage skills, e.g. Storm Brand+CwDt+Decay(+Blind) sounds reasonable but since decay will than also lack damage support gems. It's DPS is laughable. If this don't-use-disclaimer wasn't enough for you; I have a section on Decay in my (F)aQ. 0% more: Slower Projectiles Support (do not take!)
Spoiler
54% more Area Damage sounds nice until you rememeber that you read in Section 1 that our spells are not affected by Area Damage. And our DoTs are not affected by projectile Damage.
Slower Projectiles can be nice if you get it in an item for free (e.g. can roll on Shaper gloves) to prolong Soulrends uptime. Tier U: Utility, not damage related but sometimes useful Occasionally you just want a bigger area of effect on Bane or Contagion. Intensify has no effect on our damage over time! ED doesn't need AoE, Blight is usually single target anyways and Soulrend prefers addtional projectiles support. Spell Cascade is great on Bane for mapping. It cuts our damage almost in half if we replace a damage support with it. Usually still worth it for extreme area coverage (offscreening!). Uselesss on Blight, Essence Drain and Soulrend. Don't link Spell Cascade to Contagion, it will Cascade only the initial cast but still reduce the AoE for spreading.
Awakened-Gems
See next post.
Let tomorrow be about solutions. Today is about vengeance. - John Oliver Had a Chaos-DoT-Caster-guide for any class, then 2021 patches happened^^ https://www.pathofexile.com/forum/view-thread/2485596 Last edited by Lightelder#6734 on Apr 14, 2021, 12:11:14 PM Last bumped on Apr 14, 2021, 12:14:51 PM
|
|
|
Awakened-Gems
Awakaned Gems are on level 1 are strictly more powerful than their normal versions on level 20, only Swift Affliction has a small drawback. Fully leveled they are similar to the normal support gem on lv25, but some come with an additional big perc.
Awakened gems usually cost 1ex+ (or 10ex+ for the more desired ones). They also take an eternity to level up. Only available if you spend a lot of time on PoE :/ These gems receive upgrades which I consider ridiculously powerful: Awakened Curse on Hit: effectively +1 curse limit. These are improvements to our damage support: Awakaned Swift Affliction: +5% more damage, 10% CDoTM (instead of 0), 25% reduced skill effect duration (instead of 15%), which is a serious trade off. Awakaned Void Manipulation: +5% more damage, +10% increased chaos damage Awakened Controlled Destruction: +5% more damage, +10% increased cast speed. These are QoL improvements to gems used in some builds: Awakened Spell Cascade: adds additional areas left and right from casting point (Bane will LOVE this). Usually one of the top 5 most expensive awakened gems :/ Awakened Increased Area of Effect: +5% increased AoE, 14% more Area Damage (from 0% but we don't benefit from this stat), superminor improvement
Support-Gem-Tier-List-including-Awakened
For more detailed descriptions, check the first tier list.
??% Empower 52.9% Infused Channeling (only on Blight selfcast) 49% Awakened Controlled Destruction 49% Awakened Swift Affliciton (comes with +10CDoTm and 25% reduced skill effect duration) 48.8% Efficacy 44% Awakened Void Manipulation 44% Controlled Destruction 39% Void Manipulation
Spoiler
This is a rather traditional Tree for a life-ES-hybrid Occultist from 3.11 Harvest.
My main skill is Bane with ED and Blight for bosses. Possible adaptations: a) Vary the timeless jewel or replace the timeless jewel for a very large ring Threat of Hope. b) Remove one or two cluster-jewel-cluster for useful other notables. c) Grab MoM and go life+mana+ES or add EB for life+ES (again cutting the Timeless Jewel).  This is a somewhat exotic tree from 3.9. It's a Hierophant using Bane, ED and Blight-Totems plus MoM+EB (ES protects mana and part of life damage is taken from mana thus es). Nowadays I wouldn't include the bottom right chaos cluster anymore but get the full scion life wheel or cut some stuff to add a cluster jewel. 
Spoiler
The top 3 curses usually are: Despair, Temporal Chains, Enfeeble. If you can apply 3+ curses, make sure to apply all of these. I don't recommend Punishment for the Debilitate debuff, but if you find yourself able to apply 4 curses, maybe consider it. Note that all bosses have less curse effect mods on them.These are usually used only for charge generation. Stat requirements increase significantly per level, but you rarely need gemlevel 20. Don't increase your dex/str just to add a higher gem level for your mark.
Specific builds might utilize other curses, these 5 fit for most chaos-DoT-caster. So how do we curse properly? There are a couple of options. They each have pros and cons. With one exception: You never want to self-cast defensive/utility curses. And you almost never want to selfcast offensive curses, but maybe it's sometimes ok for despair if everything else fails. Curse-on-hit-rings are the mainstream choice. Some options work like auras, which implies limited range.
Bane
*Hrmpf* No, this is totally not self-casting curses. This is just self-casting a skill with a curse tag which coincidentally... ahh whatever...
Casting your curses automatically along your trash-clear-skill is just smooth. Linking 3+ curses to Bane will sacrifice damage (diminishing returns result in poor %more-dmg compared to %more-damage-support-gems). This is not a problem if you use Bane mainly for clearing trash alongside a good single target spell. Check out Section 3 for all the details on Bane.
Vixen's-Entrapment
Does no longer work with Bane since 3.12, as Bane is now a hex skill, not a curse skill.
Can be used to self-cast one curse and auto-apply the rest. Not optimal but the easiest way to get 3+ curses on an enemy without Bane.
Mark-Of-Submission
Plain and simple, but mostly a budget option. High-end characters will find a more efficient way than sacrificing a whole ring slot.
Make sure you actually hit regulary.
Curse-on-hit
Make sure you actually hit regulary. Sources: Curse on hit Support, Aberrant Fossil on a weapon, Glove-corruption, influenced rings, there might be more. Put's restrictions on your gear.These are great options.
You won't get a lv20, 20%Quali curse this way. That's ok, because bosses have less curse effect and thus the difference between gem levels is low. You can ofc go the whole way: 1 curse + This occupies a whole 4L and can fit only one curse in. I don't recommend this route, as it takes too much a toll on your gemslots.
Blasphemy
Reserves 35% mana per curse or needs the right Impresence / Solstice Vigil Amulett. With these Amuletts you may want to link support gems for free to that curse!
Blood Magic Support allows you to reserve life instead (but roughly doubles the reservation). This is a viable option on low life builds.
Flasks
Witchfire Brew can free up gem slots but will not have quality on your Despair and won't profit from increased effect of your curses or increased effect of flasks. Since Despair is purely offensive, you won't rip if you mismanage and don't have it up all the time.
Comes with 40% increased damage over time, some evasion and a small blinding smoke area on top, which is very nice.
Trigger-socketed-spells-weapon
Great option but hard to acquire. You don't want to miss out on damage prefixes on your weapon, so you need to multi-mod or you need an insane weapon with all damage-prefixes rolled naturally (hello Harvest).
Arcanist-Brand
Good option to apply 3 spells easily but still requires some self-casting.
Wither
I mentioned a 90% increased damage taken in Section 4. That is the result of the maximum 15 times 6% increased chaos damage taken through 15 stacks of withered.
As long as you care about single target damage at all, you'll ave to include some means to apply withered. These are your options: Blight + Spreading Rot Jewel, Wither-Totem, Withering Step, Selfcasting Withered (only Totem builds). If you use Blight anyways you'll want a Spreading Rot Jewel. Note that investing a jewel socket is significant though (juicy 6% ES/life and 4% NaCDoT on other jewels). Do not use two Spreading Rot Jewels, this only buffs the hinder duration further and is not worth it. Wither + Spell Totem + Multiple Totems (+ Faster Casting) allows you to apply withered pretty rapidly with 2 or 3 totems but uses several gemslots. Only this setup allows you to leave and do other important stuff after applying your DoTs and placing totems. Some of the endgame bosses will kill these totems very regulary, so you'll need to replace them a lot. Why not use Blight-Totems instead? Blight has too short a range for our fragile totems (unless you actually ARE a totem built) and Blight lacks effective damage-scaling on a 4L-totem. Can be done, but needs more support than just the gemslots (unlike Wither-Totems). See Section 9 for further info. Here is an example of how to squeeze in a 5L-Blight-Totem for a nice damage boost (maybe get a +1 totem shield on top): Withering Step can apply up to 7 withered stacks instantly at lv21, which is nice. This can actually be used to constantly and without any casting time apply 14 stacks of withered. Strategy: Link an Increased Duration Support and make sure that the enemy is cursed with Temporal Chains (debuffs expire slower). This will grant you a skill effect duration of over 6s (even against Shaper and other bosses with 66% less curse effect). With a cooldown of 3s on Withering Step you can now apply 14 stacks of withered permanently. Casting every 3s takes some getting used to (but you do not need to be precise against anything without 66% less curse effect, because the withered duration is much longer on those enemies). And you need to be close to the enemy most of the time, which is difficult for some builds. If you want to go totally overboard, get a helmet enchant for +3 withered stacks. Withering Step shares a cooldown with blink skills, so (flame) dash interferes a bit. Be aware that both the withered-application as well as the elusive buff end as soon as you use another skill. Furthermore the cooldown only starts after the skill has ended, so in order to apply withered twice in 6s, you'll need to cast withering step followed by another skill. Casting it while channeling something works really smoothly. The Occultist Ascendancy node Withering Presence applies 1 Wither per second just like that. A nice variant that will spread some withered even during mobclearing where you usually don't have the time for this (cze Mobs die too fast). Takes 15s to stack 15 Withered though and you need to stay nearby. Additionally you might want different ascendancy nodes more (I do). This is one only makes sense if you are a chaos-DOT totem built and have taken the Ancestral Bond Keystone (+1 totem, you can't deal damage yourself), but then it's nice. Since you can't deal damage anyway, you might wanna spent your free time self-casting Wither, which has the chaos gem tag, giving you Chaos-Infusion. And while totems can not gain Infusion they "obviously" still get the 10% more chaos damage buff if your character gains Infusion. And then there is the Withering Touch Support, which would need a skill that applies a lot of attack hits (which we don't have). Emphasis on attack and on hits. Plus this does not apply Hinder. If you are interested, I have dedicated a section to an idea I actually cooked up 100% by myself: Spectral Spirits (effectively three permanent SRS Raging Spirits). It is totally hipster (NO ONE plays it yet). It's also not good, but maybe one day someone will find a way to make it work. For more details, check Section 8. The basic idea looks like this:
Hinder
Hinder is a different debuff that reduces Movement Speed. Only Spells can apply Hinder while only attacks apply Maim. I mention it here because most forms of withered come with some form of hinder. Hinder is really helpful to keep you dodging.
Reduced movement speed will not slow attack/cast animations on enemies. That would be reduced action speed (Temporal Chains, Chill). Blight will apply a juicy 80% hinder for a nice Duration with the first stack. (This will only happen if the target has no Blight debuff on it already!) Vaal Blight applies 80% hinder for a longer duration (3-4 times that long) and does not care about previous Blight stacks. The Spreading Rot Jewel increases the Blight hinder duration and even the Vaal Blight hinder duration (tested!). Wither-Totems will apply a less juicy 36% Hinder that will last as long as you have at least one totem firing plus some seconds. Aspect of the Spider hinders nearby enemies for 30% movement speed and increases damage taken on enemies. Aspects aren't auras, so this is unaffected by increased aura effect. There are some other ways to apply hinder (cluster and abyss jewels can provide hinder on hit chance), but these are the most common ones. From the Wiki: "If a creature is hindered by multiple sources only the strongest Hinder takes effect." So for example Aspect of the Spider won't override Blights hinder but also won't add to it. If you want to add Maim on top, you will need some form of attacks (maybe check out my Spectral-Spirits-Analysis in Section 8). The Occultist Ascendancy node Withering Presence states "Nearby Hindered Enemies deal 15% reduced Damage over Time" but it has no build-in hindering.
my-3.6-builds
Triple-DoT-Occultist-v.0.99
This setup is far from min-maxed but will map smoothly. For more refined set-ups check out the next two spoilers.

What-I-gained-and-what-I-sacrificed-in-my-setup
Squeezing 3 Chaos-DoTs in here allowed high Boss-DPS. While my built has a large healthpool (10k+), it is by no means a face-tank-built and including Blight is a bit greedy (not HC viable). I have died several times going for damage instead of just dodging and watching boss-health tick down.
I willingly sacrificed trash-mob-damage, since I use Bane with 2 Curses and Spell Cascade as clear skill. Great AoE, still kills trash reliable, but lv80+ rare mobs will need a Blight on top. The wand (pseudo-5L) freed up desperatly needed gem sockets. I have pumped this built to 12k Energy Shield before and it was nice. Right now, I prefer a defensive Focus-addition and some other utility, which leaves me at 10.8k ES but feels safer anyways (value > raw tooltip-numbers). Having Focus ready every 12 seconds to instant-recover ES and make me Ailment-immune without using flask charges or anything is GREAT. Especially burning damage as map / memory mod blocks ES-Recharge and my Ruby flask of Dousing often can't handle that alone. Flame Dash is my gemslot-efficient movement skill (+Arcane Surge) and I hate it. I might swap to a meekly 2-socket Lightning warp. Build does currently not: apply blind, have a 4th curse (Poacher's or Warlord's Mark), Endurance Charges, Maim. Build does include: 80% Hinder (Spreading Rot Jewel), Frenzy Charges (Gloves), Watcher's Eye with bleed immunity, CI,...
Skilltree

Jewels
Bow-Bane-Occultist-HIGH.budget
 Uber Elder, Cortex und Uber Atziri down deathless (Atziri took several tries, inadequate reflexes) Uber Elder, Cortex und Uber Atziri down deathless (Atziri took several tries, inadequate reflexes) Still experimenting on the skilltree, you can check my profile for the current version. I am not happy with the chests Gem-setup yet. I currently have 11.5k ES. Squeezing an additional 1k ES into this would take a toll on my dps. Gear is anywhere between 50ex and 80ex, dunno, acquired over several weeks. Ascendancies: Wicked Ward -> Vile Bastion is a no-brainer, but I am constantly torn between Malediction and the Withering Presence-route: Malediction: +1 Curse, Enemies deal 10% reduced Damage, 25% increased curse effect, ignore Hexproof, explode some enemies Withering Presence results in roughly 20%more Damage than Malediction-route, 15% reduced DoT taken, automated withered, makes enemy chaos damage irrelevant. Sounds better overall but it needs: +1 curse from somewhere. Doable but would lead to one otherwise useless ring slot / gloves and resis-problems. Also need Aspect of the Spider for Hinder. Core Item to make Low Life ES work (2 gem setups as examples, both not final):Bow with lv8 Empower (+7lv) and lv8 Enhance (+56% Quali). Results in lv30 Bane, lv29/30 curses all with 76%+ quality. Swap Despair for Spell Cascade Support + Witchfire Brew for mapping. (UPDATE: Did some analysis and discovered that Enhance is not worth it if you do a lot of Shaper/Guardians, better take a generic 40% more dmg support gem) Greatly reduces high damage rolls, greatly reduces Lightning Damage due to high DMG-span, 6% less Damage or something on average hits Capping resists, getting str/dex and ES. Reenchanted the boots roughly 50 times, not the desired result yet. Insane talisman, thanks Hillock. I actually prefer it to Chayula's (Chayu gives like 300 additional ES and would stop me from ever ripping to chaos damage).
Passive-Tree-and-Jewels
 My Jewels. Watcher's Eye is the best I would wish for without paying 30+ exalts. Intuitive Leap to reach the nodes Melding and Overcharged for cheap. Alternative / outdated jewels:
Wand-Bow-Weapon-swap-Occultist:safest+most.expensive
 This is my Bow-Bane-Occultist-HIGH.budget taken to the next level (big currency spent a new helmet and shield). This is my Bow-Bane-Occultist-HIGH.budget taken to the next level (big currency spent a new helmet and shield).I swapped to Wand+Shield since a) I like this setup. b) I could best abuse the available gemsockets (Wand is a pseudo-6L). c) I decided to start the grind from lv98 to lv100 and the occasional stupidity-rip can best be avoided with a shield. Focus is on clear speed, QoL and mapping. Finally parted from Malediction and ascended to Withering Presence (better DPS + I hate explosions) Battleplan: Cast Bane, plant down a Blight-Totem and replant when necessary, stay at safe distance. Against t16+ Bosses I'll cast Bane, weapon swap to bow, cast Essence Drain, weapon swap back to safer shield, plant totem. I have to wear an expensive bow and an expensive shield and had to make sure to socket auras in armor only. The result is a "free" 6L lv30 Essence Drain to skyrocket DPS whenever necessary. (Who said you have to sacrifice DPS for survivability?) For movement I walk on foot with Phase Run and 300% movement speed. Lightning Warp is just to jump over memory voids or rivers (rarely used -> no support gems). Weapon Slot 1, Vixen's Entrapment to reach 3 curses without Malediction (and Wand-Bane can't apply all curses alone), Bow+Quiver for weapon swap How to Low Life Passive Tree (zoom in, download or right-click -> show graphic)  Jewels Flasks (75% evade-chance just by blinding and flasks. Also covering missing immunities) Resistance/ES-gear Further min-maxing would involve some better corruptions, one rare item with a fossil-crafted abyssal socket and a synthesized ring with insane implicits (Arcane Surge, Onslaught on hit, that kinda stuff).
3.9-my-Bane-Hierophant-ft.-Blight-Totems
I'll first explain a straight forward version of the build, then show alternatives which scale mana and which I consider more powerful.
It's a life-ES-hybrid with Mind over Matter + Eldritch Battery (ES protects our mana). Bane is for clear, pseudo-5link-totems are great against Bosses. While Banes DPS-numbers do not impress at all, they still make for a good mapper with insane AoE thanks to Spell Cascade. I ended up with a 50% Mind over Matter and a comfortable 10k effective life. Known Deficencies: Watcher's Eye with "% of mana added as Energy Shield while you have Clarity" was beyond affordable for me this league. Atm the build lacks Arcane Surge, which is a disgrace and should be changed by anybody adopting this (ideally crafted on the wand). Flasks can be varied, Ascendancies could maybe be varied if one goes for a +1 totem shield. For more boss killing potential I'd recommend squeezing Bane into a wand with pseudo-links and 6linking an Essense Drain in the chest. Originally I planned to scale Mana. The version above is more straight forward, but after trying stuff out I'd say this is more powerful: Memory Vault + Cerberus Limb + high armor shield grants the quite unique combination of high ES and armor. Insane effective life pool at the cost of a little DPS. Cerberus Limb with a cast speed corruption would be optimal. Vaal Molten Shell was great for surviving almost everything (absorbing 13k damage). I recommend crafting "immune to ailments while focused" on your boots and adding "increased armor during flask effect" on your utility flasks for even insaner Vaal Molten Shells.
Builds-by-other-players
3.11-ED-Contagion-League-starter-Trickster-ft-Spellslinging
I haven't actually played this myself, but this guide is good. Guide contains the Spellslinging-Leveling-Setup and the non-spellslinger-version. The spellslinging version is even a competitive racing character. And Big Ducks is just a chill content creator :)
https://www.youtube.com/watch?v=-hcAO0V9Puo Earlier then 3.10:
Bane-Occultist-ft.Profane-Bloom-and-Herald-of-Ash-Explosions
mbXtreme made this nice build guide for a Bane-Occultist in 3.8 and he scales Explosions to make a great map-clearer.
Nice build, interesting concept. https://www.youtube.com/watch?v=Ay3Q1ArSTA4
My-nitpicking-about-improving-the-build
mbXtreme uses some Power Charge scaling and considering my math, that is a suboptimal way to go. To finetune his build, I'd recommend scrapping all the Power Charges from the passive tree (maybe keep the ascendency) and instead path all the way to the Corruption notable. This will result in slightly better damage, a free skillpoint for increased AoE for slightly better AoE and you will no longer need to anoint Corruption on an amulett.
Vaal-Blight-Magic-Find
Yep, that works. https://www.youtube.com/watch?v=IQV2wh_wpu0
Very specific topics: 8. Spectral Sprits and Withering Touch Support: A hipsters dream
Spoiler
The basic idea evolves around any Insanity-Weapon with Withering Touch Support. TlDr: If you look for something effective, look somewhere else, this is a work in progress ;) Essence of Insanity will grant the summon Spectral Spirits suffix to a Weapon. These are basically three immortal, permanent Raging Spirits (SRS) which actually attack. Thus they give us access to Withering Touch support and Maim Support. Since Chaos-DoTs builds rarely hit and rarely attack, this is an immense oppurtunity. Applying the withered debuff this way can: a) supplement Blight b) speed up the Withering Presence Occultist ascendency node (ough, 15 seconds, not for me!) c) replace Wither-totems without any casting, giving us more time to dodge. Furthermore the Spectral Spirits will catch some enemy projectiles flying around and could be used to apply blind or even curse on hit. Before you read on: I think that there is a way for this concept to make it into an efficient build. But I have not found one yet. If you care only about top notch builds, this section most likely is not for you. I refuse to let my memes be dreams and will continue looking, but atm this is not more (and not less) than an idea for experimantation and theorycrafting. Also note that this section is still in it's 3.6-state since I don't think anybody reads it. 3.8 might provide interesting new options.
Indepth-Analysis
If you just want the results, skip this entire spoiler. Warning: Math incoming.
Duration: Withering Touch Support with TempChains and 20% increased duration from Malevolence will buff the Wither-Duration. Increased curse effect for Temporal Chains will help further. The skill tree can not really help here (Spectral Spirits are minions and will not profit from things affecting just you). Let's see if we can stack 15 withered! 3 Spectral Spirits attack one target with their basic 2.5 attacks per second. I'll just assume the spirits have a 75% chance to hit, I actually got no clue on this one. Poacher's Mark would help here. Furthermore I assume we have a total 45% increased curse effect on Temporal Chains (quali, Bane, Tree). If you're character has largely different values, bad luck for you, you will have to adapt this math.
Too-much-math
Spirits * Attacks per second * chance to hit * chance to wither = wither stacks applied per second
3*2.5*0.75*0.25= 1,41 wither per second. Wither per second * wither duration = max withered stacks Wither-Duration is 7.51s / 4.88 on boss (reduced curse effect for Temporal Chains) resulting in 10.5 or 6.8 wither stacks applied. Not good enough... Adding 20/20 Faster attacks support: 3*3.8*0.75*0.25=2.13 wither per second -> 16.0 / 10.4 wither stacks Adding 20/20 Increased Duration Support (or a different source of additional 75% increased skill effect duration): 3*2.5*0.75*0.25*11.5 (new Duration) = 16.2 stacks 3*2.5*0.75*0.25*7.4 (new Duration on Bosses) = 10.4 stacks Faster attacks support and Increased Duration Support: 3*3.8*0.75*0.25*7.4 = 15,81 > 15 Wither stacks on Bosses, WE DID IT
The-one-part-where-I-make-assumptions-in-this
As mentioned before, all of this is based on the assumption, that our spirits will have a 75% chance to hit. This is basically my guess and I just hope this is roughly true. Increasing / decreasing this to-hit chance would be like a more/less-multiplier to our number of withered stacks applied per second. This would change the time we need to reach full withered-stacks. If this time exceeds the withered-duration, all this effort will be in vain as we won't reach the maximum of 15 withered-stacks.
They-can-apply-15-stacks-of-withered-without-casting-or-ascendancies
You'll need an Insanity-weapon with Withering Touch Support, Faster Attacks Support and Increased Duration Support as well as an active Malevolence and Temporal Chains with 50% increased curse effectiveness. If you only need the Spirits to supplement Blight or Withering Presence, you can skip that hassle and use the utility-setup in the weapon above. Same goes if you somehow stack significantly more than 50% curse effectiveness on Temporal Chains. The spirits will need 7s to apply 15 withered stacks on a boss (withered-duration will be 7.4s so we will reach stack-cap). The huge benefit is that you need to do nothing other then equipping the Insanity-Weapon with the gems (links aren't even necessary). No casting required. (I estimated that the Spectral Spirits have a 75% chance to hit which I hope is accurate enough.)
Spectral-Spirits-not-superuseful---yet---I'm-working-on-it
I have started testing and the results are not too promising yet. The Spectral Spirits fulfill a very niche role. They might fit into a build guide diving really deep rather than in a general guide. Especially because they need quite some investment to work properly.
Unless the Spectral Spirits also get Multistrike on top of the other stuff, they will apply wither only on bosses reliably and you can't even let the boss off screen since these guys really like to follow you. Betrayal encounters for example have too many mobs distracting them from the juicy targets. Other wither-options just seem smoother. But I am still testing stuff. Spectral-Spirit shenanigans in combination with self-casting Soulrend looks promising. Applying withered without casting gives you more time to keep Soulrends 0.4s-DoT up. And sometimes I dream about these Spirits in a 6Link, blinding, maiming and withering. This would maybe allow you to maim, hinder, chill and tempchain an enemy for the ultimate slow. I will keep you posted.
Spoiler
I've ranked all the ascendancies into tiers depending on how fitting they are for chaos-caster. If the pictures are too small, feel free to zoom in.
Tier 1: Natural fits with lots of power for our playstyle fitting for all chaos DoT spells.
Spoiler
Occultist: The CDoT-nobrainer, providing lot's of damage, an additional curse, chaos explosions and auto-withering. The once great ES-support of this Ascendancy was mostly outsourced to the general passive tree.
Witch has optimal acces to CDoTM tree nodes. The standard choice would be Profane Bloom, Malediction, Void Beacon and Withering Presence. Some players prefer Forbidden Power over Void Beacon: We have only very limited use for Power Charges, but in some playstyles you will never be nearby opponents, making Void Beacon obsolete. I don't recommend Vile Bastion for ES-support, even on ES-chars as it does not give additional ES. Trickster: The other CDoT no-brainer with lot's of damage, lot's of recovery on kill and Ghost Charges for an evasion/ES related defense boost. Patient Reaper, Prolonged Pain, Ghost Dance and Escape Artist is the usual way to go. Shadow has optimal acces to CDoTM tree nodes. 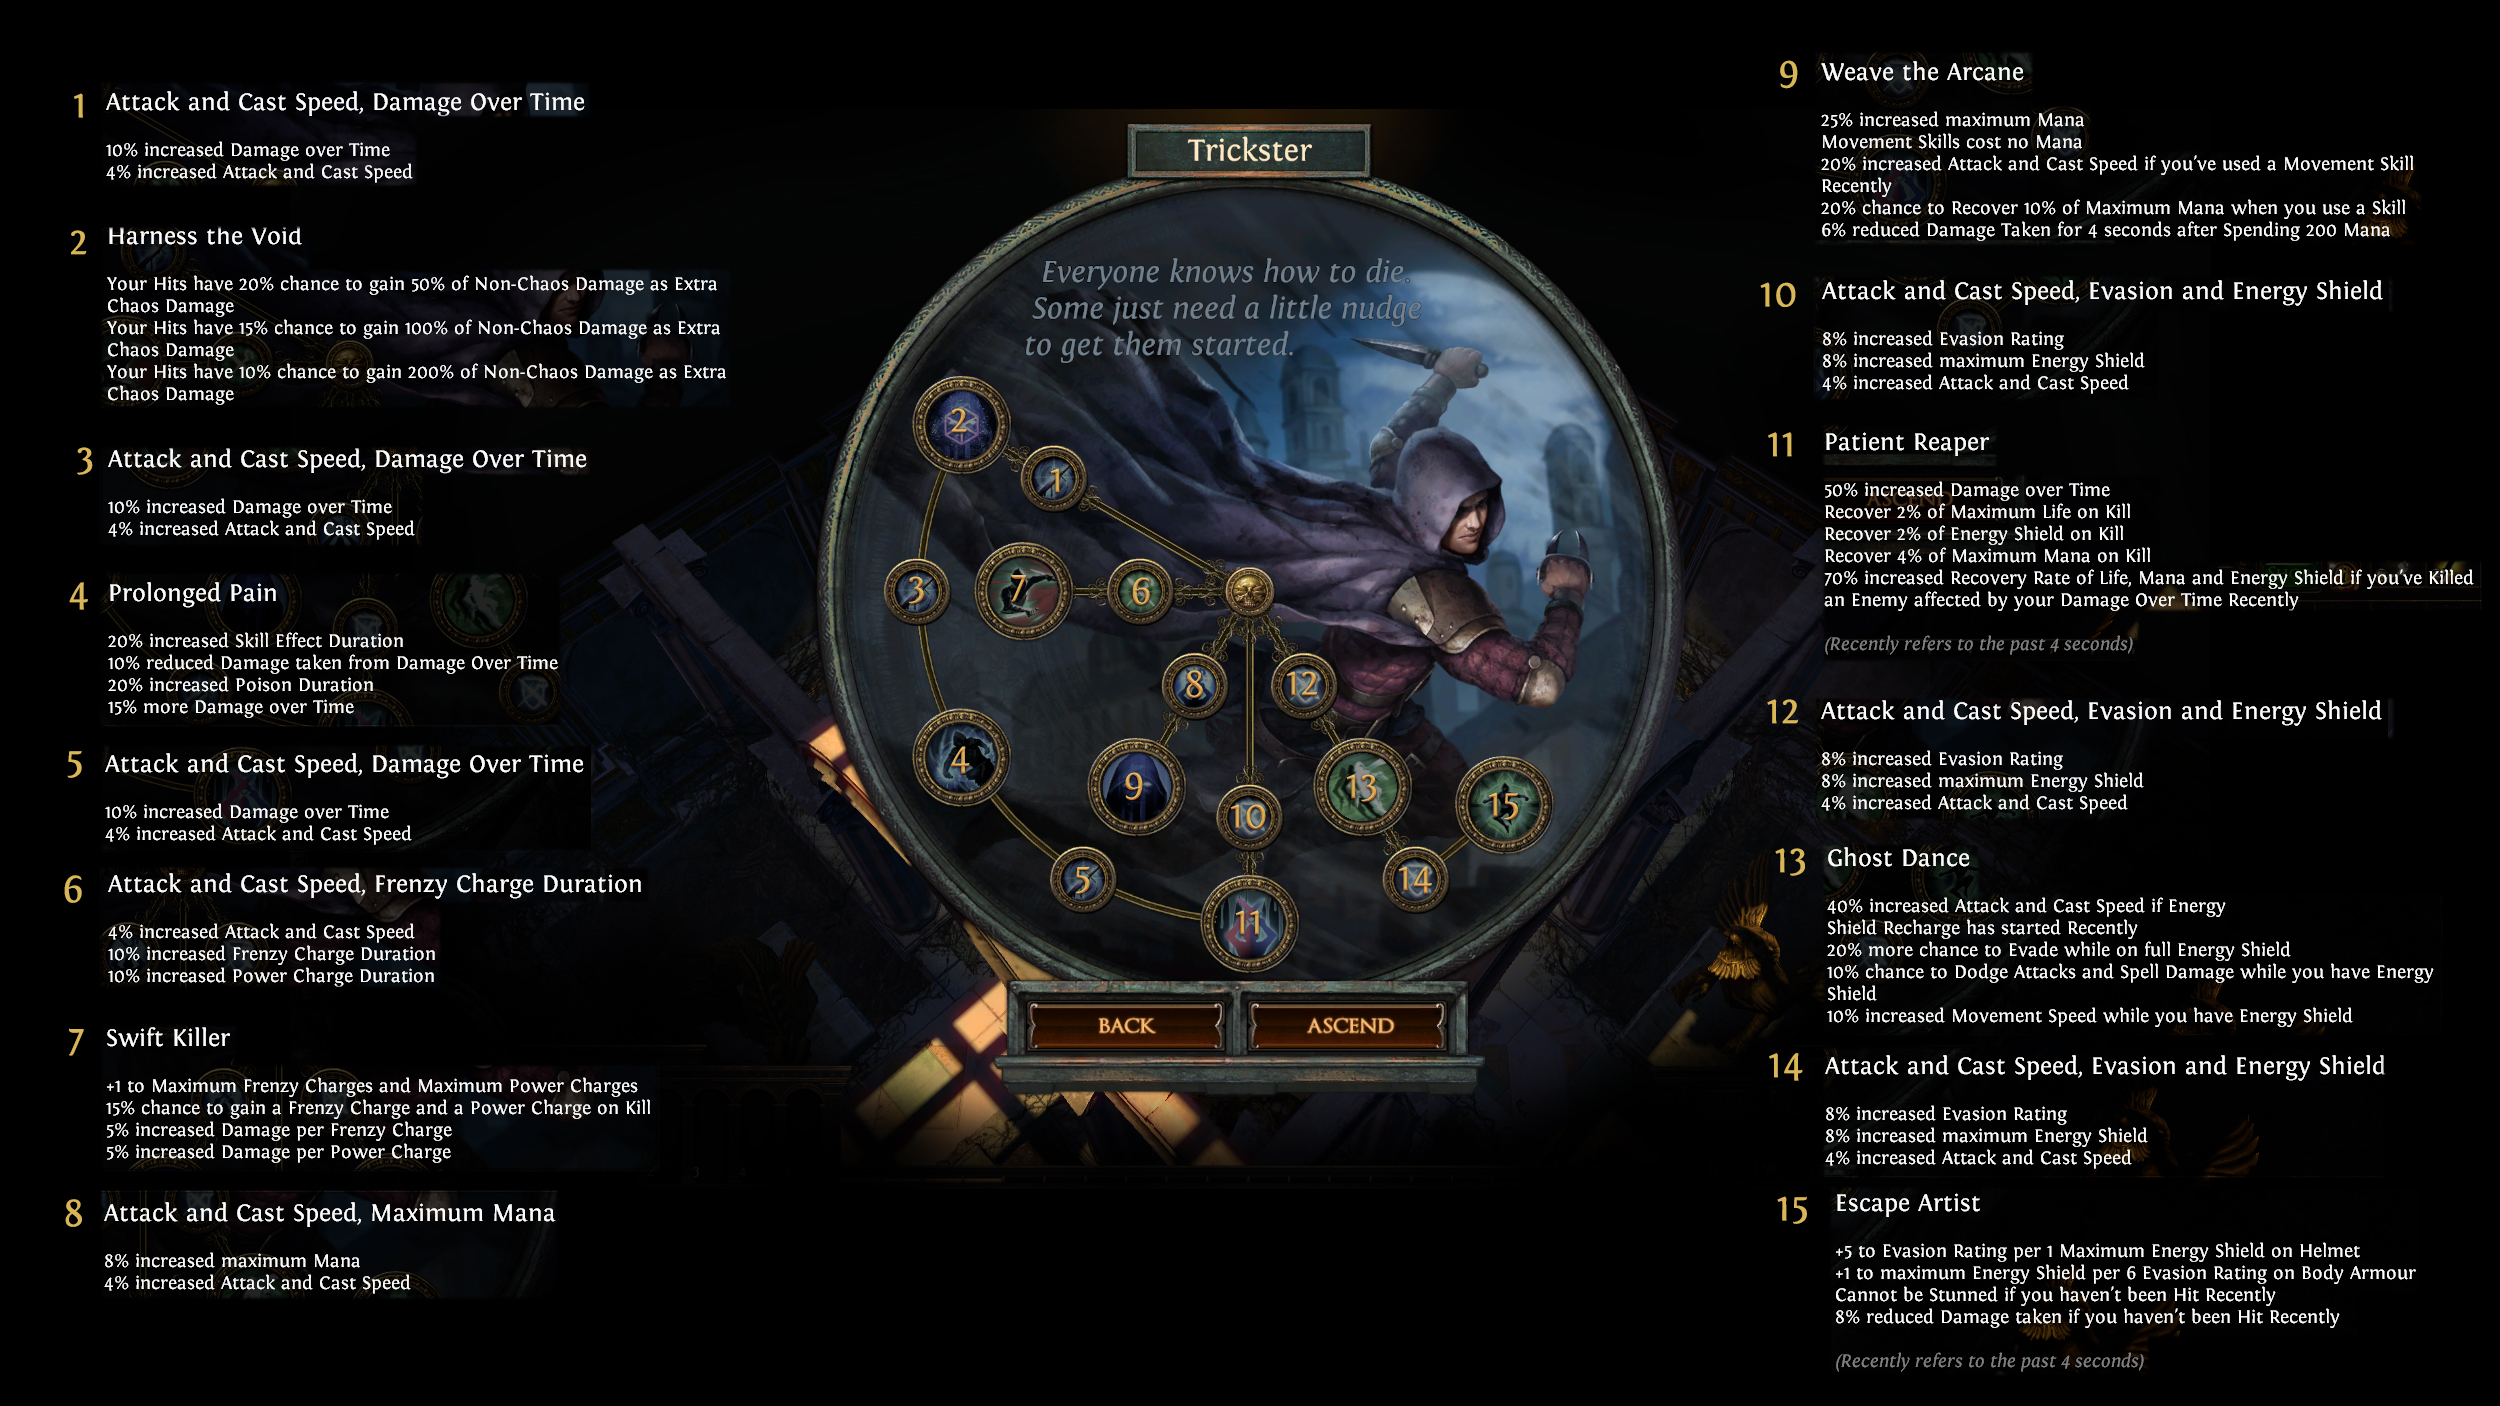 Tier 2: Usuable for specific builds Pathfinder provides a significant AoE+Damage boost (Nature's Reprisal) with a lot of flask synergy. While overall the defenses and offenses are lackluster, it can enable certain playstyles that make up for it. In section 7 I've linked to a Vaal-Blight-Magic-Find-Pathfinder. If you are up for the hassle of permanent flask upkeep, you could go ES-low-life with Coruscating Elixir. Allows for lot's of Auras and 30% more spell damage with Pain Attunement. The Ascendancy node Master Toxicist does not help us. Since the 3.8 patch notes CDoTM also affects poison. I sometimes toy around with the idea of a Soulrend-Poison-Pathfinder or Assassin, but it just does not compete with dedicated poison builds. Hierophant's +1 totem can be an option to go for a Blight-Totem build without sacrificing all that damage for Multiple Totem Support. You can even go full out totem with Blight and Soulrend Totems, an Ancestral Bond Keystone and a selfcast Wither+Infused Channeling for 10% more damage on top. It also provides an immense health pool if you go Mind over Matter + Eldritch Battery or just Mind over Matter without reserving all your mana. Mana scaling can also be abused for a lot of things. I have some example setups in my build section. Last but not least Pursuit of Faith provides 6% increased damage per enemy killed by you or your totems which can easily give you 100-200% incr. damage in dense areas, creating a smooth mapping and delving experience. Scion can be an aurabot with lot's of auras/curses and some chaos spell. Not recommended for single play as it can't compete with Trickster/Occultist in that regard. Juggernaut is maybe rather tier 3, but if you really hate dieing and are willing to spend a lot of passive points on pathing, you can do it. I once played a Jugg-Totem build and while the damage was mediocre, the tankiness was there.
How-I-Once-played-Jugg-Blight-Totems
I went for staff, wand+shield would be viable, too. Nowadays I would anoint Ironwood on an amulett for better totem survivability. Playstsyle is not the fastest, but it's HCSSF viable I guess.
 Tier 3: Inferior to other ascendancies or only for super niche builds. All other ascendancies. Inquisitor, Berserker, Chieftain and Raider have attacks or elemental written all over everything. Duelist's ascendancies might have some utility but lack synergy and have the worst passive tree position to reach CDoTM-clusters. Deadeye, Saboteur (see my Traps and Mines section), Necromancer and Elementalist just don't fit us. Assassin wouldn't be the worst but Trickster is strictly better (unless someone cooks up an Assassin-Soulrend-Poison build).
Spoiler
There are no "natural" Chaos-DoTs on Totem skills. There are no damage conversions for damage over time (since DoTs do not hit). This leaves Spell Totem Support as the only option, if we decide to play a chaos DoT totem. Damage over time that is applied by a Totem will profit from increased Totem Damage.
Spell Totem Support occupies a support gem slot that would otherwise provide you with roughly 40% more damage. The damage of your DoT-debuff will consequently be much lower than self-casting: 75% Damage at 70% cast speed (Totem) vs 140% damage at 100% cast speed (Self-cast) So why even bother? Well, Blight and Soulrend have high mana cost and require a lot of casting time to keep the DoTs rolling. Consequently you have less time to cast other skills or to dodge attacks. Or maybe dodging stops you from keeping the DoTs up, resulting in damage lost. So just let a Totem do the casting for you :) Cast while Channeling can not support Totems, so Blight+CwC+Soulrend-Totems are not an option. Essence Drain, Bane and Contagion have a long uptime and a low casting time, so they do not really profit from Spell Totem Support.
Blight-Totems
(About this specific setup: Vaal Blight will be used once by a totem, why not. If you had Multiple Totems Support, it still will only place one Vaal Blight Totem using Vaal Blight once. Infused Channeling will not grant Infusion to the totem but still provides 39% more Chaos damage.) Most Chaos-DoT-builds won't scale totem life or totem res. This makes Blight Totems really squishy since they need to be placed up close. I use them anyway, since they provide more maximum DoT than Soulrend, hinder for 80% and apply the withered debuff if you have the Spreading Rot Jewel. Totems have 40% Ele res. Purity of Elements could cap this (not an efficient option though) or maybe you run other Purity Auras anyways. Both will help you and your Totems resistances. Actually picking up the notable Primal Manifestation and anointing Iron Wood on an amulett can be considered for a significant durability and DPS-boost for totems. If you somehow get your hands on an increased totem limit (other than Multiple Totems Support), planting two Blight Totems is great to double the stacks per second. Shaper shields, Hierophants and Scions come to mind. Multiple Totems Support is also an option but has drawbacks. Use if your totems don't live long (or switch to a Soulrend-Totem). Using this support gem allows you to setup three Blight Totems (given you cast twice). Using this instead of any 40%-more-Support means: Twice or three times as fast debuff-stacking (including withered) but only 79% of the Damage instead of 140% of damage. You basically skyrocket the debuff application of 20 stacks but will then have only 60% the DoT of a stand-alone Blight Totem at 20 stacks.
Soulrend-Totems
Soulrend-Totems can be placed far away from the enemies. Consequently they survive longer and are better at clearing packs.
If you want to use them for pack clearing, consider increasing projectiles somehow. See the Section 3.2 Soulrend-spoiler for ideas. Soulrend-Totems start damage quicker compared to Blight-Totems but sacrifice top-damage as Blight has better DPS if you stack it 10+ times. If you use Soulrend-Totems, make sure to still apply Withered somehow (e.g. Occultists Withering Presence ascendancy or Wither+Spell Totem Support + Multiple Totems Support resulting in a total of 3 totems). Do not link Soulrend-Totems to Multiple Totems Support as their DoTs don't stack. Unlike Blight-Totems, they also cost quite a bit of mana due to Soulrends high base cost. This will be a problem if you have <150 unreserved mana. If you are unhappy with your Totems durability and have a heavy totem focus, picking up the notable Primal Manifestation and anointing Iron Wood on an amulett can be considered.
Wither-Totem
Well, this is kinda self-explanatory. Let a totem do the withering and hindering for you. Ditch the multiple totems support only if you are socket starved. Blight Totems can Wither, Hinder and deal significant damage (given a significant investment), so why even consider this? Well, Wither-Totems need literally no investment other than the gem sockets. Furthermore they can be placed at a distance (Close up Blight Totems might die every three seconds in fights where you actually need them).
Why-just-one-of-those?
Combining Wither- and Blight-Totems is a waste, just use Spreading Rot instead.
Soulrend-Totems and Blight-Totems?  If you link Multiple Totems Support to you Blight-setup, you won't even need to raise your Totem limit. This will eat up a lot of gem sockets though. I personally don't use it. But hey, maybe there finally is a chance to actually use
Brands
The only sensible option is Arcanist Brand and Soulrend, since all the other Chaos-DoTs are better off being self-cast (and Blight doesn't work wirth Arcanist Brand). Exmaple Gemlink:
This is bad because nothing on the tree is useful for Soulbrands (see what I did there?). More brand activation frequency, brand crits or additional brands don't change our DPS, so there's basically no tree-support for this setup. Some enemies take 5% increased damage per brand on them exists on the tree/cluster jewels but it's not much and not worth this effort. Essence Drain (a compareable skill due to similar uptime and mana cost) will deal 75% more damage than Soulbrand. The math is in the next spoiler. I think this illustrates why it sucks for bossing. For mapping the DPS might still be ok enough, but Arcanist Brand is so clunky that it's inferior to ED+Contagion (or anything else we can do). Soulbrand gives some ES-leech but I don't think this ever compensates the poor damage and clunkiness.
Indepth-math-incoming
We chaos casters like to use 2+ skills for boss damage and here a Soulbrand might be really good. The math on the level 20 gem:
Arcanist Brand activates once per second, Soulrend has a duration of 0.6 seconds. For 100% uptime we need some increased skill effect duration, brand activation frequency or cast speed. But this should be manageable with very little investment (Malevolence, some cast speed on gear/tree, quality on Arcanist Brand, Arcane Surge, ...). This is unproblematic. So how about the damage:
skip-if-you-trust-my-math
Arcanist Brand:
46% less damage * 59% more damage to branded enemy = 0.54*1.59 = 0.8586 = 14% less damage *damage penalty on "unbranded" monsters is much higher -> low damage for mapping Remember we get 14% less damage while already using two gem sockets. Let's assume we use a Void Manipulation instead of Arcanist Brand Support: 1.39 * x = 0.86 -> x = 0.6187 -> 38% less damage 400% MORE DURATION for 38% less damage is the tradeoff. Mana cost of Soulrend is an issue on your build? Keeping the DoT up while dodging boss mechanics is hard and dangerous? Swapping Soulrend to Soulbrand seems ok. BUT Soulrend lv 20 with Arcanist Brand (first two gemlinks, 38% less damage): 1203 damage per second Essence Drain lv 20 with one damage link (first two gemlinksat least 40% more dmg): 2107 damage per second 1203*x=2107 -> x=1.75 -> ED deals 75% more damage.
Traps-and-Mines
Chaos DoTs don't stack and 1 Trap/Mine will consequently do the damage of 10 Traps/Mines. Throwing multiple traps/mines instead of casting one spell is the whole selling point of traps and mines. You might squeeze out some minor advantages but none of it will be worth sacrificing a whole support gem slot. Not worth the hassle, but I'd be delighted to be proven wrong :)
Some final thoughts: Like I said, I don't claim to be an expert. I just sank quite some time into my builts and I think I learned something along the way that is worth sharing. Also I myself have been learning quite a lot by writing this guide and your input is appreciated (no student without master, no master without student). Thanks for reading, stay sane and may your coffee always be delicious, exile.  Let tomorrow be about solutions. Today is about vengeance. - John Oliver Had a Chaos-DoT-Caster-guide for any class, then 2021 patches happened^^ https://www.pathofexile.com/forum/view-thread/2485596 Last edited by Lightelder#6734 on Jan 13, 2021, 7:31:05 AM
|
|
|
Patches
3.11-changes
Arcanist Brand was added and might be utilised by CDoT-Casters.
OP Vaal Molten Shell was nerfed, heavily affecting armour-based CDoT Casters (if those existed). Crit multi is nerfed across the board, which nerfes all crit builds, which is most people except CDoT casters :) That would be a very uneventful patch for Chaos Casters, but GGG made significant changes to all CDoTM-clusters for casters! Corruption will give you 20% increased effect of withered. That's a new mechanic found nowhere else. At max withered stacks, this means 18% increased damage taken (or 15% if the server is rounding off in between) The cluster also gained withered expires 20% slower. Nice, wither-duration could be problematic. Corruption now grants 0% CDoTM (from 10% CDoTM) and the whole cluster grants 57% increased damage (from 72%). The overall DPS-result seems to be the same, but the involved mechanics are pretty unique. Method of Madness now grants +1 max chaos res. This is 100% useless unless you have the very niche timeless keystone Divine Flesh. The whole cluster now gives 12% CDoTM (from 14%) and 30% increased Chaos Damage (from 46%). Method of Madness is nerfed and will often be skipped to save skill points. Anointing Method of Madness is no longer viable, as any CDoTM is located in the small passives. A lot of cluster jewel notables were nerfed, including chaos and dot ones. They seem still viable but tuned down. I won't list all changes here (there's a lot). One theme is skill effect duration being tuned down all over the place. Keystones The Agnostic and Eternal Youth were added near the Scion life nodes. Interesting options for life-based chars. Supreme Ego was also added. It's imo too far away for CDoT-Casters (even with a hole MoM + Essence Worm package). It does not pay off on Malevolence, which is our strongest offensive aura.
3.10-changes
Spell Totem Support received a 50% increase in maximum totem life. More survivability for Wither and Blight Totems, nice.
Cluster Jewels added, which we like just as much as the next guy.
3.9-changes
Soulrend has a base duration of 0.6 (from 0.4). That means 50% more duration, an immense buff.
Caustic Arrow got +3 radius and 15% more dot. This buff is huge and makes it a Soulrend-level-DPS but with sweet 2s base duration. Additional Curse can no longer be crafted on body armours. A general increase in enemies resistances makes reducing resistances more important for everyone. Several gear affixes (that we don't use) were nerfed :)
3.8-changes
Non-ailment chaos damage over time multiplier (CDoTM) has been changed to Chaos Damage over time multiplier (CDoM). This is
a) easier to read and b) CDoT-caster+Poison build possible? The addition of stuff like Fire Damage over time multiplier should result in a more streamlined game mechanic overall, making stuff easier to understand. Contagion has no more radius bonus on higher levels, which is sad. Trickster Ghost Dance has roughly 30% less effect overall now. Occultist had 40 ES regen added to Vile Bastion. Minor passive tree changes but bottom line: Everything as usual here. For Details check Section 1.3.
3.7-changes
Skills:
Bane deals roughly 15% less damage but was overperforming anyways. Bane is still good. Soulrend's AoE was reduced (13->10), which is a significant nerf but does not kill the skill. League: ED+Contagion is damn OP for the Monolith. Tree: Occultists defensive options got nerfed (Vile Bastion). Wicked Ward was exported to the general skill tree. Trickster got nerfs but remains damn strong. ES was nerfed overall. Others: Wand+Shield can now use Shield Slam and consequently Fortify Support. This is an insane buff for any Wand+Shield-build, since this setup could not get Fortify previously (Dread Banner doesn't count). Bottom line: Justified nerfs. All chaos-DoT skills remain viable. Wand+Shield got buffed.
My-4.0-Speculations
This is speculative and much is yet unknown.
Most builds are busy attacking/casting their main skill. Chaos caster apply a debuff and then have spare time. The amount of active skills they squeeze into their sockets actually multiplies their damage against tougher enemies, because they have the time to cast them all. E.g. if my Bane Occultist adds a 6L-Essence Drain, that will double the damage vs Bosses. PoE2's new gem system (up to 9 6links) boosts chaos caster much more than it does other chars, substantially increasing our boss killing potential. (F)aQ
Can-we-combine-Poisons-and-CDoT-spells-effectively?
" I tried Cyclone CoC Soulrend the first half of the league (not with Sire of Shards though). Here is my result: Spamming Soulrend with CoC Cyclone does little in itself since the DoT does not stack and the hit damage is bad (I think, I never really used Soulrend for the hit damage). So we need an additional ingenious idea: My logical consequence was going poison and double abusing chaos damage over time multiplier and use support gems that work on poison and on soulrend (stuff like swift affliction and void manipulation). So I went Assassin for crit and poison utility plus great survivability of Mist Walker. Going CoC on some non-crit ascendancy like Occultist or Trickster is not viable imo. 1 month later I finally retired the concept, because try as you might, your damage will always be lower than a pur cyclone coc bladefall poison setup, partly because pure ailment support gems (deadly ailments, Vile Toxins) each provide 5-15% more damage than our cdot-supports, making us miss out on lots of damage. Only upsides of Soulrend were the integrated ES leech (I played a Glorious Vanity ES/Life Hybrid) and the range, but the reduction in damage wasn't worth it imo. On top of that we need additional projectiles to have any area coverage with soulrend while bladefall has amazing aoe automatically build in. You can look at my char TheChaosDoT and just mentally make my sixlink from Cyclone, CoC, Bladefall, Awakened Added Chaos Damage, Deadly Ailments, Vile Toxins into Cyclone, CoC, Soulrend, Swift Affliction, Void Manipulation, Added Chaos / Efficacy / Energy Leech / some other 6th gem and varify yourself that the damage just doesn't keep up. Nice concept, I might try again in some leagues, but atm not as good as pure poison. Haven't done a cast while channeling cyclone soulrend yet (pathfinder? or classical occultist/trickster) but I suspect similar problems. I lost faith in the idea, but hey, maybe you can find something I didn't discover. On the Sire of Shards: Be aware that your damage will suck. This might be ok if you wanna build a mapper who mainly needs movespeed, area coverage,... but going for a two handed weapon without a single damage stat will hurt. Plus Soulrend in itself (at least the DoT) does not profit from crits which is bad for a crit build. Or maybe you are going for the hit damage, in which case my whole speech was besides the point^^ Lemme hear what you find, I'm intrigued.
Party-play-and-multiple-Blights
" Not sure how to read your question, I will answer both ways I could understand it. Very niche but very interesting topic, had to think about this quite a bit. a) Can my friend and I do 40 normal Blight stacks in total? No. "All damage over time effects [...] usually only the one with the highest damage per second works at any given time (except for poison where all applications stack cumulatively); this is true even in the case of effects applied by different players or sources." (wiki) Blight text overrides the 1-stack-max with a 20-stack max but this is counted per monster not per player. Thus two players can only apply 20 active stacks in total on a mob. b) Can I have 20 Blight stacks and 3-20 Vaal Blight stacks simultaneously? No. I am only 99% sure, but this is my reasoning: The game treats the Blight debuff exactly like the Vaal Blight debuff. Proof: The Spreading Rot Jewel affects both Blight Hinder and Vaal Blight Hinder (can be seen in the tooltip) although Spreading Rot specifically names "Blight" not "Vaal Blight". (Would the game differentiate then this would not be the case) Let's imagine you somehow applied 15 Blight DOTs and 15 Vaal Blight DoTs. The mobs would only receive the damage from the 20 highest DoTs, most likely 15 Vaal Blights and 5 Blights (all debuffs are on the monster but only the 20 strongest deal damage). But more importantly: To synergies instead of interfering with each other I would recommend each skill should only be on one of you two (Blight, Essence Drain+Contagion, Soulrend, Bane). Than you would profit of each others withered, -chaos res to enemies etc. but never override each other DoTs. And if you need help considering which skills to pick then you have come to exactly the right guide :)))
Bane-and-unlinked-curses
"
Bane-Support-DMG-vs-linked-Curse-DMG
" Bane 47% more: First linked curse 32% more: Second linked curse 24% more: Third linked curse 19,5% more: Fourth linked curse, you see where this is going... On the other hand: 55% more: Lv4 Empower (or around 55%more, high variance! Also buffs the curses) 48,8% more: Efficacy 44% more: Controlled Destruction 44% more: Swift Affliciton 40% more: Lv3 Empower (or around 40%more, high variance! Also buffs the curses) So yes, more curses sacrifices DPS for utility. Which might be okay, since Bane-DPS is awesome, but if you have no seperate single-target this will need considering. Also note that quality on Bane will increase the curse effect of linked curses, which is nice.
Why-do-you-consider-Decay-Support-useless-on-high-budget-gear?
I once looked into the Decay Support Gem and it blew my mind how utterly bad it is on a caster with good gear. The only sources of Decay are the Decay Support Gem and an Essence of Delirium on a weapon. Decay Support can be used if you are on a tight budget. Let's look at why it's horrible if you have good gear:
First of all: No hit = no Decay. Blight, Bane and Contagion can't hit. A utility skill like Storm Brand could be used to apply Decay (e.g. Storm Brand lv1 + CwDt lv1 + Blind lv20 + Decay Support lv20 or a Delirium-Weapon). Decay does not stack, do not combine multiple Delirium-weapons and/or Decay Support (for the reasoning behind this, check Section 1.1) Remember the basic mechanics section? I mentioned that chaos-DoTs are not affected by spell damage unless the gem tells you otherwise. Well... Decay Support is the only non-ailment chaos damage over time applyable via spells that is NOT affected by spell damage. Every chaos DoT spell says "this skills DoT is affected by spell damage." But this does not cover Decay. Any scaling through spell damage is lost on this one. Confused? Just read this paragraph 3 times (it won't become better...) Consequence: Decay ignores increased spell damage, Controlled Destruction Support, half of Efficacy Support and so on. Increased (Chaos-)Damage and increased (Chaos-)Damage over time do buff Decay (e.g. Void Manipulation Support and literally one half of Efficacy Support). If you want to waste 5-10 minutes of your life, check PoB to see if somehow your character wants Decay Support on Essence Drain or Soulrend. I had characters for which a level 20 Decay Support will deal roughly the damage of ONE Blight stack being inferior to level 1 Void Manipulation Support. It does not hurt if your gear somehow says "Inflict Decay on hit". But keep in mind that something like 40% increased Spell Damage would be more useful. Maybe you are not a caster and consequently do not utilize spell damage anyways? Then Decay might be good for you! I am surprised you read until the end of this article about chaos DoT spells, but hey, I'm sure you have your reasons :)
Can-we-leech-ES-from-Profane-Bloom-Explosions-(and-others)
Body explosions can be leeched from and can be caused by Bane (Occultist Ascendancy profane Bloom, Obliteration Wand). Problem is that body explosions deal secondary damage (not "spell damage"), thus you would need something that leeches from all (chaos-)damage (not just spells/attacks).
Hunter amuletts have a prefix leech life from chaos damage. Innsbury Edge would leech life from Chaos Damage. Valokos Sign, The Harvest and Thirst for Horrors grant leech from any damage. Of all these Thirst for Horrors is the only one that seems viable for a chaos caster. Combine this with Ghost Reaver and you have ES leech from Prfoane Bloom explosions. Let tomorrow be about solutions. Today is about vengeance. - John Oliver Had a Chaos-DoT-Caster-guide for any class, then 2021 patches happened^^ https://www.pathofexile.com/forum/view-thread/2485596 Last edited by Lightelder#6734 on Sep 16, 2020, 2:17:08 AM
|
|
|
(another placeholder cze I'm paranoid)
Let tomorrow be about solutions. Today is about vengeance.
- John Oliver Had a Chaos-DoT-Caster-guide for any class, then 2021 patches happened^^ https://www.pathofexile.com/forum/view-thread/2485596 |
|
|
Bump
Let tomorrow be about solutions. Today is about vengeance. - John Oliver Had a Chaos-DoT-Caster-guide for any class, then 2021 patches happened^^ https://www.pathofexile.com/forum/view-thread/2485596 Last edited by Lightelder#6734 on Apr 13, 2019, 4:22:23 AM
|
|
|
bump
Let tomorrow be about solutions. Today is about vengeance.
- John Oliver Had a Chaos-DoT-Caster-guide for any class, then 2021 patches happened^^ https://www.pathofexile.com/forum/view-thread/2485596 |
|
|
bump
Let tomorrow be about solutions. Today is about vengeance.
- John Oliver Had a Chaos-DoT-Caster-guide for any class, then 2021 patches happened^^ https://www.pathofexile.com/forum/view-thread/2485596 |
|
|
Thanks for sharing 🙂
|
|
|
This is a great write up! Definitively gonna have to give my Occultist another go armed with this guide.
|
|
|
vaal blight is pretty good both for crowd control (like opening a strong box) and to fight boss. My personal boss combo is: cast spell totem + wither, cast Bane (linked with Despair, temporal chain, enfeeble), get close and personal then cast vaal blight and fire soulrend at point blank (to apply dot fast) while the boss is extremely slowed down. Tactic is efficient against boss with low curse resist, with guardians and elder I just let Bane works its magic.
Also, it is not chaos spell but using a wand with the affix "trigger a socketed spell when you use a skill" I found out that frost bomb + cold snap nicely complements bane since I use Occultist ascendances Curse and shield , cold snap has roughly the same area of effect than bane and frost bomb is caste in the middle. Several advantages: -Chill ennemies with chilled ground, even more slow down ! -Ennemies dying in the area give you frenzy charge => better damage + good for extending phase run (CWDT set up) -Frost bomb block life regen -Extra damage without investment (cold damage + cold dot with cold exposure ) + extra chaos damage on kill (ascendancy property) I also use fire golem in the wand: no need to worry about golem dying he is cast when I use Bane! Now what is left is to get the discipline has reduced mana reservation enchant so I could run aspect of the spider, extreme slow down should be possible: temp chain + spider web + chill + vaal blight Last edited by rugalb666#0869 on Apr 22, 2019, 10:47:00 AM
|
|


