


[2.3] Crit Chin Sol RoA Poison Traps - Full Key Uber Runs/Atziri/Pale Court/ T14 in 60c/4-links
|
<deleted>
IGN: GoldenPepe Last edited by emFIHCXiDo#4100 on Dec 22, 2018, 4:01:14 PM
|
|
|
Hi, currently leveling this build. Can you tell me why going Assassin is so good? The skillpoints don't really have gamebreaking aspects or am I missing something? I mean toxic delivery is kinda useless because we always poison because of the jewel? The rest seems kinda meh except for ambush and the crit chance. Am I missing something?
|
|
" Sorry for the late response man! Looks like you're almost good to go. I wouldn't run the AoE setup on the 6-l, i'd run the single target setup on that and the aoe on the 5-l. I've cleared T14 maps with no trouble using just a 4-l NOT in deerstalkers for the AoE setup so I really doubt you need that, except maybe for Uber Atziri's ads. The 6-l I'd use Trap and Mine-Conc Effect-Trap-RoA-Physical Proj-Slower Proj. You don't need cluster traps for it since you're assassin now :) the 5-l: Trap-Cluster Traps-Physical Proj-RoA-Increased Aoe. Other than that, jewelry is looking good so all you need is blasphemy-enfeeble and grace and you should be fucking shit up. Hope that helps! |
|
" Can't cull her unfortunately. That being said, we already have culling strike on all of our crits from assassin :) |
|
" Bleed is a huge source of damage too, can't count that out. The main thing that takes it to the next level is toxic delivery. It doesn't say it poisons. It increases the damage of the poison by a huge 100% MORE multiplier on crit as well as for bleed.. That's an absolutely gigantic amount of added damage that when multiplied out with all of our double-dipping goodness already, is a ludicrous amount of DoT damage. Ambush also pretty much ensures we will crit against any enemy with full life. That turns into killing almost anything on the first shot. Hope that helps! |
|
|
Gonna give some feedback on the build:
UberLab = Easier than your other build (by quite a lot) Atziri = Sameish, a little harder (the vaal trap was better and more reliable) However that's with a 6l chin sol for single target damage, with a 4-5l it will be even worse UberAtziri = Sameish, harder to kill easier to survive. (trio are easier with this because you don't rely on your vaal trap) Maps = Safer but slower (you basically have a the same clear speed for any map since your traps won't come back as fast as you can clear) Overall I like this better because it is much easier to make money on UberLab than to make money mapping or on Atziri. This is a pretty reliable Uber Lab farmer even with 4-5l. With 6l everything just melts. However, there are a couple of days that the Lab is just annoying and not worth farming (Argus is offroute, annoying phases like the golems + dual wield swords which the risk of getting OHKOed is pretty high, labs with too many traps, etc) I'd say I like the theme of the other one better but this is more efficient in regards of acquiring currency. It is not however the best build for uber lab full key runs, but it is by far the cheapest one you'll get. If you're patient you could easily farm Ubers and make yourself a better farmer *cough* pathfinder *cough* Here are a few drawbacks I've found: -Not much room to grow. You can get better items but you don't need them. -Low health, if you're not flasking properly you can get OHKOed by ranged exiles and op stuff -Slow mapping = slow leveling -Really miss the chain effect, more than the cooldown I believe this build serves it's purpose fully: Cheap, fun and reliable way to farm end-game lab. |
|
|
So i was kinda bored and decided to try this build out.
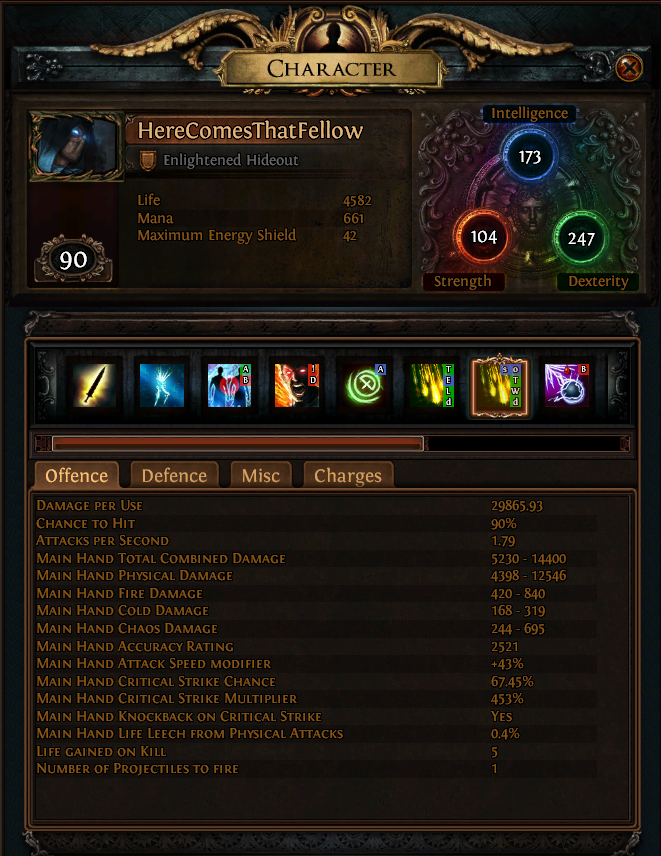
As some have said, mapping isn't very fast, but since this build is using some very, very broken mechanics it absolutely melts bosses like it's nothing. Since I've been doing Chin Sol builds for about 2 years now, something I like to do is to calculate the dmg/DoT these builds actually do (due to the misleading tooltip ofc). Here's my attemt of calculating a 6l RoA single target dmg: Disclaimer: It was 3AM and I wasn't entirely sober so there could be some things I've missed or miscalculated! For example: I had increased critical strikes linked instead of increased critical strike multiplier, which would give a much bigger dmg output... Going to start off with the tooltip which is currently sitting nicely at 29,865.9 avg. dmg. (RoA - trap - trap and mine dmg - proj phys dmg - inc crit strikes - conc effect and the ice golem active).
Spoiler
 The skill itself deals 4398 to 12546 Physical dmg which I'm going to base my calculations off (not accounting for a bit of chaos dmg even though it does scale the poison DoT). For the purpose of maximum dmg, but reality in mind, I'm going to assume that 3 out of 3 traps are going to do an average of 8,472 (4398+12546/2) physical dmg and critically strike (With a silver flask active and the 100% more crit chance from Ambush). This means that due to the Chin Sol and point blank multipliers the actual dmg is 2.5 times higher = 8,472x2=21,180. My current crit multiplier sits at 453%, so if the trap crits (with the ascendancy choice and silver flask it's very likely it will), then the 21,180 is multiplied by 5.53 = 21,180x5.53 = 117,125.4 average dmg per trap. But here comes the hardest part - calculating the DoT for bleed and poison, since we do have to account fo all the "double-dipping" this build has. Bleed does 10% of the initial hits' physical dmg as DoT and 50% more if the target is moving or being moved (knockback for instance). 10% of 117,125.4 = 11,712.54 DoT x6 (if moving) = 70,275.24 DoT (without double-dipping). First things first, this DoT is then scaled by all the % increased dmg from the passive tree and skillgems: Skilltree: 30% inc DoT 155% inc phys dmg 54% inc proj dmg 210% inc trap dmg = 449% inc dmg Gems: 39% MORE from Trap support gem 59% MORE from conc. effect 10% inc dmg and 39% MORE from more trap and mine dmg support 10% inc dmg and 49% MORE from porj phys dmg support = 186% MORE and 20% increased dmg Total: 469% increased and 186% more dmg This means that the 11,712.54 DoT is multiplied by 5.69 and then multiplied again by 2.86 for a total of: 11,712.54x5.69= 66,644.3526x2.86= 190,602.848436 physical DoT, if the target is not moving. If the target is moving, then this damage is simply multiplied by 6: 190,602.848436x6= 1,143,617.090616 physical DoT while the target is moving and even if just one of 3 traps (can be placed up to 6 though) has applied a bleed. So naturally this is a LOT of dmg, but there is one last thing - Toxic Delivery - the sole reason why this build is made as an assassin - both poison and bleed deal 100% MORE dmg if they're applied by a critical strike, which means our 190,602.848436(stationary) and 1,143,617.090616(moving) DoT is doubled for a total of 381,205.696872 (to stationary targets) and 2,287,234.181232 (to moving targets). An avg of 2.3 million DoT for around 6 seconds is quite ok, but if that wasn't already enough we still have poison. So poison also does 10% the inital hit as DoT as long as it's applied by chaos/physical dmg. Since poison has different double-dipping stats we need to recalculate the DoT starting from 11,712.54 DoT: Skilltree: 30% inc dmg over time 66% inc chaos dmg 54% inc proj dmg 210% inc trap dmg = 360% increased dmg Gems: 39% MORE from Trap support gem 59% MORE from conc. effect 10% inc dmg and 39% MORE from more trap and mine dmg support = 137% MORE and 10% increased dmg Total: 370% increased dmg and 137% MORE dmg 11,712.54x4.7= 55,048.938x2.37= 130,465.98306 DoT per poison stack. Assuming we use 3 out of 3 traps even though 6 can be up at the same time, we have 3 poision stacks = 130,465.98306x3= 391,397.94918 chaos DoT. Now again Toxic Delivery means this dmg is literally doubled for a total of: 391,397.94918x2= 782,795.89836 chaos DoT from 3 posison stacks. Total combined DoT (for stationary targets): 381,205.696872+782,795.89836= 1,164001.590472 DoT Moving: 2,287,234.181232+782,795.89836= 3,070,030.079592 DoT And of course we have our initial hit dmg from 3 traps: 117,125.4x3= 351,376.2 phys dmg (could be close 400,000 if we count our 5% extra chaos dmg and fire dmg from Chin Sol) Conclusion: BY THE GODDESS, A 3+ MILLION DOT???????????????????????? Now my gear, gems, character aren't minmaxed so it's highly possible to achieve even more absurd dmg levels with this build, regardless of it being necessary or not. Also the traps can roll a higher than 8.5k phys dmg, up to 12.5k, so technically if I get lucky the DoT can be a lot higher by itself, reaching something like 5 mil, lol. And yes, I'm aware that RoA isn't your be all end all single target skill, puncture will be a lot more practical in many scenarios even though it does less dmg, the purpouse of these calculations was to show how ridiculous these multipliers and double-dipping can get. Thank you for reading to whoever did and I'm sorry that this doesn't count as your summer litterature. Have a nice day! -sys Have a nice day! Last edited by _sys#5751 on Jul 20, 2016, 9:57:35 AM
| |
|
One small thing that I've tried doing to imporve this builds' clearspeed is using a 5L blastrain setup in a pair of deerstalkers, regardless of it being half as good as RoA when it comes to DoT.
It worked quite nicely, but i simply couldn't afford losing a 4l for utility. Hence I settled for using RoA and blastrain in my 6L: RoA - blastrain - trap - clustertrap - inc aoe - inc crit strike chance(could be replaced with inc crit dmg/trap and mine dmg) So far I've managed to clear a couple of rare gorges that even have had a variety of clearspeed damping mods on them (more mob life, less dmg taken from crits, enfeeble, reduced physical dmg taken) in less than 2 minutes and less. Also I've done a couple of Oba's cursed troves with no issues and almost half of the time remaining. Have a nice day!
| |
" Pretty much on point Fishoo! I believe the single target damage is more reliable for prolonged encounters that don't end with 3 burning arrow traps (or if you miss somehow). Agree with pretty much every point. It's nuts how incredible chain reaction really is on saboteur. You miss it almost immediately. |
|
" Amazing dps overview man. Thanks for the in-depth analysis. Blast Rain + RoA is a good idea! It'll definitely make up for losing the cooldown from the other build and make clearing a lot faster. Glad you're enjoying it! |
|


