


[3.13] King of Self Curse | Fire Blade Vortex Chieftain | Strongest 100% Delirious Map Farmer
|
This is a self curse fire Blade Vortex Chieftain build guide. This build can do everything the Occultist version can while having a much more consistent performance. I have run hundreds of 100% delirious T14-T19 maps without failing a single one. The reason is that this build can do any map mods. It is immune to chill, freeze, ignite, and shock (as well as their respective ground effects) without flasks. Besides, it has a ridiculous 10.8 second Immortal Call with a 78% uptime. When Immortal Call is up, we take 90% less physical damage and 25% less elemental damage. Even between Immortal Calls, we still have a 36% physical damage reduction from 6 endurance charges and permanent Enduring Cry buff, as well as 15% physical damage taken as fire damage from our ascendency passive Tasalio, Cleansing Water. As a Chieftain, gearing is much more flexible. We can easily cap our elemental & chaos resistances (without flasks) and have 4k+ life (5K with GG gears). Having much better survivability does not mean the sacrifice of damage. We run three offensive curses, Elemental Weakness, Flammability, and Assassin's Mark, to make sure we have enough damage to get started under any circumstances.
TL;DR POB: https://pastebin.com/h3L22sGd Videos: A9 T19 100% delirious Burial Chamber 1. Introduction
Spoiler
Self curse is one of the most unique playstyles in Path of Exile. It utilizes the unique leather belt Headhunter and possibly one or more unique crimson jewels called Inspired Learning to gain mods from rare monsters on kill. Some of the mods can be extremely powerful, such as "Deadily" (300% increased global crit chance and 65% increased crit multi) and "Shimmering" (100% increased maximum Energy Shield). These mods can be stacked, e.g., you can have two "Shimmering" prefixes at the same time, granting a 200% increased maximum energy shield. However, the duration of each mod is registered separately, i.e., obtaining the same mod a second time does not refresh its duration. This means you can have hundreds of gained mods simultaneously but each of them can only last for 20 seconds by default. To break this limitation, we curse ourselves with Temporal Chains so that effects including the gained mods expire up to 4 times slower. In other words, the buffs can last for 80 seconds instead of 20 seconds, which results in faster map clearing and better survivability. The problem is that if we gain the "Hexproof" mod, we become immune to hexes including Temporal Chains, and that breaks the build. The most common solution to this problem is to pick the Occultist ascendency because it has Profane Bloom, the only skill in the game that makes hexes still work on us after we become hexproof. Alternatively, the unique Assassin's Garb Cospri's Will allows us to play other ascendency classes by sacrificing a chest slot. This alternative has not been very appealing because there exist quite some powerful mods that can be rolled on rare body armor. The "explody" mod (enemies you kill explode, dealing #% of their life as physical damage) is especially essential to most if not all end game mapping builds. It is one of the most important reasons why roughly 91% of characters playing self curse as of the time of writing are Occultists, according to poe.ninja. The "explody" mod, however, is not unique to body armor. With the return of synthesized items, this mod can be obtained as an implicit mod on synthesized weapons. This makes it possible to play self curse with any other ascendency classes while having comparable performance. 2. Mechanisms
Spoiler
There are a few mechanisms I would like to go over first. Knowing them helps understanding this build guide. You can even make your own build once you have grasped the core concept of a self curse build. 2.1 Self curse
Spoiler
Self curse generally means applying curses to ourselves. Curses usually do not offer any benefits when applied to ourselves with the exception of Temporal Chains. This curse extends the duration of buffs and debuffs on us, which include but are not limited to flask effects and Headhunter buffs. To the best of my knowledge, the unique chain gloves Shackles of the Wretched and the unique unset ring Rotblood Promise are the only two means through which we can curse ourselves. 2.1.1 Shackles of the Wretched
Spoiler
These gloves are the more common choice for self curse. The advantage of using them is that a 4/0 Enhance Support and an 1/22 Hextouch Support can be linked to Temporal Chains to give it 23% increased effect. The downside is that the gloves slot is one of the few places where we can get up to a 50% damage conversion. Therefore, sacrificing the gloves slot greatly restricts our aura, item and anointment choices. 2.1.2 Rotblood Promise
Spoiler
This ring just got introduced in the game in 3.13.0, and therefore it has not yet gone up in popularity. The advantage of this ring is that Temporal Chains socketed in it becomes an aura. This at least offers two benefits. The first one is that nearby enemies are automatically slowed, which leads to better survivability. The second one is that the Temporal Chains on ourselves is permanent, which means we do not have to hit a monster once a few seconds to refresh its duration so that we can take our time to loot. The disadvantage is also quite impactful. We lose 20% curse effect from the ring alone. Since we cannot put Enhance Support or Hextouch Support in the ring, we lose another 23% curse effect. The 43% curse effect lost makes it very hard to cap our curse effect outside of the Occultist ascendency. 2.2 Temporal Chains
Spoiler
Temporal Chains by default makes effects expire 40% slower on a valid entity. However, since we are players, we only get 50% of the effect. That is, effects expire 20% slower on us. The maximum slow effect we can get is 75%. To reach this cap, we need (75% / 20% - 1) * 100% = 275% increased curse effect. This number is not impossible but extremely hard to achieve. Fortunately, the unique onyx amulet Solstice Vigil grants us Shaper's Presence on killing a rare or unique monster. This buff makes effects on us expirer 20% slower, which is additive to the 20% given by Temporal Chains. With this amulet, we only need (75% / 40% - 1) * 100% = 175% increased curse effect to reach the 75% cap. This number is much easier to achieve without scuffing the rest of our build. 2.3 Increased curse effect
Spoiler
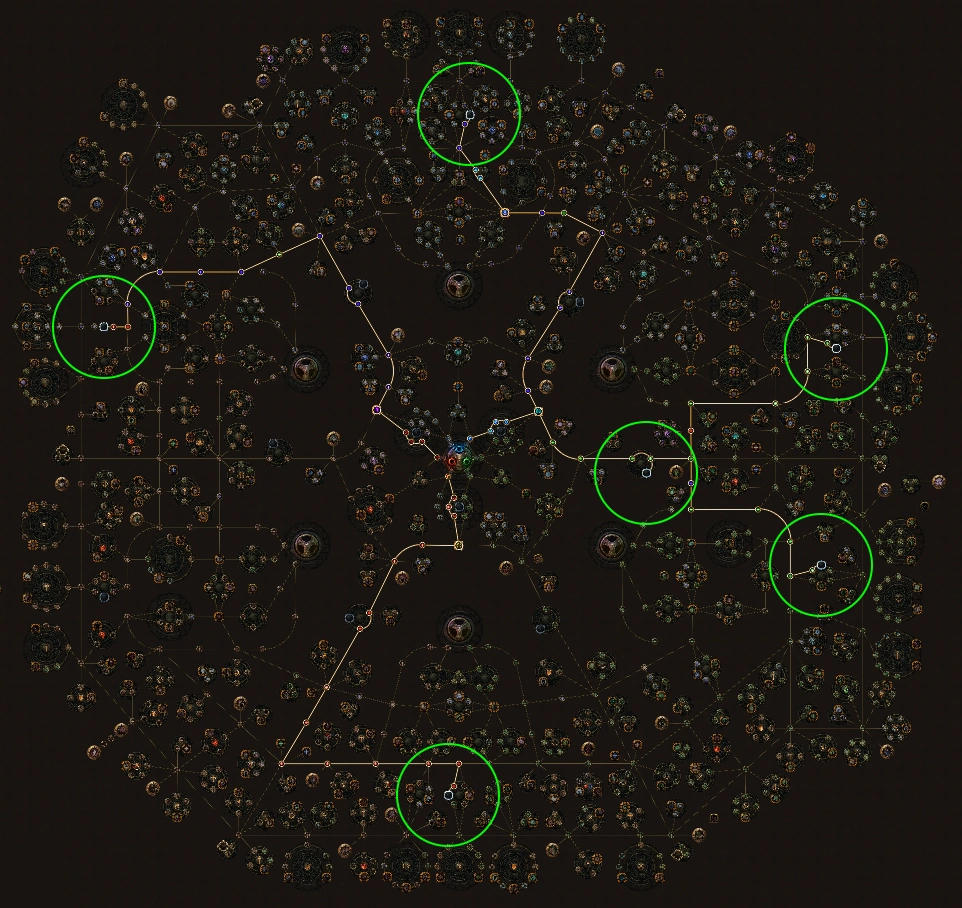
There are many options to increase our curse effect. The ones that I consider mandatory are (1) the helmet enchant that grants "30% increased Temporal Chains Curse Effect", (2) the 22% (23%) quality from Temporal Chains itself that gives 11% increased effect, (3) a level 4 Enhance Support that gives 24% increased quality (12% increased effect) to our Temporal Chains, and (4) a Hextouch Support with 22% (23%) quality that gives 11% increased effect to our Temporal Chains. The above sources give a total of 64% increased effect of Temporal Chains. It means that we need to get 175% - 64% = 111% increased curse effect from other sources. This can be obtained from (1) nodes that grants "#% increased Effect of your Curses" on the passives tree, (2) medium cluster jewels that have the "3% increased Effect of your Curses" enchant, (3) certain unique items listed on this page, and (4) other potential sources that I am not aware of. The combination I recommend is (1) 78% increased curse effect from 3 6-point curse medium cluster jewels rolled with Dark Disclosure and "Added Small Passive Skills have 35% increased Effect", (2) 10% increased curse effect from the Hex Master cluster on the passive tree, and (3) 15% increased curse effect from the Skittering Runes cluster on the passive tree. This combination gives a total of 103% increased curse effect, which leaves us 111% - 103% = 8% curse effect to reach the cap. This 8% can be easily obtained from a curse medium cluster jewel, a Glorious Vanity, or a Megalomaniac that has Dark Disclosure. 2.4 Damage conversion
Spoiler
With the number of "Gain 25% of Physical Damage as Extra Fire/Cold Damage" mods we can steal from monsters, we want our main damage dealing skill to be physical based. However, we want to fully convert it to an element because it is much more effective to scale elemental damage for a self curse build. We also do not want to be dealing with physical/elemental reflection at the same time. 2.4.1 Fire conversion
Spoiler
Fire conversion is the most common approach, largely due to the unique fire arrow quiver The Signal Fire. This quiver converts 50% of physical damage to fire and it also gives 25% - 35% of physical damage as extra fire damage. Additionally, bows happen to be a very good weapon type for self curse builds, so this quiver is often the go-to choice for fire conversion. The remaining 50% of physical damage is converted to fire by using Anger together with a Watcher's Eye that has "(30-40)% of Physical Damage Converted to Fire Damage while affected by Anger", and anointing Magmatic Strikes. You may replace The Signal Fire with a GG quiver that has a 25% phys to fire conversion. However, you will have to take Magmatic Strikes and its previous node on the passive tree to achieve an 100% phys to fire conversion. Your quiver needs to be extremely good to worth the skill points. An important thing to note is that you do not want to do fire conversion through Avatar of Fire. This keystone makes you only deal fire damage but we usually need to deal lightning damage so that we can kill shocked enemies and our Herald of Thunder can be triggered to reflect Temporal Chains to us. Herald of Thunder, though, is not the only way to reflect Temporal Chains to us. You can use many other skills or even manually cast Temporal Chains if you want to. The advantage of Herald of Thunder is that it takes care of itself. Once you kill a shocked enemy you can just zoom through the map without having to stop to cast anything. If in some rare cases you really need to spec into Avatar of Fire, the unique golden mask The Three Dragons may still allow you to shock while only dealing fire damage. I have not tested myself so I am not sure if the combination will work in practice. Regardless, The Three Dragons is not an ideal item for the helm slot. There are much better options, which we will discuss in the gearing section. 2.4.2 Cold conversion
Spoiler
Assuming we are still using a bow/quiver setup together with Shackles of the Wretched. The only reliable way to achieve an 100% phys to cold conversion that I am aware of is by using (1) Hatred with a Watcher's Eye that has "(35-40)% of Physical Damage Converted to Cold Damage while affected by Hatred", (2) a synthesized or Crusader influenced quiver that has a 25% phys to cold conversion, and (3) taking Winter Spirit and its previous node on the passive tree. You may use a Glorious Vanity with one or more nodes that give a 10% phys to cold conversion. However, the viability of this approach is completely at the mercy of RNG. As such, I do not consider it to be a reliable way for damage conversion. 2.4.3 Lightning conversion
Spoiler
Naturally, there are no nodes on the passive tree that offers phys to lightning conversion for pure physical skills. However, Physical to Lightning Support and its anomalous version with 20% quality give 50% and 60% phys to lightning conversion respectively. The remaining 40%-50% physical damage can be converted by using Wrath together with a Watcher's Eye that has "(25-40)% of Physical Damage Converted to Lightning Damage while affected by Wrath" and a quiver with damage conversion if necessary. The problem is that Physical to Lightning Support is a rather ineffective damage multiplier. Therefore, going lightning conversion can result in lower initial damage at the start of a map. 2.4.4 Chaos conversion
Spoiler
I am not sure if chaos conversion is even a thing for self curse builds. Nature's Reprisal from Pathfinder is the only skill on the passive tree that offers a 40% phys to chaos conversion. I am not sure how one can achieve the other 60%. Even there is a way, I do not think phys to chaos conversion is as good as phys to elemental conversion because we will miss a considerable amount of damage from the "Gain #% of Elemental Damage as Extra Chaos Damage" mod from sources such as Atziri's Promise. 2.4.5 Mixed conversion
Spoiler
Full conversion does not mean converting 100% physical damage to a single element. You in fact can convert physical damage to multiple elements as long as the combined percentage is no less than 100%. For example, a simple way to achieve an 100% conversion is by using The Signal Fire and Physical to Lightning Support. Mixed conversion might be OK if you are on a budget but I do not consider it to be optimal. Sources of resistance reduction such as Flammability and fire exposure often target a single element. By going mixed conversion you are only effectively scaling a portion of your damage. This is especially true since we are stacking so much curse effect. 3. Ascendency Choice
Spoiler
As mentioned in the previous section, any ascendency class can go self curse. However, some ascendency classes may be more suitable than others. When determining the suitability of a given ascendency class, here are some points to consider: (1) ease of access to nodes that grant "increased Effect of your Curses", (2) ease of access to the 6 Inspired Learning spots, (3) defensive abilities the ascendency can offer, and (4) any other ascendency-specific abilities that synergize with self curse. The reason Occultist is the most popular ascendency is that it scores very high in terms of (1), (2), and (4). However, its major flaw is the lack of defense and sustain. I am not talking about face tanking in an 100% delirious map but enough mitigation to not get one tapped by some remaining monster. A typical scenario of 100% delirious farming is that you spend 3 minutes to clear the map but 10 minutes to loot. In the map clearing phase, you have infinite damage and recovery as long as there are packs of monsters. However, in the looting phase, you can easily get killed by a blue mob. Even caustic/burning ground can kill you in seconds. With the amount of loot to pick up, wasting even one portal means a significant loss in your profit. Therefore, for consistently profitable 100% delirious farming, we cannot just look at how much damage, movement speed, or AOE we have. They are all icing on the cake. What really matters is more mitigation and sustain after having just enough damage. Once you get the ball rolling, it does not matter how much damage you initially have because you will be one shotting everything anyway. For the above reasons, Chieftain is surprisingly a good ascendency for self curse. Unlike, the Occultist ascendency, which amplifies the advantages of self curse. The Chieftain ascendency, on the other hand, minimizes its weaknesses. To begin with, Valako, Storm's Embrace generates endurance charges after using a warcry. This passive itself gives +1 to maximum endurance charges. We also take Stamania and Endurance on the passive tree for a total of 6 endurance charges. We put Enduring Cry on our left click so it automatically gets used every 8 seconds to generate up to 6 endurance charges. 6 endurance charges by themselves give +24% to all elemental resistances and 24% physical damage reduction. We get an additional 12% to all elemental resistances and an additional 12% physical damage reduction from the Enduring Cry buff. Enduring Cry has an 8-second cooldown and a 2-second buff duration. Thanks to Temporal Chains, buffs on us expire 4 times slower, including the Enduring Cry buff. Therefore, the buff instead lasts for 2 * 4 = 8 seconds, which makes it effectively permanent. Having a reliable endurance charge generator also allows us to use Immortal Call in a Cast when Damage Taken Support setup. The base duration of Immortal Call is 1 second, as it is designed to offer temporary protection against damage spikes. However, with 6 endurance charges and Temporal Chains, we can extend the buff duration to a ridiculous number. Every endurance charge increases the base duration by 20%, which means 0.2 second with a base duration of 1 second. Having 6 endurance charges makes the base duration of Immortal Call 1 + 1 * 20% / 100% * 6 = 2.2 seconds. This 2.2-second base duration is then extended to 2.2 * 4 = 8.8 seconds by Temporal Chains. We can further get 20% increased effect duration from the 20% quality of Immortal Call and 74% increased effect duration from a 20/20 Increased Duration Support, resulting in a total duration of 8.8 + 2.2 * (20% + 74%) / 100% = 10.8 seconds. Next, Tasalio, Cleansing Watere has 2 QoL properties. The added 100% fire resistance makes gearing much more flexible. Because we use a decent number of unique items, capping our resistances can be a real problem, especially without expensive gears. Capping chaos resistance is still next to impossible even with expensive gears. Having this 100% fire resistance allows us to cap our elemental resistances without too much effort and even chaos resistance with a bit of effort. "Unaffected by ignite" can also be a lifesaver. Remember Temporal Chains also extends the duration of debuffs on us, which includes ignite. Being unaffected by ignite means a free suffix on one of our magic flasks or the possibility of using an additional unique flask. Both Valako, Storm's Embrace] and Tasalio, Cleansing Watere show how the Chieftain ascendency synergizes with the self curse playstyle. What really makes Chieftain stands out in my opinion is the ascendency passive Ngamahu, Flame's Advance. This passive offers a straight up 50% phys to fire damage conversion. It means that we do not have to use Anger. Nor do we have to anoint Magmatic Strikes. A free aura and an anointment open up many possibilities. In my case, I use Purity of Lightning for shock/shocked ground immunity and anoint Whispers of Doom for the additional curse. The second part of this ascendency passive grants us 100% physical damage as extra fire damage for 4 seconds once every 10 seconds. It is useful at the start of a map as some extra damage. However, the duration of this "buff" cannot be modified like other buffs or debuffs. Otherwise, it would be way too OP. As for the last ascendency passive, I recommend taking Hinekora, Death's Fury. The life leech may not seem important but it really helps during harvest boss encounters or when dealing with remaining beyond bosses. Covering rare or unique monsters in ash on hit is also very nice since we fully convert our physical damage to fire. It essentially means a 120% damage multiplier against rare and unique monsters. 4. Gears
Spoiler
4.1 Bow
Spoiler
The base should be a synthesized bow with the explody implicit. The ilvl needs to be no less than 73 and the dex requirement should ideally be lower than 183. The mods we are looking for are implicit mods: (1) Killed Enemies Explode, dealing 5% of their Life as Physical Damage explicit mods: (1) (123–144)% increased Spell Damage (2) +1 to Level of Socketed Gems (3) +2 to Level of Socketed Support Gems (4) +(35–38)% to Global Critical Strike Multiplier (5) (8–10)% chance to deal Double Damage (6) Can have up to 3 Crafted Modifiers The crafting steps are (1) Spamming Deafening Essence of Woe until you get the T1 crit multi suffix. (2) Removing every affix other than the essence prefix and the crit multi suffix. If you succeed the bow should end up with just the essence prefix and the crit multi suffix. Otherwise, return to step (1). (3) Bench-crafting "Can have up to 3 Crafted Modifiers" and "Cannot roll Attack Modifiers". Now your bow should have one prefix and three suffixes. (4) Closing your eyes. (5) Slamming an exalt on the bow. If your bow is not ruined, it should get the "+1 to Level of Socketed Gems" prefix. (6) Removing all bench-crafted mods (7) Bench-crafting "Can have up to 3 Crafted Modifiers", "+2 to Level of Socketed Support Gems", and "(8–10)% chance to deal Double Damage". 4.2 Quiver
Spoiler
The Signal Fire is easily the BiS because of the 50% phys to fire damage conversion. You can further (double) corrupt it to get the "Gain (8–12)% of Physical Damage as Extra Cold/Fire/Lightning Damage" implicits. 4.3 Helmet
Spoiler
The best base is an ilvl 85+ Warlord influenced Archdemon Crown enchanted with "30% increased Temporal Chains Curse Effect". The mods we are looking for are explicit mods: (1) +(90–99) to maximum Life (2) +1 to Maximum Power Charges (3) (19–22)% increased Elemental Damage (4) Nearby Enemies have -9% to Fire Resistance (5) +(17–20)% to Global Critical Strike Multiplier (6) dex/res 4.4 Body armor
Spoiler
Cospri's Will is our only choice because it allows our hexes to affect hexproof enemies. Since we are not stacking evasion, we can use the harvest craft that makes quality on body armor instead grant extra life. The 3% movement speed implicit is better than nothing but we can double corrupt this chest piece to get better implicits. Any corrupted implicit can be useful EXCEPT FOR (1) (3–5)% additional Physical Damage Reduction while stationar, (2) +2 to Level of Socketed Curse Gems, (3) +2 to Level of Socketed Trap or Mine Gems, and (4) +2 to Level of Socketed Projectile Gems 4.5 Gloves
Spoiler
As mentioned earlier, we have to use Shackles of the Wretched for self curse. We need a corrupted pair with the "Curse Enemies with Elemental Weakness on Hit, with (40–48)% increased Effect" implicit. This implicit mod is mandatory for this build but it can cost several exalts. My suggestion is to make your loot filter show unique chain gloves as Shackles of the Wretched is the only one. You will save a few exalts if you get lucky corrupting yourself. 4.6 Boots
Spoiler
The conventional option for the boots slot has been Kaom's Roots. These boots prevent our action speed from becoming negative, which is a side effect of Temporal Chains. I recommend getting a pair of those enchanted with "10% increased Movement Speed if you haven't been Hit Recently". A more expensive option is getting one with the enchantment and the "(8–10)% increased Movement Speed speed" corrupted implicit. You may replace Kaom's Roots with something else if you can get a large amount of cast speed. My tests show the real problem without using Kaom's Roots is clunky casting animation. Movement speed is actually not a problem as we can steal a ton of movement mods from rare monsters. 4.7 Amulet
Spoiler
Solstice Vigil is without a doubt the only viable option for this build. The best anointment in my opinion is Whispers of Doom for the additional curse because we need to run 3 offensive curses for enough damage. Alternatively, you can use a corrupted one with the "You can apply an additional Curse" implicit. 4.8 Rings
Spoiler
4.8.1 Ring 1
Spoiler
The minimum requirement is a ring with Flammability on hit. This mod can either be an implicit on a synthesized ring, a suffix on a delve ring, or a suffix on a Warlord influenced ring. I think a Warlord influenced Vermillion Ring is the overall best option. The mods we are looking for are explicit mods: (1) +(70–79) to maximum Life (2) (13–15)% increased Area of Effect (3) (17–20)% increased Damage (4) Curse Enemies with Flammability on Hit, with 32% increased Effect (5) dex (6) res 4.8.2 Ring 2
Spoiler
We need Assassin's Mark on hit on our second ring. This mod can only exist on Shaper influenced rings. I also recommend using a Vermillion Ring for more life. The mods we are looking for are explicit mods: (1) +(70–79) to maximum Life (2) +(13–15) Life gained for each Enemy hit by your Spells (3) (17–20)% increased Damage (4) Trigger Level 12 Assassin's Mark when you Hit a Rare or Unique Enemy (5) dex (6) res 4.9 Belt
Spoiler
Headhunter is obviously the best belt for this build. Make sure you have "30% increased Damage with Hits against Rare monsters" on the belt. Divine it to 30 if you do not because this mod is equivalent to a 130% damage multiplier against rare monsters. 4.10 Jewels
Spoiler
4.10.1 Large cluster jewels
Spoiler
We only use large cluster jewels because we need to use medium cluster jewels. The best base is an 8-point one enchanted with "12% increased Physical Damage". The best mods in my opinion are implicit mods: (1) 10% reduced Reflected Elemental Damage taken explicit mods: (1) Added Small Passive Skills also grant: +(8–10) to Maximum Life (2) Added Small Passive Skills have 35% increased Effect (3) dex (4) res Alternatively, large cluster jewels enchanted with "10% increased Elemental Damage" are also OK. The only notable worth taking is Prismatic Heart. Make sure your combination of notables "pushes" Prismatic Heart to the front because we only want to spend 5 skill points on each large cluster jewel for the two sockets. 4.10.2 Medium cluster jewels
Spoiler
We need 3 6-point medium cluster jewels enchanted with "3% increased Effect of your Curses". The mods we need are implicit mods: (1) 10% reduced Reflected Elemental Damage taken explicit mods: (1) Dark Disclosure (2) Added Small Passive Skills have 35% increased Effect (3) res (4) dex/res In addition, we need one more medium cluster jewel that has at least 8% increased curse effect. I recommend using a Megalomaniac with Dark Disclosure and at least one other good notable. There are plenty of good options. I choose Lead By Example for the 4-second onslaught buff after using a warcry. The duration of this buff can be extended to 16 seconds by Temporal Chains. Since we use Enduring Cry every 8 second, we effectively have permanent onslaught. 4.10.3 Inspired Learning
Spoiler
We use 2 Inspired Learnings to accelerate the ramp up. The way Inspired Learning works is that it allows us to gain 1 mod from a rare enemy on kill. The same mod can be gained multiple times if multiple Inspired Learnings are equiped. One caveat is that 4 notable passive skills must be allocated within the radius of an Inspired Learning for it to work. For this reason, using too many Inspired Learnings may not be ideal because you are going to waste skill points on undesired passives. Like many other self curse builds, we use 2 Inspired Learnings. 4.10.4 Rare jewels
Spoiler
Rare jewels are the best means for us to fix our attributes and resistances. Jewels with (5–7)% increased maximum Life and dex/res are great to start with. Once you can get enough dexterity and resistances on other pieces, jewels should be where you get your crit multi. An endgame jewel should have implicit mods: (1) 10% reduced Reflected Elemental Damage taken explicit mods: (1) (5–7)% increased maximum Life (2) (14–16)% increased Global Physical Damage (3) +(9–12)% to Global Critical Strike Multiplier (4) +(12–15)% to Critical Strike Multiplier for Spells 4.11 Flasks
Spoiler
4.11.1 Flask 1
Spoiler
The first flask should be an Alchemist's Quicksilver Flask of Adrenaline. We need the speed boost to jump in the first pack of monsters. If you do not have shock immunity this flask can also be the place to get it. 4.11.2 Flask 2
Spoiler
The second flask should be a Diamond Flask of Staunching. We need to kill a shocked enemy to trigger our Herald of Thunder and we are guaranteed to shock on crit. Therefore, a Diamond Flask effectively increases our chance to trigger Herald of Thunder. We need the suffix to grant us bleed immunity because there is no other place in the build to get it. 4.11.3 Flask 3
Spoiler
The third flask should be a Cinderswallow Urn. It is very helpful in keeping us alive before killing the first few packs of mobs. The order of importance for the rolls is life->es->mana. The preferred veiled mod is "(60-80)% increased Critical Strike Chance during Flask Effect". 4.11.4 Flask 4
Spoiler
Atziri's Promise is a solid option for the fourth flask. It grants chaos res, life leech, and extra damage. All of those are useful in this build. 4.11.5 Flask 5
Spoiler
The fifth flask can be anything you like. If you want more damage, Bottled Faith is your best friend. If you want more AOE, use Dying Sun. If you want to be able to run no regen maps, you can use an Enduring Eternal Mana Flask. 5. Skills
Spoiler
5.1 Bow (6L)
Spoiler
(Vaal) Blade Vortex Empower Support (Anomalous) Inspiration Support (Awakened) Unleash Support (Awakened) Increased Area of Effect Support Combustion Support The most important thing is getting a 21/23 Blade Vortex. A 21/23 Vaal Blade Vortex is even better but not necessary. The extra DPS from Vaal Blade Vortex is only needed when killing conquerors. You may replace (Awakened) Increased Area of Effect Support with another support gem if you struggle with damage. However, do not use (Awakened) Elemental Focus Support as it prevents us from triggering our Herald of Thunder. Also, avoid using (Awakened) Controlled Destruction Support. The reduced crit chance makes it harder for us to trigger Herald of Thunder. 5.2 Body armor (6L)
Spoiler
Dash Second Wind Support Enduring Cry (Anomalous) Immortal Call (Anomalous) Cast When Damage Taken Support Increased Duration Support/(Divergent) Arcane Surge Support Keep (Anomalous) Cast When Damage Taken Support at level 1 and (Anomalous) Immortal Call at level 3. If you want more uptime for (Anomalous) Immortal Call, use Increased Duration Support. Otherwise, use (Divergent) Arcane Surge Support for more spell damage. Keep (Divergent) Arcane Surge Support at level 5 if you use it so that both Dash and Enduring Cry can trigger it on use. If you keep it at level 6 you do get 1% more spell damage but then only Dash can trigger it. 5.3 Helmet (4L)
Spoiler
(Anomalous) Herald of Purity (Divergent) Herald of Ash (Divergent) Purity of Lightning Enlighten Support We use (Anomalous) Herald of Purity and (Divergent) Herald of Ash to boost our damage. (Divergent) Purity of Lightning is not required but I use it together with a Watcher's Eye that has "Immune to Shock while affected by Purity of Lightning" and "Unaffected by Shocked Ground while affected by Purity of Lightning". We get freeze/chill (ground) immunity from Kaom's Roots, ignite immunity from our ascendency, and burning ground immunity from Soul of Abberath. The combination of (Divergent) Purity of Lightning and that Watcher's Eye makes us fully immune to elemental ailments and their respective ground effects. 5.2 Gloves (4L)
Spoiler
Temporal Chains Enhance Support Herald of Thunder Awakened Hextouch Support Make sure you use the awakened version of Hextouch Support. We have a curse limit of 3 and we use Flammability, Elemental Weakness, and Assassin's Mark for damage. Therefore, Awakened Hextouch Support is our best way to apply Temporal Chains as our fourth curse. The quality on Temporal Chains and Awakened Hextouch Support is important. Get them to 23 if you can. The level of Enhance Support is also important. Make sure you use a level 4 gem. Last edited by bwangwp#3468 on Apr 8, 2021, 10:16:33 AM Last bumped on Apr 12, 2021, 9:56:57 AM
|
|
|
This looks really good, only problem will be getting that explody base. How much did you pay for yours
|
|
" I got mine in the first month of the ritual league for 30ex. The base was pretty cheap back then. If you can't find a bow you can use an expkody wand/sceptre/staff. The price will be significantly lower. However, you need to find another way to convert your damage fully to elemental. |
|


