


[3.3] Soul Ripper Vaal Blight (Pat / Occ)
 Hello Guys. Until now, Blight have a reasonable firepower for a single target., but it was a weak skill for collective warfare.The Vaal version was added due to the update of 3.3. The Vaal version is a very powerful skill in collective warfare, but its cool down time is long and it is not easy to use. By using Soul Ripper which was also added in 3.3, you can get high annihilation power by ignoring the cool down time of the Vaal version.Let's enjoy Blight altogether. こんにちは。 今まで、Blightは単一のターゲットに対してはそれなりな火力を持っていましたが、対集団戦において弱いスキルでした。3.3のアップデートでVaal版が追加されました。 Vaal版は集団戦で非常に強力なスキルですが、クールダウン時間が長く、使いにくいです。 同じく3.3で追加されたSoul Ripperを使うことで、Vaal版のクールダウンタイムを踏み倒しすることで、高い殲滅力を得ることができます。さあBlightを存分に堪能しましょう。 Since Blight is DoT damage of chaos attribute, it is difficult to achieve both damage rise and protection performance. The defense plane uses automatic flask recovery, which is the ability of Ascendant's Pathfinder. Make regen and inc by Sulfur Flask. With Stibnite Flask, you will earn high avoidance performance by rising Blind and Eva. Build that can not reach reach and can not possess high regeneration, but emphasizes recovery by life flask. Blightはカオス属性のDoTダメージであるため、ダメージ上昇と防御面の両立が困難です。 防御面のギミックとしてフラスコの自動回収を利用します。これはアセンダントのパスファインダーの能力です。 Sulfur Flaskは高いRegenとIncを供給します。 Stibnite Flaskを使用すると、BlindとEvaの上昇によって高い回避能力を得ることができます。 リーチ能力が無く、高いRegeneがあるわけでもありませんが、ライフフラスコによる回復量に注目しています。 ****** Updata ******* 2018/07/09:add Ascendancy Choice 2018/07/04:add Video Uber Lab. add Playlog
Pros&Cons
+ The speed of the map farm is good. + Enough DPS for endgame (Shaper, red elder, all maps to t16) + Tanky enough for all softcore purposes (6k eHP, Phase Acrobatics, Enfeeble) + Enjyoy Vaal Blight - There are many high priced items. It is not a starter build. - Cannot do no regenerate maps - It is quite difficult to beat uber elder.
PoB Link
30pt: https://pastebin.com/dERYAEEs 60pt: https://pastebin.com/QYzGY8vX 92pt: https://pastebin.com/mJBiXWNQ (without MoM) 118pt(lv90): https://pastebin.com/nAGbXx99 My character(lv97): https://pastebin.com/TKih9hT2
Video
T11 Underground Sea(lv82): https://www.youtube.com/watch?v=VOiXBSQQjYI T15 Reef: https://www.youtube.com/watch?v=K3K0emFQ8Ew Omnitect: https://www.youtube.com/watch?v=ZZRidRoF-8I Phoenix: https://www.youtube.com/watch?v=muHdxFAV9uI (His cyclone is very very slow) Chimera: https://www.youtube.com/watch?v=blt24JD62h8 Minotaur : https://www.youtube.com/watch?v=fibQY5Czjtk Shaper : https://www.youtube.com/watch?v=6yKEkDAUdcU Uber Lab: https://www.youtube.com/watch?v=FFH5px3xlgM (very easy run) T11 Underground Sea(Obliteration): https://www.youtube.com/watch?v=y9jEZO540kQ T11 Underground Sea(Soul Catcher): https://www.youtube.com/watch?v=QJHadQ2E9Gw
Flask
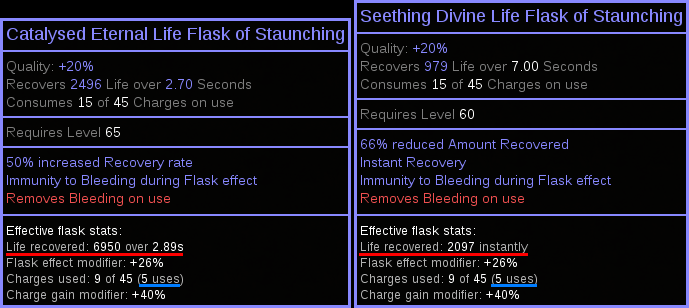 By acquiring various flask nodes, the performance of the Life Flask increases dramatically. The Eternal Life Flask with Recovery Rate has about 2400 recoveries per second. This can be used at least five times in a row. You can have it for 5 use * 3 sec = 15 seconds. During which it recovers 2 use, so you can keep it for at least 20 seconds. At map farm time, there is a possibility of unexpected big damage, so an instant recovery flask is useful. 各種フラスコノードを取得する事で、ライフフラスコの性能は飛躍的に上昇します。 Recovery Rateの付与されたEternal Life Flaskは、秒間に約2400もの回復量を持ちます。 これが最低でも、連続で5回使用可能です。 5回 * 3secで15秒間持たせることが出来ます、その間に2回分回復するので最低でも20秒間は維持することが出来ます。 マップファーム時には、予期せぬ大ダメージを食らう可能性があるので、即時回復のフラスコが有用です。
Ascendancy Choice
Pathfinder: + Flasks gain 3 Charges every 3 Seconds + 15% chance for your Flasks to not consume Charges This build heavily depends on the flasks for the defensive plane. Also, in order to increase the number of uses of Soul Ripper, the above two kinds of effects are very powerful. このビルドは防御面をフラスコに大きく依存しています。 またSoul Ripperの使用回数を多くするために、上記2種類の効果は非常に強力です。 Occultist: + Enemies can have 1 additional Curse + 10% increased Effect of your Curses + 1.5% of Energy Shield Regenerated per second + Cannot be Stunned while you have Energy Shield +1 curse is useful as a means to supply a third curse (Enfeeble or Temporal Chains). It is also a nice effect that the effect of various curses rise. The bottom two effects, but this build does not use Shield Charge to move. (Used mainly for Fortify) Therefore, it is not necessary to use the Blood Rage because of AS rising effect. In other words, the ES will never be 0 at any time, and if you have more than 1 ES you can invalidate the stun. Continuous attacks of enemies can be blocked by Temporal Chains (check my video), It is almost always possible to invalidate the stun. +1呪いは3つ目の呪い(Enfeeble or Temporal Chains)を供給する手段として有用です。 また各種呪いの効果が上昇するのも嬉しい効果です。 下2つの効果ですが、このビルドは移動にShield Chargeを使いません。(主にFortifyの為に使います) そのためAS上昇効果の為にBlood Rageを使う必要がありません。 つまり常時ESが0になる事は無く、ESが1でもあればスタンを無効化出来ます。 敵の連続的な攻撃はTemporal Chainsによって阻止する事が出来るので(私のビデオをチェックしてみてください)、ほぼ常時スタンを無効化する事が可能になります。
Required Gear - 必須
You can ignore Vaal Blight's long Soul Gain Prevention Vaal Blightの長いSoul Gain Preventionを無視する事が出来ます Vaal Blight is so heavy Soul Cost to increase recovery efficiency Vaal BlightはSoul Costが重いので回収効率を上げるために Belt with reduced Flask Charges used with more than 19% ベルトにはreduced Flask Charges usedが19%以上を付いたものを It is necessary to set Despair's reserve to 0 Despairのリザーブを0にするのに必要です The fire power of Blight can be drastically extended Blightの火力を大幅に伸ばすことが出来ます
Recommend Gear - 推奨
 It's img because it's not at hand, but + 3 Tabula is recommended Performance is higher for AoE and Duration by 3% in Duration 手元に無いのでimgですが、+3 Tabulaを推奨します AoEとDurationはDurationの方が3%程性能が高くなります Chaos Skill Effect Duration is powerful, especially against bosses 高い攻撃性能を持ちます、特に対ボスにおいてChaos Skill Effect Durationは強力です It is also useful here at farm time if you have enough inc 他の装備で十分にincを稼げている場合はファーム時にはこちらも有用です Dodge Spell Chance is useful, Incursion rare shoes would be good Dodge Spell Chanceが有用です、Incursionのレア靴でも良いでしょう The combination of Mark of the Shaper and Elder Ring is very powerful Elder Ring is strong if crafted with Essence if possible Mark of the ShaperとElder Ringの組み合わせは非常に強力です 出来ればElder RingはEssenceでクラフトしたものが強いです High life shield with Spell Dmg, Mana Rege 45% or more is recommended Spell Dmgの付いた高ライフの盾、マナリジェ45%以上推奨
Gem Links
Main Skills: Vaal Blight - Efficacy - Controlled Destruciton - Swift Affiction - Void Manipulation - Empower Other Skills: Blasphemy - Despair - Temporal Chains - Enfeeble Wither - Spell Totem - Faster Casting Shield Charge - Faster Attacks - Forify Arctic Armour CwDT(20) - Stone Golem CwDT(1) - Immotal Call(1)
Pantheon & Bandits
Pantheon:
Major = "Soul of Lunaris" or "Soul of Arakaali" Minor = "Soul of Ryslatha" or "Soul of Tukohama" "Soul of Garukhan" +6% Movement Speed is very powerful at map farm time. +6% Movement Speedはマップファーム時において非常に強力です。 Bandits: Kill all
Current Gear - 私の装備
Playlog
Last edited by alloces77#2869 on Jul 9, 2018, 2:31:10 AM Last bumped on Sep 1, 2018, 7:33:00 AM
|
|
|
thank you for posting this build. I've always wanted blight to be decently good so maybe i'll give this build a try.
sorry if its a noob question but why the occultist ascendancy? |
|
" The choice of the occultist is only for the + 1 curse. Despair / Temporal Chains / Enfeeble, it is regrettable to give up which one. Despair is mandatory. Enfeeble is the best in defense performance. If it gives up, it becomes Temporal Chains, but once there is, it can be relieved. If you gain +1 curse by other means. There are options to choose other than occultists. |
|
|
Hello.
Could you add trees for lvl 30 ; 60 ; 90? |
|
" We added 30pt 60pt 92pt to PoB Link. Also added ES shield to recommended equipment. |
|
|
Is this hardcore viable?
|
|
" I am a SC player, but this character is hardly dead. Therefore I think that survival rate is high even in HC. |
|
|
Is theres any downsides of using Witchfire brew with despair aura
|
|
" It is not a bad choice to rely on Witchfire for despair. But since the flask frame is full, you will have trouble deciding which one to give up. If you have Atziri 's Reflection you can exchange it with the Flask frame of uncaled. But if you want to use more Soul Ripper, you will choose The Overflowing Chalice. |
|
|
How is it so tanky? Where does all the regen come from
|
|


