How does this build perform in patch 3.5 compared to 3.4?
The short answer: no differently. None of the core items for either version of this build nor any core skills were changed significantly enough to impact the build too much, if at all. On top of this, many other popular bow builds were nerfed drastically with the changes to Quill Rain and Chin Sol, however, Hopeshredder has not been touched and remains a top tier bow in my eyes.
FAQ
Spoiler
If there's a question you have please see if there's an answer here for you first, if not I'll reply as soon as I can in this thread.
Q: How should I prioritize gear upgrades? A: 6l Hopeshredder -> Kaom's Heart -> Might of the Meek jewels -> Yoke of Suffering -> 2socket Tombfist. Past that is personal preferance.
Q: How do you deal with the reflect clone from Atziri/Uber Atziri? A: Swap out Mirage Archer/Ice Bite (depending on which version of the build you are playing) for Slower Projectiles in your Scourge Arrow setup and always position yourself near the clone on the opposite side of the mirror, then fire Scourge Arrow away from the mirror and the thorn pods will not reach far enough to hit the reflect.
Q: Your PoB shows that you don't have enough Intelligence to use Wrath, so how are you using it? A: I have it from a ring corruption, which allows me to bypass attribute requirements. If you don't have this ring corruption you can use it in a gem at a lower level.
Q: What do you use to level? A: Storm Cloud/The Tempest with an RoA setup. For gems use generic flat damage like Added Cold and Added Lightning with Mirage Archer then more generic damage gems like Concentrated effect, Elemental Damage with Attacks, and Increased Crit.
Q: Why do you use Increased Critical Strikes even though it isn't the highest DPS link? A: I do this for damage consistency, without Increased Crit your DPS will fluctuate a lot due to this build being a heavy crit one.
Welcome to my first ever Path of Exile build guide, the reason I wanted to share this build is simply because of how effective it turned out to be at, well basically everything. When I really got this build going I was surprised at how easily it smashed all content and farmed endgame bosses, all while being safe and fairly tanky. Since I had a few people ask me about the build in-game I decided hey why not just make a guide, so here we are.
What is this build capable of?
Spoiler
The short answer: just about everything the game has to offer
At the time of writing this guide, my character is a level 95 Ascendant with:
- 6,478 Life
- 5M+ Shaper DPS (calcs in the guide itself)
- 200% movement speed buffed (No QoTF)
- 40-60% of life overleeched via Slayer + Vaal Pact and Captured Arachnoxia
In its current state, my character has no problems smashing the most deadly T16 maps, all endgame bosses including Uber Atziri and Uber Elder while even being a fast mapper, safe delver and a great Uber Lab runner. On top of all that, this build is extremely safe for both mapping and bossing due to its long range freezes, decent life, dodge and massive amounts of overleech. The only content this build currently can't deal with is Hall of Grandmasters.
How does this build work?
Spoiler
For this build we will be stacking flat elemental damage and using Hopeshredder, which is a very unique bow that adds flat cold damage while granting you many bonuses such as leech, damage and movement speed per Frenzy Charge, but with the added downside that you take a nasty cold damage degen while moving, in order to counter this and utilize the bow properly, I decided to play as a Slayer/Raider Ascendant in order to counter the degen and maintain Frenzy Charges against bosses.
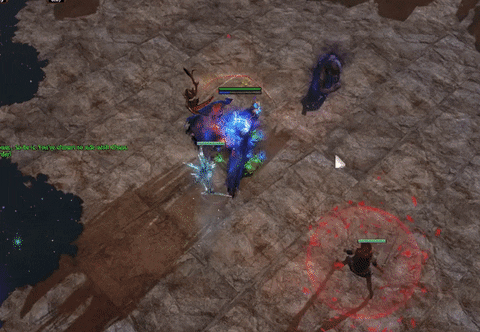
As our main skill we use Scourge Arrow, a new skill introduced in 3.4 that's quickly become one of my all-time favorites, and I believe it's currently very underrated. As a quick summary of how it works for those unfamiliar, Scourge Arrow is a charge skill similar to Blade Flurry or Incinerate that has up to 5 stages, releasing it fires a piercing arrow that spawns a pod along its path for each stage, these pods then explode, firing projectiles all around it, each seperate pod can damage the same enemy on top of the initial arrow, making Scourge Arrow an absolute monster at single target with the overlapping damage all while being a great clear skill as well due to the range on the projectiles the pods spawn. While mapping I rarely charge up Scourge Arrow to maximum stages, 2-3 stages is usually enough to delete an entire pack, with the help of some Herald of Ice explosions of course. For Single target we utilize Point Blank and fully charge the skill, shotgunning all bosses off the face of the game.
How did I decide on doing this build?
Spoiler
The original inspiration for this build came from me trying to make a super fast clearspeed build that revolved around Hopeshredder, and also to optimally utilize the Zerphi's Heart I splurged on in Incursion League.
Seeing as how Hopeshredder had that huge degen before the buffs and required Frenzy Charges, I decided on going Slayer/Raider Ascendant rather than a traditional Deadeye for this build when I theorycrafted it in Incursion, however this was about a month and a half in to the League, and I didn't have the interest to make another character that late in, so I shelved the build for the time being.
So out comes 3.4 with huge buffs to Hopeshredder as well as a teaser video for Scourge Arrow, and being a huge fan of other charge-type skills such Blade Flurry and the newly reworked Incinerate, I decided I just had to make a build for it, and incorporated the skill into my Hopeshredder Incursion build.
Pros
- Maps and Delves quickly and safely
- Decent amount of health (currently ~6500 on my char)
- Incredible boss DPS and survivability, Completely Uber Elder viable and does NOT require any changes to your setup to do so
- Stupid amounts of overleech thanks to Soul of Arachnoxia Pantheon, also makes this build great at sustaining Darkness in Delves
- Great Lab runner
- Freezes everything other than the top bosses, turning most mobs into target dummies
- Very satisfying Herald of Ice explosions
- High movement speed
- Best of all, absolutely no gem swapping required :)
Cons
- Cannot do Elemental Reflect or No Leech maps
- Scourge Arrow can get buggy when firing through small doorways and sometimes won't shoot through them
- Not HoGM viable
Version 1 Full build guide details:
"
This is my original version of the build and I recommend that most players stick to this version. It's significantly cheaper and less complicated than version 2.
Gem Links
Spoiler
Scourge Arrow->Elemental Damage with attacks->Increased Critical Strikes->Damage on Full Life->Mirage Archer->Hypothermia
Spoiler
This is in order of priority. If you do not have a 6link take out Hypothermia. Since we do so much cold damage even without much invested into our gear, we will have no problem chilling bosses for Hypothermia, giving us a huge more multiplier. Another option if you don't feel like you're chilling your enemies consistently enough is to simply use Added Cold Damage Support. For those doubting Damage on Full Life, we will always be outleeching the degen from Blood Rage and Hopeshredder, even though sometimes your health appears to be staying below its maximum, as long as you are outregenerating degeneration effects, Damage on Full Life will be enabled. The rest of the links are relatively self explanatory and are just simple damage multipliers.
Blink Arrow->Frenzy(Optional)->Faster Attacks
Spoiler
This is for mobility as well as topping off on Frenzy Charges against bosses. When moving between instances(which removes your charges as well as any leech you've built up) and I need some quick Frenzy charges, I will just use Frenzy rather than Ralakesh's Impatience to quickly reach my Frenzy Charge cap. From that point you shouldn't have to touch the skill again for the rest of the fight as your Raider Ascendancy should keep your Frenzy Charges up for the rest of the fight.
Cast when Damage taken(level 1)->Immortal Call(Level 3)
Spoiler
Since we use Blood Rage this will proc the 50% increased recovery rate of life from Captured Queen of the Great Tangle due to Immortal Call momentarily stopping the degen from Blood Rage, increasing our Leech rate by 50%. If you have the extra socket, feel free to put in Increased Duration as well.
Wrath+Blood Rage+Frost Bomb+Herald of Ice+Summon Ice Golem
Spoiler
Wrath is our highest DPS Aura and can be used with a Watcher's Eye that grants high crit chance, Blood Rage is also very important since it's our only way of generating a high amount of Frenzy Charges while mapping (since the Raider Ascendancy only grants them on hitting a Rare or Unique monster) and also grants a nice chunk of Attack Speed. The rest are just minor damage improvements and are somewhat optional, although I highly recommend at least using Herald of Ice for the clearspeed.
Gear (Includes budget recommendations)
Spoiler
My current gear:
Weapons:
Spoiler
- Weapon: Hopeshredder is the weapon that my entire build revolves around, we use it for its high flat cold damage as well as its high movement speed and leech. The bow synchronizes with the Slayer/Raider Scion perfectly since Slayer will counter the cold damage degen while Raider will maintain your Frenzy Charges against bosses. Hopeshredder is non-negotiable in this build.
- Quiver: After a bit of revision to my build and some advice from Guffinn, I've decided that a rare quiver is overall better than Hyrri's Demise because of life since after switching back to Tombfist, I have much more flat elemental damage than before making the flat elemental damage from Hyrri's less needed. Hyrri's is still an amazing and cheap option but ultimately you should look for a quiver with Crit Multi, WED and life.
Armor:
Spoiler
- Helmet: Your helmet slot is a free slot in this build, I use Devoto's for the movement and attack speed as well as enchant availability on the market.
- Body Armor: We don't need a second 6link for this build, making Kaom's Heart a no brainer for the massive life pool increase.
- Gloves: Initially I used a pair of rare gloves with the "Socketed Skills gain 18% increased attack speed" affix, but the interaction this pair of gloves had with attack speed buffs like Blood Rage and Haste was removed in the recent patch (3.4.3c) so I've swapped back to a standard pair of 2 socket Tombfists as they are without a doubt the next best thing thanks to the innate Intimidation and Abyssal Sockets for more flat elemental damage.
- Boots: I use a pair of 2socket Bubonic Trail boots simply for the movement speed and access to 2 Abyssal Jewels but like the helmet, this slot can be a wild card, feel free to use whatever you want.
Accessories:
Spoiler
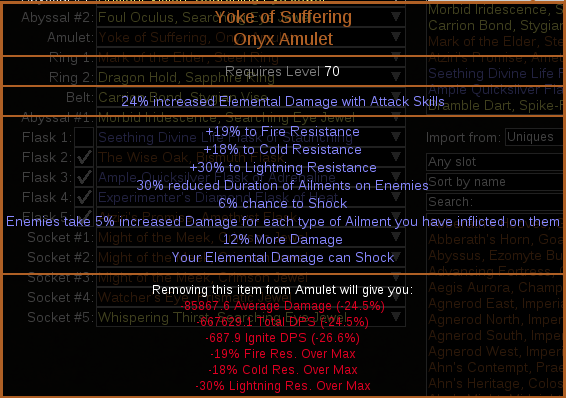
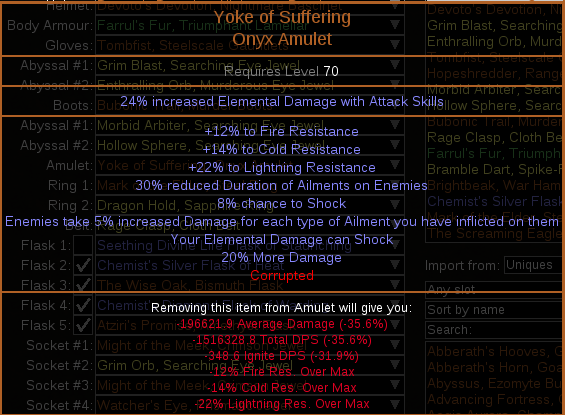
- Amulet: Yoke of Suffering is absolutely BiS for this build, since you do majority Cold Damage and also reliably apply 3 elemental ailments thanks to crit, this makes you apply huge Shocks via Cold Damage even to endgame bosses on top of another 15% more multiplier thanks to your ailments. Other decent options include The Pandemonius for Cold Penetration or Carnage Heart if you're on welfare.
Further Explanation of why Yoke is undeniably BiS for this build:
Spoiler
Although a bit out of order, I urge anyone reading this who hasn't read the DPS calculations at the bottom of the page to read that before reading this, that's how I calculate how much damage we get from the Shock that Yoke of Suffering provides.
And now that that's out of the way, we know that against Shaper, Yoke will provide a total of 12% more damage via Shock in this build, also just for the purpose of this demonstration, I'll be using a Yoke of Suffering with 24% increased Elemental Damage with Attacks corrupted onto it, due to the fact that I currently have one and they only cost around 2ex, while the amulets I'm going to be comparing this to are mirror tier Shaper/Elder Rare amulets with perfectly Divined Quadra T1 Damage rolls, so I'd say the 2ex corruption I'm adding onto Yoke is pretty fair here.
Here's what the Yoke looks like in my PoB, note that I have not ticked Shock and have instead ticked "Is the enemy Bleeding" to accurately represent the 5% increased damage taken per ailment that Yoke has:
Remember that the time between the first shot of Scourge Arrow and the Thorn Pods exploding is shorter than our ailment duration of 1.4 seconds, meaning our Thorn Pods (which is most of our DPS) will ALWAYS benefit from Shocks applied by that initial Scourge Arrow shot, so a Shock of this caliber can always be reliably applied to our DPS.
Now lets take a look at some unrealistically OP amulets in the exact same PoB setup:
Note that these Amulets have FOUR T1 Damage rolls, and I added in the Cold Resistance so it remains our highest resist for Wise Oak. Amulets like this only exist in Standard for prices well over a mirror, and most likely won't give the same kind of resistances that Yoke of Suffering does.
TL;DR of the comparisons? A Yoke of Suffering with a 2ex corruption offers the same or more DPS than standard mirror tier amulets for this build.
"But whatabout life? Yoke of Suffering can't get life"
This is true, but with the absurd amount of DPS this amulet provides for the build, it's far more worth it to sacrifice some damage nodes in our tree for Jewel sockets that provide life or simply just life nodes, and is far more efficient than buying a rare amulet with life on it.
All in all there is NO REASON WHATSOEVER not to use Yoke of Suffering in this build other than it being too expensive at the start of a league, but especially when it's only 25c at the current point of the league, you should absolutely be running one.
- Rings: Mark of the Elder is pretty standard for most attack-based builds these days, and this build is no different especially since Mark of the Elder adds a nice amount of flat Cold Damage which this build loves. Your other Ring should be any rare Shaper ring that fills out your elemental resistances, if you can get one with more flat elemental damage added onto it then more power to you. Both rings should be relatively inexpensive as well as hard to beat in terms of DPS, so I don't recommend anything else. My current ring has a level 21 Wrath corrupt on it since this build is pretty thirsty for gem sockets, but this isn't necessary.
- Belt: Your belt is another free slot, use this slot mainly to fill out elemental resistances or get more life. If you have your resistances filled out by your other gear, feel free to use Darkness Enthroned with more flat ele Abyss Jewels for big deeps.
Jewels:
Spoiler
3x Might of the Meek around the Scion starting tree grants an absolutely insane amount of stats and should be one of your hugest gearing priorities, apart from that, Abyssal Jewels with flat Cold damage and life should fill up your other jewel slots. A Watcher's Eye that grants crit chance while affected by Wrath is also a nice touch.
Other stat priorites on jewels include accuracy, attack speed (preferably attack speed if you've crit recently since they roll higher) and other flat elemental damages.
Flasks:
Spoiler
- Instant Life Flask with Bleed Immunity for when your health dips hard
- Wise Oak for penetration and elemental defense
- Quicksilver flask with movement speed for obvious reasons
- Diamond Flask with antifreeze for massive crit chance, I also keep a Diamond Flask of Warding in my inventory for curse maps
- Atziri's Promise, helps you build your leech just a little bit faster and adds a nice amount of Chaos Damage
Budget Gear recommendations:
Spoiler
- Starkonja's instead of Devoto's if you really want the extra pod helm enchant since both are cheap without the enchant (Devoto's Devotion with the Scourge Arrow Pod enchant is currently much more expensive than a Starkonja's with it). Other decent enchants include the simple increased Scourge Arrow damage enchant or Blood Rage attack speed.
- Belly of the Beast instead of Kaoms, your chest slot should be used purely for defenses and Belly is a cheap option with a nice chunk of life, but if you really want a 6L and don't have it on your Hopeshredder, feel free to use a Tabula or a rare 6l chest with life. Loreweave is also another option for this build but those don't tend to be very budget friendly for most, especially earlier on in leagues.
- Carnage Heart instead of Yoke of Suffering, Carnage Heart is especially nice because of its high attributes and you should use it until you can afford Yoke of Suffering (Or until its price drops more)
- One socket Tombfist instead of Two sockets will work perfectly fine as a budget option, or alternatively just a pair of generic rare gloves with life, resists and attack speed will work.
- Use a Doryani's Delusion with flat cold damage instead of Bubonic Trail (If you are doing this, I recommend using Herald of Ice and Herald of Thunder alongside the Purity skill the boots provide instead of the normal Herald of Ice+Wrath setup)
- Use flat elemental Abyss Jewels instead of Might of the Meek (Although I strongly recommend getting at least 2 Meek jewels ASAP)
- The Nomad is a really good option for a budget belt and I used one for most of my playthrough, it has pretty much everything you need aside from life and helps fill some of your strength requirements.
The rest of my gear should be relatively inexpensive for uncorrupted versions
Last but not least:
A Ralakesh's Impatience to generate charges before a boss fight starts, I mainly only use these on Uber Elder and Shaper but it helps to make sure you're at full power before starting some of these bosses. If you're not familiar with how to use these boots, just equip them before a boss fight and don't move, when you're ready or the boss fight starts, reequip your normal boots before you start moving around and you'll keep all your charges.
Skill Tree + Bandits/Pantheon
Spoiler
Bandits:
- Alira for Crit Multi and EleRes
Pantheon:
- Major God: Soul of Arakaali. We use this for the Queen of the Great Tangle effect, which can be acquired from Tier 6 Jungle Valley (updated as of patch 3.5). If you don't know what this does, it grants 50% increased life recovery rate if you've stopped taking a damage over time in the past 4 seconds, and yes this affects leech. We proc this by using Blood Rage and Cast when Damage Taken + Immortal Call, stopping the physical degen from Blood Rage will activate Queen of the Great Tangle.
- Minor God: Personal preferance. I use Soul of Yugul for Varesh, causing you to take reduced Cold Damage if you've been hit recently which is a nice defensive boost against cold damage bosses like Elder.
Keystones:
Spoiler
Vaal Pact - we are going Slayer in our Ascendancy Tree, granting us overleech, this makes Vaal Pact an absolute must as it doubles our leech
Point Blank - up to 50% more damage in close range, this is what gives us our massive boss DPS, and does not hurt clearspeed
Acrobatics - this build utilizes almost no armor, block and ES, making the 30% dodge on Acrobatics pretty much free, and is one of our strongest defensive nodes. You can also take Phase Acrobatics if you like it but I personally don't care for it too much
Ascendancy:
Spoiler
Slayer is the crux of this build when it comes to our skill tree and is absolutely required. Paired with Vaal Pact, the overleech will not only sustain us through the degen from Hopeshredder and Blood Rage, but will heal so fast that even some of the most brutal hits can be shrugged off completely, the innate Culling Strike from this Ascendancy is also nothing short of amazing for bossing.
The Raider Ascendancy keeps our Frenzy Charges at maximum throughout boss fights while giving us Onslaught and movement speed, this makes us much faster while mapping and is a great boost to our dps.
Ascendancy tree path:
- Normal Lab: take the two nodes leading to the Duelist Ascendancy node
- Cruel Lab: Take the Duelist Ascendancy node and go Slayer, then take the 40 Dexterity node leading to the Ranger Ascendancy
- Merciless Lab: Take the 2 points towards the Ranger Ascendancy then take Raider
- Uber Lab: Go to Path of the Duelist
IMPORTANT NOTES- By now you should definitely have Uber Lab done and have Path of the Duelist, it's important to unspec all the points leading to the Duelist side tree from Constitution
This is the node area I'm talking about just for referance
Leveling
Spoiler
After the 3.5 nerfs to Quill Rain, I now recommend leveling with The Tempest/Storm Cloud and RoA instead of Toxic Rain, while still using the cookie-cutter Goldrim + Tabula setup. Your gem links should be Rain of Arrows -> Added Lightning Damage -> Added Cold Damage -> Mirage Archer -> Concentrated Effect -> Increased Critical Strikes.
Other great leveling uniques include:
Gloves - Tombfist, Hrimsorrow/Hrimburn
Boots - Nomic's Storm, Lioneye's Paws
Belt - Darkness Enthroned with leveling Abyss Jewels, Belt of the Deceiver
Amulet - Carnage Heart, Karui Ward/Charge
Quiver - Hyrri's Bite, Drillneck
Rings - Berek's Pass, Berek's Grip, Le Heup of All
For early mapping just make sure your resistances are capped and you should be fine even without too large of a health pool thanks to your freezes and long range. Past that, mapping is smooth sailing to level 90 and beyond.
Tips & Tricks:
Spoiler
- When going for raw single-target DPS, make sure to hold your cursor close to your character; this will shorten the spread between the pods that Scourge Arrow spawns, allowing for more thorn arrows to hit and benefit more from Point Blank.
- Also for bossing, a good time to place down a Frost Bomb is right after you fire the initial arrow, this will apply the debuff before your thorn arrows explode and give you more burst damage.
- When mapping just charge Scourge Arrow to 1-3 stages rather than fully charging, this should wipe most mob packs with ease while being much faster and smoother.
- Try not charge up Scourge Arrow in close range to mob packs, even though we're pretty tanky and this usually isn't very fatal, this can result in us getting stunlocked without getting any damage off, either use your high movement speed to kite back if large packs get too close or Blink Arrow out.
Full DPS + Yoke & Shock calculations
Spoiler
I will be using my exact PoB link for referance on these calculations:
First lets calculate DPS before factoring in Shock multiplier: (we tick "Is the enemy bleeding" to compensate for the 5% increased damage taken per ailment affix on Yoke of Suffering since we will not tick Shock)
- Release at 5 stages DPS: 937,422
- Thorn Arrows DPS (we also factor in the extra pod enchant since PoB doesn't, which is 20% more Thorn Arrows DPS: 2,343,987 x 1.2 = 2,812,784
- Added together (937,422 + 2,812,784 = 3,750,206 DPS)
- Now we factor in Mirage Archer (PoB does not factor this in whatsoever) which has 60% less attack speed and 11% less damage, this makes it easy to calculate for as both stats are very linear to DPS: 3,750,206 x 0.4(attack speed) = 1,500,082. Now we calculate for the less damage multiplier: 1,500,082 x 0.89(damage multiplier) = 1,335,072 total Mirage archer DPS
- Lastly we add both values together: 3,750,206 + 1,335,072 = 5,085,278 DPS before applying any Shock
Now we're going to calculate and apply a very basic Shock but first I'm going to explain my logic here with Shock. Shock is an ailment that causes the enemy it's applied to to take up to 50% increased damage depending on how much damage you deal in a single hit (50% Shock is achieved by dealing 10% of your opponents maximum life in a single hit, it's a linear scaling meaning if you do 1% of your opponents maximum life you get a 5% increased damage Shock, and dealing 5% of your opponents maximum life nets you a 25% increased damage Shock and so on). Since the multiplier is applied to the enemy and not the player, it can be thought of as a More multiplier. Against trash mobs and even most random map bosses that have a low life pool, you're going to get the maximum Shock value since they're basically going to get 1-2shot by Scourge Arrow, so we're just going to focus on endgame bosses since that's where high DPS matters the most anyways. For our test dummy we use Shaper, since he has among the highest health in the game before factoring anything external such as map mods. For reference, the Shaper has 18,328,731 life (taken from the PoE Wiki).
The highest single hit in Scourge Arrow comes from the 5 stage release as it deals double the damage of each individual pod, and in my current PoB, fully buffed and BEFORE applying any sort of Shock, my single-hit damage averages out to be 602,836 on Shaper. Now that we have all this information, we can do a Shock Calculation:
- 602,835/18,328,731 = ~0.03, meaning this deals 3% of Shaper's life, leading to a 15% increased damage Shock multiplier taken by Shaper, since we already have 25% increased damage taken total from other sources (intimidate + Yoke ailment multiplier) I use this equation to more accurately calculate the more multiplier we get from Shock:
1.4(total increased damage multiplier)/1.25(damage multiplier before shock) = 1.12 (12% more damage)
So now that we know that we can plug in 12% more overall damage into our DPS to calculate for Shock: 5,085,278 x 1.12 = 5,695,511 total DPS for our final calculation.
One final thing to keep in mind is that since Yoke of Suffering reduces our Ailment Duration to 1.4 seconds, however the time it takes between firing Scourge Arrow and the Spore Pods exploding is slightly less than 1 second, meaning that if you apply the Shock from the initial arrow, the Spore Pods (which are the largest bulk of our damage) will always benefit from the Shock.
This guide should cover most of what you need for the build, although if not, I'm open to answer questions or uncertainties :)
Last edited by SkillshotsOP#4043 on Dec 23, 2018, 6:42:23 AM
This is the more finalized version of my build, all the basics of the build and the playstyle are more or less the same, just with several tweaks and gear differences that focus on improving the overall quality of life in this build. Keep in mind that this build is MUCH more expensive, costing me at least 50-60 ex more than the original version, if not more, which is why I still advise most players to stick with Version 1.
Gem Links
Spoiler
Scourge Arrow->Elemental Damage with Attacks->Increased Critical Strikes->Damage on Full Life->Hypothermia->Ice Bite
Spoiler
The main difference here between this build and Version 1 that we swap out Mirage Archer for Ice Bite, the reason being that we will now be using Mirage Archer in our second 6link. This gives Scourge Arrow a significantly higher hit, allowing us to apply larger Shocks from our Yoke of Suffering, without losing the DPS from Mirage Archer.
Rain of Arrows->Elemental Damage with Attacks->Increased Critical Strikes->Damage on Full Life->Mirage Archer->Hypothermia
Spoiler
We are no longer using Kaom's in this version of the build which allows us to have another 6link setup. Rain of Arrows is by far the best option for a second skill due to the fact that it scales very similarly to Scourge Arrow in the sense that you don't scale additional projectiles with it like you do with almost every other bow skill, and does not require any gem swaps between mapping and bossing. This is an amazing addition to our clearspeed and bossing; simply firing Rain of Arrows every now and again ensures that the Mirage Archer stays above us, and with the huge AoE on the skill, even Mirage Archer alone does a great job at clearing mobs. Even if the Mirage Archer doesn't outright kill a pack, it will often chill and freeze them, lowering the amount of threats to you.
Another huge bonus we get is Vaal Rain of Arrows, which deals much more damage than it seems while applying a hefty maim on enemies (yes even endgame bosses). If you have uses of this skill upon entering a boss room, use both charges on top of all your other skills and watch as even the tankiest guardians get deleted almost immediately.
Blink Arrow->Faster Attacks
Spoiler
Standard mobility setup for bows. We don't need the Frenzy skill anymore since Farrul's Fur will permanently keep us at maximum Frenzy Charges,
Cast when Damage Taken(level 1)->Immortal Call(level 3)
Spoiler
No changes here. We use this to proc Arachnoxia and increase our leech. As a nice bonus our Immortal Call now lasts longer since we use Endurance Charges now.
Wrath+Blood Rage+Frost Bomb+Herald of Ice+Summon Ice Golem
Spoiler
Again, no changes here, but I do want to make it a point that it's very important to get Wrath as a corruption in our ring since we don't have a single gem socket to spare and we don't want to have to meet intelligence requirements. Having the skill come from a corruption rather than a gem allows us to have a level 21 Wrath and completely bypass the Intelligence requirement.
Gear
Spoiler
My current gear:
Weapons:
Spoiler
- Weapon: Hopeshredder is still as much, if not more core to the build. Now that we use Farrul's Fur with Aspect of the Cat, we are permanently at maximum Frenzy Charges, and no weapon loves Frenzy Charges as much as Hopeshredder.
- Quiver: While Hyrri's Demise was a great option in Version 1, a rare quiver with life and resists is now much more important due to the loss of life from dropping Kaom's, as well as the fact that it's going to be a little harder to get resists from our belt (more on that later). While a rare quiver was optional in Version 1, it's now essential for Version 2.
Armor:
Spoiler
I'm not going to go over every individual armor piece again as everything but the chest piece is exactly the same, but I will talk about our shiny new armor a little bit.
- Body Armor: We've dropped Kaom's Heart for Farrul's Fur, the reason for this is mainly due to the permanent Frenzy Charge uptime, but there are other noteworthy points about this chest. First of all it makes Aspect of the Cat reserve no mana, without this, this build wouldn't even be possible because dropping either Herald of Ice or Wrath would be a huge reduction in our DPS and/or clearspeed, and running all 3 even with a level 4 enlighten just takes up too much mana. We also gain almost permanent Power Charges for a huge boost to our crit. (our power charges are still up the large majority of the time since they last 10 seconds. There is only a 2 second window of downtime which isn't really a problem at all.)
Note that there is something a little bit annoying about this setup though, and that's that since Hopeshredder has the cold damage degen per Frenzy charge, and you now always have Frenzy charges, this means you will degen in even in your hideout, but this is very minor and easily fixed by just swapping to your secondary weapons.
Accessories:
Spoiler
- Amulet: While there's technically no difference in our choice of amulet here, I want to further stress how important Yoke of Suffering is especially to this second version of the build, since we dropped Mirage Archer for Ice Bite in our 6l Scourge Arrow setup, and have overall more damage in our gear, this makes the initial hit from Scourge Arrow SIGNIFICANTLY higher, allowing us to apply an even larger Shock, just as in the original guide, I'll include more details in the spoiler so this doesn't take up too much room:
Spoiler
If you haven't yet read the DPS calculations for this build, I strongly recommend you go there first at the bottom of this guide so you can see how I've calculated the Shock multiplier into the build.
Because we have a much higher hit than before, our Shocks now come out to 20% More damage total, so I've edited my Yoke of Suffering in PoB to reflect that. I've also ticked bleed and unticked Shock in my PoB to properly reflect the amount of damage we get from the 5% increased damage from ailments that Yoke has. This is what Yoke does for us in this build:
I compared this to standard mirror tier amulets in my original build, but with Yoke providing a whopping 35% of our damage in this build, it's safe to say that absolutely nothing in the game will beat this amulet for our build.
All in all Yoke just isn't optional for this build, it simply brings way too much to the table to pass up.
- Belt: This is how we get Aspect of the Cat. I decided that the belt slot was the best piece of our gear to get this on due to the fact that it was the least essential part of the build. Note that these are pretty rare in the current league as they only come from Delves, so finding a belt with decent rolls is very hard. Prioritize a belt with life and at least 1 sizeable resist. Aspect of the cat is a great DPS boost and is now essential to maintain Frenzy Charges due to Farrul's Fur. Since Aspect of the Cat gear with strong stats is pretty hard to come by currently, I've decided to make up for the lack of resists in our quiver, which is why I stressed the importance of now having a rare quiver instead of Hyrri's.
If using up your belt slot for Aspect of the Cat isn't something you want to do (most likely for Headhunter) I recommend trying to get Aspect of the Cat from the Farrul's Bite helmet instead since it's actually a pretty nice damage upgrade to this build at the cost of the movement speed from Devoto's, but I'll add that doing this will make the Scourge Arrow enchant a huge pain to acquire.
- Ring: Although my Mark of the Elder remains unchanged from version 1, I want to stress how important it is that you get the "Grants level 21 Wrath Skill" in version 2. We don't want to be wasting gear affixes and skill points to meet intelligence requirements and we don't have a single gem socket to spare as every socket we use is essential, and having this corruption allows us to completely bypass the Intelligence requirement of Wrath. If you just REALLY can't get this ring corruption (since it's become pretty expensive on the market) then the closest you can do is get a Shaper ring with Herald of Ice as an affix on it then use a lower level Wrath in a gem socket since you'll be able to drop Herald of Ice in your gem sockets.
Jewels:
Spoiler
This is where I've made the most changes in my gear, not only do I have 2 more jewel sockets, but my jewels also now have a higher priority on life to make up for Kaom's Heart. Whereas before, this build could afford to have some pure DPS jewels, this is no longer the case which causes our jewels to be much more expensive. Make sure your jewels have a decent life roll on them (absolute minimum 35 life) and 2 decent damage mods. Prioritize stats like flat cold damage, attack speed if you've crit recently, and critical strike multiplier.
In addition to this, we now run an Unnatural Instinct. Note that Unnatural Instinct does not interact properly with Might of the Meek jewels in PoB, but it is indeed an upgrade from the one Meek when slotted in the top-right jewel socket of the Scion wheel. Make sure you take the 3 spell damage nodes leading up to the jewel socket and unspec the attack speed, crit multi, and movement speed nodes. This leaves us with 6 extra points which we use mainly for more jewel sockets (I'll include more details about this in the Skill Tree section)
If you want PoB to accurately read what Unnatural Instinct is really doing for us, edit the jewel to say this:
Spoiler
26% increased Attack Speed
+82% to Global Critical Strike Multiplier
8% increased Maximum Life
16% increased Movement Speed
16% increased Cast Speed
+10 Life gained on Kill
+10 to Dexterity
Minions have +6% Chance to Block Attack Damage
4% increased Spell Damage
Flasks:
Spoiler
The main difference here is we now always run an Onslaught flask due to losing it from dropping raider so we can keep up on attack and movement speed, and we don't run Wise Oak while mapping. When bossing I like to swap out my Wise Oak for my Quicksilver flask for the penetration but this is optional.
Skill Tree + Bandits/Pantheon
Spoiler
Bandits:
- Still Alira, the Crit Multi and Resistances are unbeatable here
Pantheon:
- Major God: Soul of Arakaali. No changes here either. Soul of Arakaali is by far the best major god due to Arachnoxia increasing our life recovery rate by a whopping 50% when we proc Immortal Call.
- Minor God: It's still mostly up to personal preference but I find myself often using Soul of Garukhan for the evasion boost and the extra movement speed since this version of the build has slightly lower movement speed overall.
Keystones:
Spoiler
Completely unchanged.
Vaal Pact - Still absolutely core and non-negotiable in this build. Thanks to Slayer overleech this is our main form of sustain and keeps us almost always at full HP.
Point Blank - up to 50% more damage in close range, another non-negotiable node as this synchronizes perfectly with the overlapping damage of Scourge Arrow's pods. It is one of our hugest DPS upgrades for just 1 point.
Acrobatics - the only somewhat optional Keystone node in this build, but still STRONGLY recommended as it only costs 1 point in our skill tree and is a huge defense boost. Phase Acrobatics is still a nice option as well if you're willing to sacrifice a bit of life and/or damage here and there.
Ascendancy:
Spoiler
Slayer is still the absolute core of this build when it comes to Ascendancy, a huge amount of our survivability is thanks to the overleech from Slayer.
This is arguably the hugest difference in our overall skill tree for this build. We no longer need Raider since we have permanent Frenzy Charges from Farrul's Fur, which lets us explore other Ascendancy options. I've chosen Juggernaut as it gives this build a huge amount of both survivability and damage, being immune to stuns and chills lets us play more upfront due to the fact that it's near impossible to interrupt Scourge Arrow now, and is absolutely amazing for general survivability. On top of this we get a MASSIVE 1000 accuracy which is incredible for damage consistency, it isn't hard to hit the accuracy cap with this much additional accuracy and my current build has 94% hit chance. Last but not least we get free Endurance charge generation, which is great for physical damage reduction, especially since it drastically increases the duration of Immortal Call.
Ascendancy tree path:
- Normal Lab: take the two nodes leading to the Duelist Ascendancy node
- Cruel Lab: Take the Duelist Ascendancy node and go Slayer, then take the 40 Strength node leading to the Marauder Ascendancy node
- Merciless Lab: Take the 2 points towards the Marauder Ascendancy then take Juggernaut
- Uber Lab: Go to Path of the Duelist
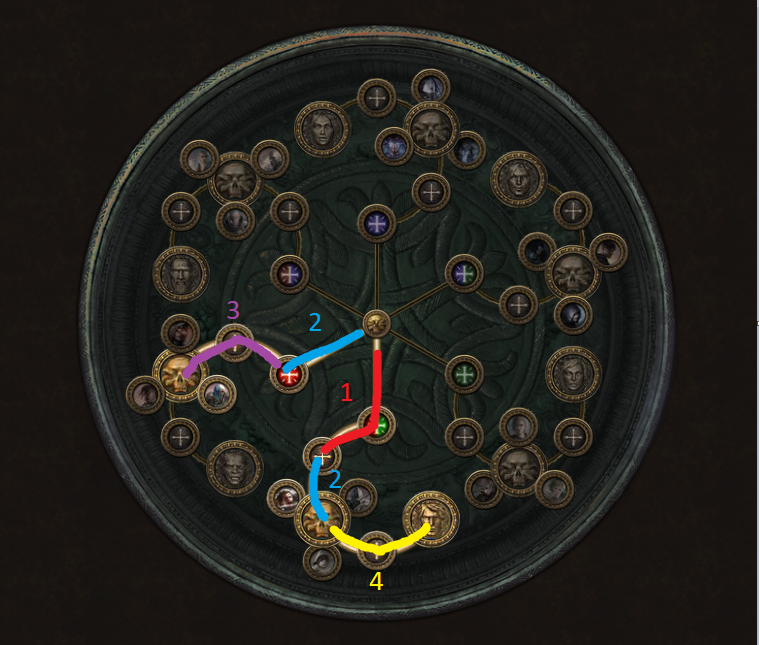
Skill Tree:
Spoiler
I'm just going to post my level 95 skill tree since most of this stuff is pretty similar to my first guide, but I will go over the differences.
I'm going to go over all the details here just to make sure nobody misses anything.
- We take out some "hanging" 1 life nodes in our tree to make more points for the jewel sockets including:
1 life node next to Bravery by the Duelist tree
1 life node below Golem's Blood by the Duelist tree
1 life node next to Blood Drinker by the Shadow tree
We also take out the Prowess node(30 strength) near the Shadow tree
- Took out the Attack Speed, Crit Multi and movement speed nodes at the top right of the Scion Tree and instead we take the Spell damage nodes for that jewel socket. The reason is because we now use Unnatural Instinct, which will take all of those nodes for use for less points and also provide us with a bit of life from the Hired Killer wheel
- Took out all 3 King of the Hill nodes above point blank, reason being we get much more crit chance in this build in comparison to version 1 which makes King of the Hill much less point-efficient
- We now take much more jewel sockets in our tree:
3 points for the jewel socket below constitution
3 points for the jewel socket above Acrobatics with Proj Damage
3 points for the jewel socket above Blood Drinker by the Shadow tree
- Took all 4 life nodes leading to Thick Skin near Point Blank
Tips & Tricks
Spoiler
There's only a couple tips & tricks here that differentiate from the original build but they're definitely worth noting down in any case.
- A great time to fire Rain of Arrows is right after you fire Scourge Arrow; the animation transitions very smoothly and can lead to a bit of extra burst damage.
- If you have Vaal souls, firing off both charges of Vaal Rain of Arrows at the very start of a boss fight will chunk it extremely hard and slow them immensely thanks to the maim, and apart from bosses with multiple phases or perhaps guardians with very tanky rolls, the maim lasts long enough for you to kill them outright, which turns most boss fights into absolute cakewalks.
Full DPS + Yoke & Shock Calculations
Spoiler
Again, I'll be using the PoB for the second version of my build for these calculations.
First, we calculate DPS before factoring in Shock multiplier: (we tick "Is the enemy bleeding" to compensate for the 5% increased damage taken per ailment affix on Yoke of Suffering since we will not tick Shock)
- Release at 5 stages DPS: 1,420,069
- Thorn Arrows DPS (we also factor in the extra pod enchant since PoB doesn't, which is 20% more Thorn Arrows DPS: 3,550,827 x 1.2 = 4,260,922)
- Added together (1,420,069 + 4,260,922 = 5,680,911 DPS)
We don't use Mirage Archer in this version of the build so we don't need to calculate for that.
I'm going to save some space here and skip the brief explanation on how Shock works, if you're uncertain about it, I quickly explained it in the DPS calculations for the original version of the build. Again, for our test dummy we use Shaper, since he has among the highest health in the game before factoring anything external such as map mods. For reference, the Shaper has 18,328,731 life (taken from the PoE Wiki).
The highest single hit in Scourge Arrow comes from the 5 stage release as it deals double the damage of each individual pod, and in my current PoB, fully buffed and BEFORE applying any sort of Shock, my single-hit damage averages out to be 920,700 on Shaper. Now that we have all this information, we can do a Shock Calculation:
- 920,700/18,328,731 = ~0.05, meaning this deals 5% of Shaper's life, leading to a 25% increased damage Shock multiplier taken by Shaper, since we already have another 25% increased damage taken total from other sources (intimidate from Tombfist + Yoke ailment multiplier) I use this equation to more accurately calculate the more multiplier we get from Shock:
1.5(total increased damage multiplier)/1.25(damage multiplier before shock) = 1.2 (20% more damage)
So now that we know that we can plug in 20% more overall damage into our DPS to calculate for Shock: 5,680,911 x 1.2 = 6,817,039 total DPS for our final calculation.
There's a little bit more to it for this build since we also use RoA and Vaal RoA, but this is much more simple to calculate for per-arrow DPS:
- 358,094 damage per arrow, calculating the Shock from Scourge arrow in we get (358,094 x 1.2 = 429,712 DPS) per arrow.
- Since we still mainly use Mirage Archer for DPS here rather than the normal RoA itself, we'll calculate for that: (429,712 x 0.4 = 171,885) (171,855 x 0.89 = 152,977 DPS) purely from mirage archer
For Vaal RoA there's no Mirage Archer so we just take the normal DPS then multiply it by the Shock value:
- 793,681 x 1.2 = 887,617 DPS per arrow
- Remember that we can have 2 Vaal RoA's firing at once, bringing potential DPS here up to (887,617 x 2 = 1,775,234 DPS) per arrow
Changelog:
Spoiler
12/23/2018
- Updated Pantheon Divine Vessel location for Soul of Arakaali from Arachnoxia from Tier 5 Toxic Sewers to Queen of the Great Tangle from Tier 6 Jungle Valley
- Updated leveling section
- Updated version 1 PoB missing strength
- Added a FAQ section
10/1/2018
- Switched Hyrri's Demise for a rare quiver and updated the quiver gear description
- Changed my Shaper ring (generic upgrade)
- Changed my +2 sockets Tombfist for a +1 Frenzy Tombfist
- Updated PoB link to include these changes
10/4/2018
- Added a few new videos
10/11/2018
- Added the completed build guide for the 2nd version of my build, PoB link included
- Added DPS and Yoke of Suffering Shock calculations for those who are confused about how this all works
- Added more Yoke of Suffering descriptions in the original build guide
10/12/2018
- Added Uber Atziri video
- Added Delving video
Last edited by SkillshotsOP#4043 on Dec 23, 2018, 6:39:21 AM
Looks really strong, will be interesting to see how it performs in deep delves - might be worth switching in some more defensive jewels (blind, phasing, etc) later on.
Do you feel the Scion movespeed is a necessary 3 points to take? I'm quite happy with the move speed without it and was thinking of taking Cloth and Chain (with 1 point spare) or Survivalist to make it easier to cap resistances.
Hey, can you explain me the math behind "5.9kk shaper dps"? POB has 3.9kk DPS with "Normal mobs (not shaper)" setting and 'shocked' ticked, that applies 50% shock.
Last edited by dim.kiriyenko#4684 on Sep 28, 2018, 12:06:57 PM
First of all, cool to see someone else play Hopeshredder :)
That said, there is some Stuff to adress here:
Ticking Shock in PoB is a big No No, as it applies a maximum Shock for 50% more Damage, which never happens against Shaper or any other Endgame Boss, not even remotely close.
So untick Shock, and edit your Yoke of Suffering to this:
Spoiler
Yoke of Suffering
Onyx Amulet
Unique ID: f99615577c2c33de113504f725468e92cae85bbb785cfecfcf426f2abbfe0ea5
Item Level: 85
LevelReq: 70
Implicits: 1
+16 to all Attributes
+19% to Fire Resistance
+18% to Cold Resistance
+30% to Lightning Resistance
30% reduced Duration of Ailments on Enemies
6% chance to Shock
Enemies take 8% increased Damage for each type of Ailment you have inflicted on them
Your Elemental Damage can Shock
This makes it so that Enemies take 16% increased Damage from your Attacks with Chill and Ignited enabled, which is 1% more than you actually have but the Difference is marginal.
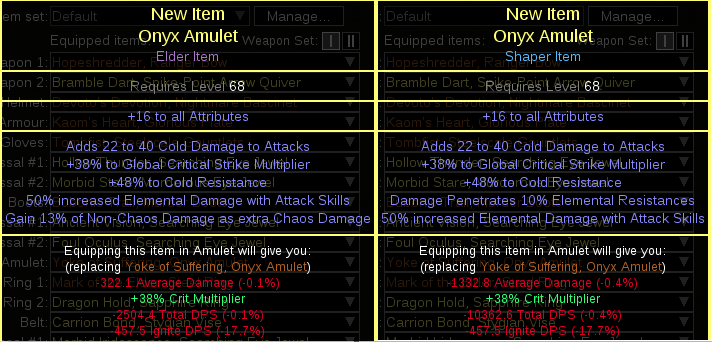
Maybe you chose Yoke because the Shock seemed so appealing, but a decent Rare Amulet can easily beat it on this Build:
Spoiler
Chimeric Noose
Onyx Amulet
Unique ID: 803f1c80074308fc0939510f6bf65166ef7850026de76b4036bef0812bf22e73
Item Level: 85
LevelReq: 65
Implicits: 1
+16 to all Attributes
+54 to Strength
+261 to Accuracy Rating
+34% to Global Critical Strike Multiplier
+34 to maximum Mana
25% increased Elemental Damage with Attack Skills
{crafted}+39 to maximum Life
Thise one cost me like 60c, and you can go way higher obviously. It's a 3.5% DPS Increase for you, and obviously offers a lot more Life (200).
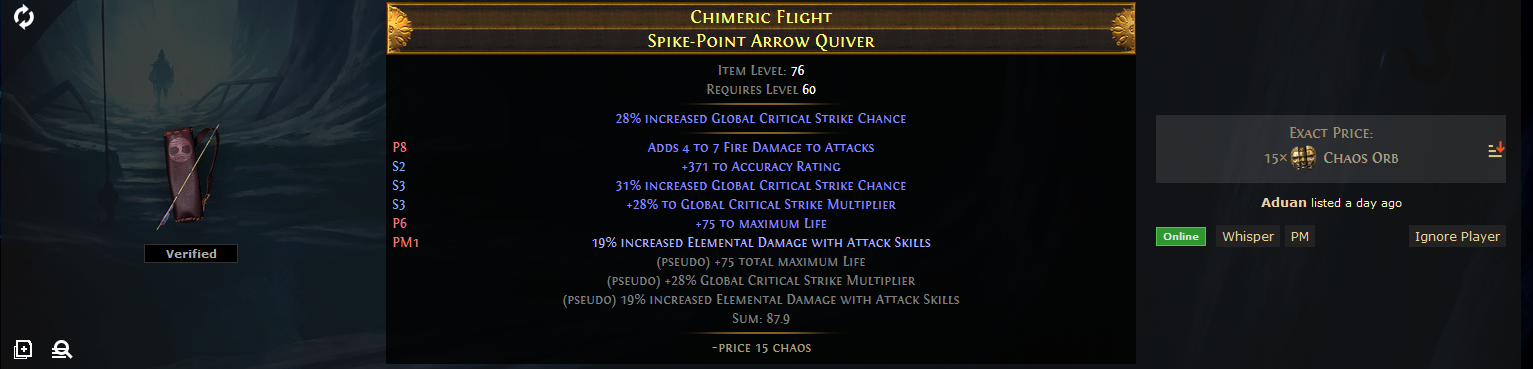
And please don't undervalue Rare Quivers. Yes, Hyrris is awesome, but this 15c Rare Quiver:
Spoiler
Rarity: Rare
Chimeric Flight
Spike-Point Arrow Quiver
--------
Requirements:
Level: 60
--------
Item Level: 76
--------
28% increased Global Critical Strike Chance
--------
Adds 4 to 7 Fire Damage to Attacks
+371 to Accuracy Rating
31% increased Global Critical Strike Chance
+28% to Global Critical Strike Multiplier
+75 to maximum Life
19% increased Elemental Damage with Attack Skills
--------
Note: ~price 15 chaos
Is a 3,4% DPS Loss, while gaining you 200+ Life. Rares can beat Hyrris in DPS or come very close, while offering more Life. And this Build really doesn't need more DPS, while more Life never hurts.
And keep an eye out for Unnatural Instincts, it is better than a third Meek in the top right Jewel Slot. You save 3 Points from the Crit Multi Nodes which you can invest into a Jewel Socker elsewhere, maybe to counter the loss of 9% Allres and some Crit Multi.
And for your Build especially, you also safe the 3 Movement Speed Nodes.
But sadly PoB doesn't take the Interaction of Meeks and Instincts into Account (it only grants the default Values of the Nodes granted by Instincts, not the Meek-amplified ones), so you gotta use a makeshift one like this:
Spoiler
Guffinn's Unnatural Instinct placeholder for 2 Meeks Scion Setup, as its Interaction with Meeks doesnt work in PoB yet.
Viridian Jewel
Radius: Small
Limited to: 1
Implicits: 0
26% increased Attack Speed
+82% to Global Critical Strike Multiplier
8% increased Maximum Life
16% increased Movement Speed
+10 to Intelligence
16% increased Cast Speed
+10 Life gained on Kill
+10 to Dexterity
Minions have +6% Chance to Block Attack Damage
12% increased Spell Damage
Just put it into the top right Jewel Socket, path through the Cast Speed Nodes and drop the Attack Speed, Crit Multi and Movespeed Nodes for a realistic Result.
Other than that, you have to enable Shaper/Guardian in the Config to actually see Shaper DPS :P
Here is your current Setup with realistic Config (No Shock, Shaper enabled, changed Yoke to 8%): https://pastebin.com/RjTbciYT 2.2kk DPS Thorn Arrows, 890k DPS for the release at 5 Stages.
Lastly, while I appreciate the Guide and it looks really awesome, this is basically the same as my Hopeshredder Guide with a different Skill (which uses the same Colours as mine so can be swapped anytime :P).
Yes, Hyrris and Yoke are different to my Guide, but Yoke is strictly worse and I don't consider Hyrris worth it at all due to the insane HP Hit we take.
Also, you path from the Duelist Start (whis is slightly better DPS at the cost of higher Degen and less Proj Speed) but other than that pick basically the same Stuff.
.
Last edited by Guffinn#6759 on Sep 28, 2018, 1:32:21 PM
First of all, cool to see someone else play Hopeshredder :)
That said, there is some Stuff to adress here:
Ticking Shock in PoB is a big No No, as it applies a maximum Shock for 50% more Damage, which never happens against Shaper or any other Endgame Boss, not even remotely close.
So untick Shock, and edit your Yoke of Suffering to this:
Spoiler
Yoke of Suffering
Onyx Amulet
Unique ID: f99615577c2c33de113504f725468e92cae85bbb785cfecfcf426f2abbfe0ea5
Item Level: 85
LevelReq: 70
Implicits: 1
+16 to all Attributes
+19% to Fire Resistance
+18% to Cold Resistance
+30% to Lightning Resistance
30% reduced Duration of Ailments on Enemies
6% chance to Shock
Enemies take 8% increased Damage for each type of Ailment you have inflicted on them
Your Elemental Damage can Shock
This makes it so that Enemies take 16% increased Damage from your Attacks with Chill and Ignited enabled, which is 1% more than you actually have but the Difference is marginal.
Maybe you chose Yoke because the Shock seemed so appealing, but a decent Rare Amulet can easily beat it on this Build:
Spoiler
Chimeric Noose
Onyx Amulet
Unique ID: 803f1c80074308fc0939510f6bf65166ef7850026de76b4036bef0812bf22e73
Item Level: 85
LevelReq: 65
Implicits: 1
+16 to all Attributes
+54 to Strength
+261 to Accuracy Rating
+34% to Global Critical Strike Multiplier
+34 to maximum Mana
25% increased Elemental Damage with Attack Skills
{crafted}+39 to maximum Life
Thise one cost me like 60c, and you can go way higher obviously. It's a 3.5% DPS Increase for you, and obviously offers a lot more Life (200).
And please don't undervalue Rare Quivers. Yes, Hyrris is awesome, but this 15c Rare Quiver:
Spoiler
Rarity: Rare
Chimeric Flight
Spike-Point Arrow Quiver
--------
Requirements:
Level: 60
--------
Item Level: 76
--------
28% increased Global Critical Strike Chance
--------
Adds 4 to 7 Fire Damage to Attacks
+371 to Accuracy Rating
31% increased Global Critical Strike Chance
+28% to Global Critical Strike Multiplier
+75 to maximum Life
19% increased Elemental Damage with Attack Skills
--------
Note: ~price 15 chaos
Is a 3,4% DPS Loss, while gaining you 200+ Life. Rares can beat Hyrris in DPS or come very close, while offering more Life. And this Build really doesn't need more DPS, while more Life never hurts.
And keep an eye out for Unnatural Instincts, it is better than a third Meek in the top right Jewel Slot. You save 3 Points from the Crit Multi Nodes which you can invest into a Jewel Socker elsewhere, maybe to counter the loss of 9% Allres and some Crit Multi.
And for your Build especially, you also safe the 3 Movement Speed Nodes.
But sadly PoB doesn't take the Interaction of Meeks and Instincts into Account (it only grants the default Values of the Nodes granted by Instincts, not the Meek-amplified ones), so you gotta use a makeshift one like this:
Spoiler
Guffinn's Unnatural Instinct placeholder for 2 Meeks Scion Setup, as its Interaction with Meeks doesnt work in PoB yet.
Viridian Jewel
Radius: Small
Limited to: 1
Implicits: 0
26% increased Attack Speed
+82% to Global Critical Strike Multiplier
8% increased Maximum Life
16% increased Movement Speed
+10 to Intelligence
16% increased Cast Speed
+10 Life gained on Kill
+10 to Dexterity
Minions have +6% Chance to Block Attack Damage
12% increased Spell Damage
Just put it into the top right Jewel Socket, path through the Cast Speed Nodes and drop the Attack Speed, Crit Multi and Movespeed Nodes for a realistic Result.
Other than that, you have to enable Shaper/Guardian in the Config to actually see Shaper DPS :P
Here is your current Setup with realistic Config (No Shock, Shaper enabled, changed Yoke to 8%): https://pastebin.com/RjTbciYT 2.2kk DPS Thorn Arrows, 890k DPS for the release at 5 Stages.
Lastly, while I appreciate the Guide and it looks really awesome, this is basically the same as my Hopeshredder Guide with a different Skill (which uses the same Colours as mine so can be swapped anytime :P).
Yes, Hyrris and Yoke are different to my Guide, but Yoke is strictly worse and I don't consider Hyrris worth it at all due to the insane HP Hit we take.
Also, you path from the Duelist Start (whis is slightly better DPS at the cost of higher Degen and less Proj Speed) but other than that pick basically the same Stuff.
Wow, thats a really nice analysation. thanks for this.
Looks really strong, will be interesting to see how it performs in deep delves - might be worth switching in some more defensive jewels (blind, phasing, etc) later on.
Do you feel the Scion movespeed is a necessary 3 points to take? I'm quite happy with the move speed without it and was thinking of taking Cloth and Chain (with 1 point spare) or Survivalist to make it easier to cap resistances.
No it is not necessary to take at all, if you want to use the points for anything else that's perfectly fine.
Hey, can you explain me the math behind "5.9kk shaper dps"? POB has 3.9kk DPS with "Normal mobs (not shaper)" setting and 'shocked' ticked, that applies 50% shock.
With "Shaper/Guardian" ticked on in PoB the main arrow deals 1,259,344 DPS, and the the thorn arrows deal half of that each and there's 5 of them which equals out to 3,147,770 DPS for thorn arrows in PoB. Note that we're not counting the additional pod helmet enchant at the moment which would bring the thorn arrow DPS up to 3,777,422.
Added together this totals out to be 4,407,114 shaper DPS, and then we have to calculate for Mirage Archer since PoB doesn't include that whatsoever. I just did some super rough math for Mirage Archer so it's not 100% accurate but it will be close. Mirage Archer at level 20 will use the same skill with 60% less attack speed and 11% less damage, since both are pretty linear to DPS I simply took the 4,407,114 total DPS and first multiplied it by 0.4 to reach 1,762,845 DPS then multiplied it again by 0.89 which comes out to a final product of 1,5
68,932 DPS.
Finally I added the two values together (4,407,114 + 1,568,932 = 5,967,046 DPS) and that's how I did my DPS calculations. Hopefully this clears this up a little bit.