


[3.10] Bergerbrush's Barrage Impale Deadeye - Project Builds
 Hello everyone! My name is Bergerbrush and this build is a part of my "Project Builds" where I try to make a viable Build out of every ascendancy in the game that can get you from zero to hero. My plan is that you should be able to start this Build with no investment or as a League Starter and work your way up to Red Maps on an extreme budget. Invest as you play along and be able to clear up to Red Maps including bosses and later with heavier investment be able to clear mostly all endgame content. If you have any questions regarding the Build or suggestions feel free to contact me in my Twitch Stream as I am a Fulltime Streamer. https://www.twitch.tv/bergerbrush Pros and Cons + Decent Map Clearing with Bleed Explodes + Strong Single Target DPS + Decent Defenses + League Start Viable - Cannot do any Physical Reflect Map - Feel Squishy Early on - Needs to play Close for Bosses with Point Blank What is Project Builds?
Spoiler
Project Builds is a Project I made where I try to make a decent Build out of every Ascendancy in the game that is playable for anyone at any given point in the league to where you can build your character out of nothing and work your way through all the content in the game. I will try to make different Leveling Guides for every Character in the game and then the Build Guides such as this one takes of from us Killing Act 10 Kitava. Where you can start mapping with ease in White Maps and work your way up to Early Red Maps. Then I will continue to guide you with upgrading your character to finish the whole Atlas and then progressively work your way towards finishing nearly all Content in Path of Exile. It needs to be said though that some Ascendancies perform better than others. And most of the time it completely depends on your current investments. For example this Build is the "Deadeye" ascendancy. And Deadeyes generally have strong Map Clearing Potential but sadly doesn't get that great of a Single Target Boost or defenses. Our Ascendancy choices in this character gives us some decent overall damage, movement speed and extra bleed/life recovery and a bit of evasion. I also do my best to stay away from the classic Meta skills as much as I can. Therefor you will not be seeing "Cyclone Skill" for every single character but may still see them sometimes. Information about the Build
Spoiler
What can you expect? With this Build you get some decent Clear Speed with playing Bow's and using Bleed Explosions for Clearing packs. It's a pretty speedy build as well with the Deadeye ascendancy choice "Gathering Winds" that gives us a decent amount of movement speed. For Bosses you need to be close and dodge a lot and use your Barrage when you can, but our Barrage does an incredible amount of damage. "Phase 1" should get you through T1-T12 maps atleast. You need to invest a little bit into some very Cheap Uniques and a bit of filler gear to start the base of your character and then you will progressively work your way through white, yellow and red maps as your character and your skill gems level up. "Phase 2" we take all the currency we generated and start investing more into the character to increase its overall defensives and single target DPS and start working up towards Tier 16 maps. "Phase 3" Even more currency generated we start working at the min-max part version of the Build and we push our character so we can start doing all endgame content. What kind of playstyle is this? Pretty Zoomie Build since its a Deadeye with a pretty strong Single Target. Since Rangers usually don't have an incredible amount of Life then you need to dodge certain attacks yourself. We use Acrobatics and Phase Acrobatics but we can't 100% rely on them. For certain Bosses you just go in pop flasks and hold down Barrage and they melt but Awakener bosses you need to dodge certain things. Why use Barrage as a Clear Skill too? We kind of lack Gem sockets so we can't really use another Skill for Map Clearing unless you have a double Bow Setup and could use perhaps Puncture for Map Clear. Showcasing & Videos
Spoiler
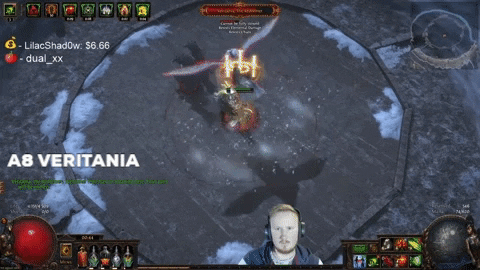 Awakener 8 Veritania - Phase 3 Gear Clip of A8 Drox Kill GIF & Videos about the Build showcasing Bossing/Map Clear/Build overall and so on :) Leveling Guide
Spoiler
video about how to level Ranged characters and general information about leveling in poe, and some info here as well (that works with every Project Builds guide) Phase 1 - Act 10 Kitava to Early Red Maps
Spoiler
Congratulations! You made it past Act 10 Kitava and are now ready for the Endgame in Path of Exile. Make sure to watch these videos below if you do not know how to prepare for the Endgame or where to start! Here is a Video to help you Prepare for Mapping after Defeating Act 10 Kitava! "video of map system/atlas and so on" Bandits Quest in Act 2
Spoiler
Your 2 options in the "Deal with the Bandits" quest in Act 2. Either KILL ALL Bandits and recieve 2 Skill Points from Eramir This is good because we can utalize 2 More Skill Points in our Skill Tree for more damage or life, or other good Skill Nodes. And your second choice is.. SAVE ALLIRA Saving Alira and Killing the other 2 Bandits will give us a hidden buff from Alira that gives 5 Mana Regenerated per second & +20% to Global Critical Strike Multiplier & +15% to all Elemental Resistances This is also good because for League Starts it can be really good to get some extra Resistances as it is usually very tough to balance your resists after killing Act 10 Kitava. It is also good overall for builds such as ours where we perhaps use a lot of Unique Items that doesn't give us Elemental Resistances and we rely on very few Gear pieces to get our resistances up. Alira also gives a decent damage boost from the Global Critical Strike Multiplier and the Mana Regeneration is OK in some situations. Ascendancy
Spoiler
Video of Labyrinth & Trials Explanation 1st / Normal Labyrinth: Gathering Winds 2nd / Cruel Labyrinth: Rupture 3rd / Merciless Labyrinth: Powerful Precision 4th / Eternal Labyrinth: Fast and Deadly  Skill Tree & Path of Building
Spoiler
Gem Links
Spoiler
IMPORTANT - You always wanna try to keep your Gems atleast Level 20 with 20% Quality unless I specifically say something different. If the Gems in this Guide don't have 20/20 Gems it is because I don't have those myself and can therefor not link them in this Guide. 5 Link Swap out Impale with Mirage Archer if you want slightly better Map Clear. But this swap is not necessary! 6-Link Swap out Slower Projectiles with Mirage Archer if you want slightly better Map Clear. But this swap is not necessary! Auras Link Flesh and Stone with Maim and keep it in Blood Stance at all times. Curse on Hit Setup Use Frenzy on Bosses to Curse them and generate Frenzy Charges. Don't spam it but use it a bit here and there. 3-Link Ballista for Single Target Damage Put up the Ballista's quickly for Bosses as Ensnaring Arrow increases Damage Taken on the boss. Movement Skills Link both Blink Arrow and Dash with Second Wind for 2 charges on them each. Utility & Extra Activate Blood Rage for clearing mobs but also keep uptime on it for Bosses for increased Attack Speed. Keep Immortal Call at level 4 and Cast when Damage Taken at level 2. Then it's important that you DON'T USE GRACE AS AN AURA. ONLY USE VAAL GRACE AS A DEFENSIVE COOLDOWN AS WHEN YOU ACTIVATE VAAL GRACE YOU GET MORE DODGE! Gear
Spoiler
- Weapon - CHEAP - Lioneye's Glare is a great early Bow for us as it has Hit's Can't be Evaded so we don't need to focus on Accuracy too much and it has high Physical DPS. - Quiver - CHEAP - The Drillneck is very strong for us. It adds Life and a ton of damage for us. - Body Armour - CHEAP - A Tabula Rasa or a random Rare 5 or 6-Linked Body Armour is fine to begin with so we can use a good Barrage Setup. (DO KEEP IN MIND THIS SPECIFIC RARE ARMOUR IS VERY GOOD AND ISN'T WHAT YOU SHOULD FOCUS ON THIS EARLY. Just get some decent Life/Resists on yours.) - Helmet - CHEAP - Just a Rare Helmet with Life & Resists. -Amulet- CHEAP~MEDIUM Prize Try getting a Amulet with Life & Resists and any form of damage if you can. Damage mods are "Physical Damage to Attacks", "Attack Speed", "Global Critical Strike Multiplier" and "Global Critical Strike Chance". On this Amulet I have Life, Resists and Physical Damage to Attacks which is more than enough before you can afford better. ANNOINT - You should either Annoint "Throatseeker" (Amber, Violet, Opalscent) first of all. But if you can afford it or want to you can annoint "Assassination" (Black, Opalscent, Gold) for the best damage output possible. Clip of me Explaining how to Annoint your Amulet - Rings - CHEAP - Kind of the same as the Amulet here. Focus on Life, Resists and any damage that you can accquire. Damage mods are "Physical Damage to Attacks", "Attack Speed", "Global Critical Strike Multiplier" and "Global Critical Strike Chance". - Gloves - CHEAP - We use Haemophelia's for the Clearspeed because we utilize Bleed a lot and have 100% Chance to Bleed and therefor every mob we kill will die by bleed and explode and then the explode damage will hit nearby mobs. - Belt - CHEAP - Belt of the Deceiver gives us Life, Resists and damage and a nice defensive stat "Take Reduced Damage from Critical Strikes" - Boots - CHEAP - Just generic Rare Boots with Life, Resists and Movement Speed. - Flasks - CHEAP - You need Atleast Anti-Bleed and Anti-Freeze on any Flasks and I also use Anti-Curse as well. I have the "Increased Critical Strike Chance during Flask Effet" craft. Just ask me on Stream and I can craft it for you. - Jewels - CHEAP - You want a Unique Volley Fire Viridan Jewel either in the Right Side Jewel Socket or the Middle one. And then any rare Jewels with Life% and any form of damage is good. Also Accuracy if you might need it to hit 100% Hit Chance. Phase 2 - Tier 16 & Early Bossing
Spoiler
Skill Tree & Path of Building
Spoiler
Main Item Upgrades
Spoiler
- Arborix Assassin Bow - EXPENSIVE Prize - Arborix Assassin Bow is our go to Bow because of the Flat Physical Damage it adds, its Critical Strike Multiplier, its evasion and its 2 Additional Arrows. Also on top of that it has a unique Mechanic where it gives us a second form of "Point Blank" sort of and it gives other stats as well when it alternates between Iron Reflexes and not having Iron Reflexes. - Steel Rings - MEDIUM Prize - Steel Rings are great for damage and we focus on Life, Resists and any other form of extra damage such as "Physical Damage to Attacks" (more than just the Implicit), "Attack Speed", "Global Critical Strike Multiplier" and "Global Critical Strike Chance" - The Nomad Belt - MEDIUM Prize - Great Belt for us, provides good overall Stats and Damage and a nice amount of all around Resistances. - Dying Sun - MEDIUM Prize - Dying Sun increases our Projectiles and therefor our overall damage because we shoot more Arrows. - Intuitive Leap - MEDIUM Prize - Intuitive Leap allows us to save a good amount of Skill Points by using it in the Jewel Socket in the right side of the tree and acquire the Large Nodes around it only. Phase 3 - All Endgame Content
Spoiler
Skill Tree & Path of Building
Spoiler
Main Item Upgrades
Spoiler
+1 Barrage Helmet & Other good stats on the helmet?! -15 Socketed Attacks Mana Body Armour? Crit Chance Attacks Body Armour? Last edited by Bergerbrush on May 23, 2020, 8:43:51 AM Last bumped on May 3, 2020, 8:51:46 PM
|

|
|
reserved
|
|
|
Worked a bit extra on this character.
Now it has much better Clear ability by using Volley Fire Viridan Jewel and I managed to tinker a bit with Skill Tree and stuff and make it actually feel really good! Very enjoyable character to play. Now has Gems, Gear and all Phases finished. Also a quick Showcase GIF but will add more and make video for this Guide soon. |
|


