


PC servers are restarting in: .
They should be back up in approximately .[3.15?] (Archived) Ball Lightning Miner | Facetank Sirus | Destroy All content
|
Archived 3.12 variant
 Hello everyone! Welcome to my take on the Ball Lightning Mines guide. My goal here is to bring out a new experience to those who have not played mana builds before, to both new players and experienced players, also to allow people enjoy both the fun of this build and to experience the Scion Ascendancy as she is quite underrated due to her complexity, general weakness and weird design. This guide is tilted towards beginner players and players that have close to no experience to scion build or mana builds. I will keep this build as budget as possible so most people are able to experience this build. I will be very honest on what this build can do and what it cannot do, this will avoid some "bait builds" that "claims to kill bosses in 1 seconds" but when you tried to build it, it just doesn't work. This will not happen here as I will give you as much info as possible so you will know what to expect. Notice Board <-- Check me for changes in the guide! (Last update 16/9)
Spoiler
3.12 Patch notes : Recent nerfs to this build: Watcher's eye: Can now grant 10 to 15% increased Mana Recovery Rate while affected by Clarity (from 20 to 30%. Ball Lightning Now has a base radius of 18 (from 22). Now deals 3 to 48 lightning damage at gem level 1 (from 3 to 57), up to 22 to 426 lightning damage at gem level 20 (from 28 to 533).[/quote] Total endgame nerfs: 22% total aoe reduction 21% base damage reduction 15% mana recovery rate loss with double clarity watcher's eye roughly 70% reduced AoE, so we need like 70% Inc AoE to get it back. So just the damage portion (13 hits would be not achievable anymore), the flat damage nerf is simply replaced with arcane cloak ___________________________________________________________________ (27/6) A lot of people are confused about the endgame pob because I actually forgot to submit the guide after updating it, leaving the old version up for several days. I have to apologize because of the confusing I caused without any explanation on what's going on and unable to update the guide quickly. (28/6) Passive Tree updated (4/7) Updated PoB for passive tree pathing (20/7) - New section : Community feedbacks + Community crafting guides. I do noticed some interesting conversation is going on so I've decided to add this section. If you guys have any suggestion / feedback you can let the community know! Your voice will not be unheard, it can be a positive feedback, suggestion or criticism, leave it on the replies. Foreword
Spoiler
This build is Inspired by Akane's Ball Lightning Miner, you could see the difference between these 2 builds are very similar. But this is my version and my take on the ball lightning miner so it is slightly different compare to Akane's build, Akane's is more tilted towards expensive gear while mine is more tilted towards cheape gear. Akane's will be better compared to mine so if you have something like 30ex to burn, you can follow Akane's build. Here is a link to Akane's Youtube if you are interested - Akane's Channel _________________________________________________________________________ Table of Contents " _________________________________________________________________________ 1.0 Introduction
Spoiler
1.1 Pros and Cons
Spoiler
> Great damage This damage does comes with a price, do note that we are required to utilize part of our utility gems for full damage. But with all the damage utilities are up, this build does some crazy amount of damage without aura support. > Insane amount of recovery and great defenses On our defenses, we have blind and a near dodge 60% dodge chance for attacks and 50% dodge chance for spells. On the other hand, we will have a self attack vigilant strike for Fortify, reducing damage taken. Our recovery is very insane due to Agnostic and Indigon, this allows us to facetank Sirus Triple Beam! (Just don't get shocked) > 100% Flask uptime On our Pathfinder Ascendancy, it gives us a stat "Flasks gain 3 charges very 3 seconds", by having some flask effect duration, reduce flask charges used and increased flask charges gain, we will have a 100% flask uptime, assuming that you don't spam flask every 0.5 second. > Fast movement, Great lab farmer By just having a Quicksilver flask with suffix "Of Adrenaline", our movement speed drastically increases when we use this flask and smoke mine together. We will have a near 140% increased movement speed by just using the quicksilver flask. Also, this build is near immune to Lab traps, as our build does not have a large amount of lifepool, Agnostic and Indigon recovery is so insane that the traps in labs are just toys that tickles you. > All content This is the build that can do everything you want to do in the game, except from Hall of Grandmaster which some builds definitely wreak us, she can be anything you want to be, a lab farmer? delve darkness farmer? Simulacrum wave 20 kosis? Bossing? Map farming? Just list everything here, she can do it all, the true all content build. > Mines playstle, not 1 button build Yep, we can't argue about this. If you dislike mines playstyle, then this is not the build for you. But due to the recent patches, now you can just hold down the detonate key and just right click like any other build, so for example when you freezing pulse, before you need to keep spamming the D key but now you just need to hold down the D key, it will auto detonate for you! So it is not that finger destroying anymore. But this build is not a 1 button build, we will have multiple actions required to maximize the utility in this build. > Lack of physical mitigation, not HC viable Our build lacks of physical mitigation and pretty strict on our skill points, so we have almost no physical mitigation, which makes us vulnerable to some one shots. > Lots of uniques, Not SSF viable On our gear, we have a lot of build enabling uniques and some uniques are just too good not to use it, so our build is definitely not SSF viable unless you have a lot of time to throw for the grind. Since we are also using a lot of uniques, we are required to use some jewels to patch up some of our missing resistance from our gear. > Mediocre clearspeed This build feels fast but it is not insanely fast on clearing, Ball lightning with slower projectile is just not ideal for a fast clearing playstyle. 1.2 Ball Lightning Mechanics
Spoiler
On this section, I will cover the skill gem, how the skill works, how to scale the damage and some general game knowledge for newbies! Gem __________________________________________________________________  __________________________________________________________________ Ball Lightning is a Lightning Spell skill gem. This game we have 4 major categories of skill gem, here we will only focus on the majority 2 of them, one is Spell and another one is Attack. To put this in a nutshell, a Spell is an ability that is casted with magic, while Attack is a skill that requires the user to perform an attack. So, almost all Attack modifiers does not interact with Spell skills. Now back to Ball Lightning. Since Ball Lightning is a Spell, this means we can scale our damage with these common stats found in weapons. > #% Increased Spell Damage > Adds # to # (elemental) damage to spells > +#% Critical Strike Chance for Spells > +#% Global Critical Strike Multiplier Do note that these similar stats does not scale our damage > #% Adds # to # (elemental) damage > +#% Critical Strike Chance The reason why these stats can't scale our damage is, these mods are considered "Local mods". To put it into nutshell and simplify it, Local mods only applies to Attack skill gems. Due to Ball Lightning being a Spell, those 2 stats above does not apply, thus it does not increase our damage. On default, using Ball Lightning will cast small lightning bolt projectile, piercing all targets on its way, then disappear after a short amount of time. Supporting Ball Lightning with Blastchain Mine support will make you throw mines that cast Ball Lightning instead of casting it by yourself. In short, this means that you are a "miner". Supporting a skill with mines opens a new way to scale your damage, and that is through a stat called "Mine Damage". Any modifiers to mines also applies to our Ball Lightning Mines. There are multiple benefit on making a skill into a mine. Here are some of the reasons > Canceling the need of cast speed > Opening a new way to scale damage > You can no longer take reflected damage This also brings on some downsides, it includes > Unable to leech life and mana > Need to self detonate the mines When you throw mines, the skill inside the mines doesn't activate by itself, you must manually activate it with your Detonate Key (Default D key). __________________________________________________________________ Mechanics Think of Ball Lightning is a small orb of projectile orb that strikes out arcing lighting bolts on enemies. The damage of Ball Lightning only comes from the arcing lightning bolts, not the Ball Lightning itself. A single cast of Ball Lightning is able to hit the same target multiple times. BUT, the Ball Lightning must not went too far away from the target or else it will not hit the target anymore. Because of this, we will be using Slower Projectile support, not grabbing any projectile speed anywhere (unless it is totally inevitable), to allow Ball Lightning stay close to the target as long as possible, not straying too far away to deal more damage as it hits more. This means that Slower Projectile support almost doubles our damage dealt to a single mob because it hits approximately twice as much as without the support gem. Ball Lightning CANNOT shotgun. So if you support Ball Lightning with support gems like Lesser Multiple Projectile, Greater Multiple Projectile or Dying Sun, those projectile will not shotgun. This is due to the restriction each Ball Lightning is only able to hit the same target every 0.15 second from the same entity. But, Ball Lightning generated from different mines does shotgun because they are different entities. But do not that multiple projectile fired from the same mine does not shotgun because they fall into the category of same entity. So here is an example, a single mine fire 3 Ball Lightning, if the monster is caught in between 2 Ball Lightning, only 1 of the Ball Lightning will be able to hit the target. Ball Lightning does have an AoE gem tag. Although the area of the Ball Lightning strikes radius can be increased by AoE modifiers, they do not increase the damage provided from it because Ball Lightning does not deal any AoE damage because the main source of damage is the arcing lightning bolt. So, supporting Concentrated Effect does not increase the damage on Ball Lightning, only reduce the area of it. Ball Lightning also have the projectile tag, however it does not deal any projectile damage, it only deals the arcing lightning bolt. So supporting any projectile behavior gems like Chain does not make Ball Lightning chain. 1.3 Why Ball Lightning and Why Ascendant?
Spoiler
The main reason why I went with Ascendant instead of Saboteur is 100% flask uptime, by scaling flask effect, mana recovery from flask and other flask notables, this build have some insanely tanky capabilities due to the insane recovery rate. This is not the case for most saboteur builds as they don't have 100% flask uptime. Saboteur have a lot of QoL on mines, going Low Life will give you a lot more damage. By abusing Machitta gloves, their survivability could rival us. But saboteur lacks speed and flask uptime, which I'd enjoy having on my characters, so I chosed Ascendant. I had tried multiple spell skills in the game, using the most broken mines skill like Pyroclast mines, but I still ended up with Ball Lightning. The main reason why I went with Ball Lightning is the damage it gives. Due to this build is not supported by any large aura buffs like Wrath to utilize some of the part of our build, most skills does not work well with our build and struggle very hard on single target damage for most mines build, but this doesn't seem to be the case for Ball Lightning as it hits the same target multiple times, and is considered one of the best single target damage for mine builds, so I ended up with Ball Lightning Mines 1.4 Video Showcase 1.5 Mechanics of this build
Spoiler
This build have several mechanics going on, so I will try to explain them one by one. The Agnostic - The Agnostic is a Keystone found in the passive tree. In a nutshell, this keystone basically allows our mana to recover our health overtime until our mana is gone. This keystone gives us insane amount of health recovery, it is so great that we could do all content with less than 3000 amount of total Life. Due to the fact that the more mana we have, our mana will have more room to recover our life, we will not be reserving any large auras to increase our survivability. Enduring Mana Flask - Since our mana recover our health, we will be using a specific mana flask with the Enduring stats on it. This allows the flask to continue to recover our mana even our mana is full, unlike other life or mana flask which stops when we reached full life / mana. Indigon - Indigon is a helmet dropped by killing an endgame boss called "Uber Elder". This helmet allows our mana flask to recover our life, in a nutshell, significantly increases our recovery rate on health. We will be take advantage of the stat in this helmet "Increase spell damage for each 200 total mana spent" with Arcane Cloak to increase our spell damage. Arcane Cloak - This is a newly introduced skill gem in 3.10. On activation, this skill gem basically gives us a protective layer against incoming damage by spending 64% of our mana on use. Since activating Arcane Cloak counts as "mana spent", we will be taking advantage on the Indigon helmet on the spell damage increase. On top of that, using Arcane cloak also gives us additional lightning damage! So this is one of the best skill gem available for us because it gives us both offense and defense at the same time. Mind over Matter - Since we are using mana build and we are not reserving any mana, we will use Mind over Matter. This mechanic will redirect (on default) 30% of damage taken into our mana instead of life. By using Cloak of Defiance and a Watcher's Eye with a stat "10% of damage taken from mana before life while affected by clarity", 50% of the incoming damage will be taken into our mana instead of life! Dodge and Spell Dodge - We will also be utilizing an unique boots called Omeyocan to increase our dodge per 500 maximum mana we have. We will reach a staggering of 60% dodge and 50% spell dodge. Dodge is a mechanic that completely nullifies the damage taken. It is a second layer of defense, first as being evasion. This means that when a monster attempt to hit us with an attack, we have 70% chance to completely nullify the damage, and 60% chance to completely nullify a spell damage. Do note that Dodge does not help us deal against damage over time 2.0 Gearing information
Spoiler
2.1 Path of Building
Spoiler
Path of Building (PoB) is a great tool for all poe players as it provides a "simulation" for a build. It can be used as theory making a build, getting an accurate damage calculation and planning your build! If you haven't gotten PoB or you are using an outdated PoB, you can find the link on here : https://github.com/PathOfBuildingCommunity/PathOfBuilding/wiki/Installing-this-Fork And here is my current PoB link (updated for 3.11) : https://pastebin.com/aPWBRjw5 (Starter PoB) https://pastebin.com/vD4NwawU (4/7) (Endgame PoB) This build is very different compared to other generic builds, so I HIGHLY RECOMMEND you to finish reading this guide because I know some people just jump straight into PoB. As this is an uncommon build, you are likely to have some issues / problems / failures if you did not finish reading the guide. If that happens, don't blame me as I've spent a lot of hours writing this guide. 2.2 Gearing
Spoiler
General Information on gearing All Rare Item have 6 affixes total, 3 prefixes and 3 suffixes. An item level (ilvl) will both restrict and allow certain affixes to roll on the item. In a nutshell, you would want a high ilvl item, affixes are basically the stats on an item, prefix and suffix is just a fancy way to categorize a majority of stats so an overpowered item will not appear. The name of the item are usually random, it does not decide whether it is an good item or not. Due to the unpredictable market price, I will not give an exact value, instead i will give a range of value, stating how expensive is that item. So this will be my pricing range. Cheap - 10 chaos or below Moderate - 10 chaos or above, but not higher than 1 exalted Expensive - 1 exalted or higher On rare items, I will put a link that directs you to the Delirium Softcore Trade site, which I had already filtered out the stats you need on your gear. Do note that this setup is for players who doesn't know how to properly filter out items with the trade site so they will not have a lot of trouble looking for the gear. Please use official trade and don't use poe.trade. Poetrade existed way before official trade is up, so it is a very ancient website that has reduced performance. Think about a 1 y/o PC and a 20 y/o PC. Would you pick the older one or the new one to play your games? Main reason is because poetrade API updates way slower, you would found those item getting sold before you get the chance to purchase it because the update time is just too slow. Official trade link (even works after delirium league ended) : https://www.pathofexile.com/trade/search/Delirium PLEASE NOTE : all items listed below are endgame items or items that carry you on early stages of mapping, items below are not leveling items! ___________________________________________________________________ 2.2.1 Weapon ----------- This is my endgame weapon setup. Here is the stats you want to prioritize - Adds # to # lightning damage to spells - Increase Spell damage, Gain 4% non chaos as extra chaos damage. - Open suffix Note : DO NOT BUY WANDS. This is due to the restriction of the default attack on the weapon, on default attack, wand is a ranged attack, while dagger and scepter are melee attack, since we will be using a gem setup that requires a melee attack, using wands will render that wand setup useless, so do not buy wands. You can find the weapon you needed right here : Endgame Weapon Other stats that could benefit us : - +#% Global Critical Strike Multiplier - #% Increased Critical Strike Chance to Spells - +1 to all lightning spell skill gems - +1 to all spell skill gems - +# to maximum mana - #% increased lightning damage On one of the weapon, you need to have a "Trigger Craft". Trigger craft is the stat "Trigger socketed spell when you use a skill" which can be received by unveiling weapon. This setup is used to reduce our enemies's lightning resistance when we use a skill, allowing us to deal more damage without having 500 apm on our keyboard. Head to gem section on what gems you should put into it. I do not recommend to use a shield as the damage barely rivals our weapon damage. You can choose to go an explody mace if you are into those explody fet-, you know what i meant. But explody mace does have some QoL because it remove corpse for you, it is very useful in places like delve BUT the high STR requirement is kinda a pain to deal with, you will need to take a 30 STR node to solve the STR issue. On the Mace, look for - Increase Spell damage, Gain 4% non chaos as extra chaos damage. (Crafted) - +#% Global Critical Strike Multiplier Price - Cheap to Expensive. To beginner players : - In this game, flat damage is super strong (flat damage as in adds # to # lightning damage to spells, not #% increase). Due to flat damage being the first line of the equation, it is one of the stats that decides your damage. So here is a quick example of why flat damage are strong. Assuming you deal 5 lightning damage, and have 2 wands with these stats Wand 1 : Adds 10 lightning damage to spells, 50% increase spell damage Wand 2 : 100% Increase spell damage On paper, wand 2 looks stronger, but with the calculations going on Wand 1 : (5 + 10) * 0.5 = 7.5 Wand 2 : 5 * 1 = 5 So this is the main reason why flat is super strong, hopefully this will explains why :). ___________________________________________________________________ 2.2.2 Helmet ----------- This unique item is too good not to use it, so it is considered is a priority item upgrade if you don't have it. On the rolls, prioritize the " #% Increased Maximum Mana" and "Recover #% of life when you use a mana flask" to have the highest numbers. Indigon allows our Enduring Mana flask to recover our life, which means this significantly increases our recovery rate. Meanwhile Indigon also gives us spell damage #% mana spent, by using Arcane Cloak it will significantly increases our spell damage since using Arcane Cloak counts as mana spent. For helmet enchants, look for (in order) - Arcane Cloak spents an additional 15% of current mana - Enemies affected by Bear Trap takes 10% increased damage from trap or mine hits. - Ball Lightning has 40% increased damage - Wave of Conviction applies -6 elemental resistance - Elemental Weakness has 30% increased curse effectiveness Price (no helmet enchant) : Moderate Price (with helmet enchant): Expensive ___________________________________________________________________ 2.2.3 Body Armour --------------- This is a Best in Slot piece, prioritize this item before you have indigon because it is the main source of the 40% MoM. On the rolls prioritize on +# maximum mana roll. This chest gives us the Keystone Mind Over Matter passively, so we don't need to path all the way to the keystone. It also gives us an additional "10% damage is taken from mana before life" which means it is a 40% MoM, additional survivability for us. Additionally, it gives us flat mana and mana regen which is also a huge boost in survivability. Price (6 linked) - Expensive Price (non linked) - Moderate ___________________________________________________________________ 2.2.4 Gloves ------------- For gloves, look for these stats - +# to Maximum Life - +#% to (any elemental) resistance - +#% increase spell damage Look for as much elemental resistance and life on the gloves. For the spell damage is not mandatory but it helps your damage. Link to the gloves : General - https://www.pathofexile.com/trade/search/Delirium/KyO44wgs5 Endgame - https://www.pathofexile.com/trade/search/Delirium/ZWMaQDmuQ General - Cheap to Moderate Endgame - Expensive Hands of the High Templar - Yes I have thought about this build. But the issue is we don't use any auras, so I personally would not recommend it. ___________________________________________________________________ 2.2.5 Boots -------------- This is the Best boots for us. It gives us a huge amount of mana and dodge per 500 mana. Though it has the stat "loses 7% mana per second", but don't worry, because with our amulet and rings up, our passive mana regen will be able to handle the mana lost. for the rolls, prioritize #% increased maximum mana then lightning resistance. Price : Expensive ___________________________________________________________________ 2.2.6 Amulet ------------ This amulet is the BiS, it gives us a lot of flat, increase and mana regeneration. The stat "item and gems have 25% reduce attribute requirements" also help us out on our attribute on certain gem so this is the best amulet we can get. Do use all fertile catalyst on this amulet, it increases all the mana affixes in the item and the difference is quite huge. Price - Cheap For Anointments, you can go for Divine Judgement - Cheap Destructive Apparatus - Moderate ___________________________________________________________________ 2.2.7 Rings -------------- those 2 unique rings are my current in slot items. Get Dream Fragments first before Essence Worm. If you don't have essence worm yet, use the rare ring. On Dream Fragments, prioritize the resistance roll because you really need resistance due to the amount of unique items we are using which are lack of resistance. Dream Fragments gives us mana regen and #% Increase mana, it is quite important because without it, we won't be able to sustain the mana lost from our Omeyocan. Dream Fragments also gives us immunity to both chill and freeze, this allow us to not worry about freeze from certain skills from the monsters, drastically increase our survivability. We will be putting Skitterbots on our Essence Worm. Essence worm will make our Skitterbots not reserve any mana so it won't interrupt with The Agnostic mana recovery to our hp. The 40% Increase mana reserved will barely affect our survivability because our Clarity and Precision are on low level which barely reserves any mana. For the rare ring, look for as much flat mana and flat life as possible, then look for some resistance. This will be your placeholder ring until you have Essence Worm Price Dream Fragments - Moderate Essence Worm - Moderate Rare ring - Cheap Link to the rings is here : Mana rings ___________________________________________________________________ 2.2.8 Belt For the belt, look for as much life, mana and resistance. For better flask QoL, you would also want reduce flask charges used and flask effect on your belt for the affixes. Look for these stats - +# to Maximum Life - +# to Maximum Mana - +#% to (any elemental) resistance - #% reduced flask charges used - Flask applied to you have #% increased effect ___________________________________________________________________ 2.3 Jewels
Spoiler
Basic jewels : For basic jewels, look for these stats #% Mine Throwing speed #% Increased Maximum life #% Increased Maximum Mana +#% to (any elemental resistance) Due to the amount of unique items we are using, we will be using these basic jewels to cap our elemental resistance. At the same time, we will be looking for mine throw speed which technically increases our dps There is a huge range between the prices, so I will list them base on your budget option Low Budget : https://www.pathofexile.com/trade/search/Delirium/Pva0DomUL High Budget : https://www.pathofexile.com/trade/search/Delirium/aVGY5Z3Ce ___________________________________________________________________ Highly recommended Watcher's Eye have a variety of stats and it can only be dropped by killing either Elder or Uber Elder. We will be looking for the stat "10% of damage taken to mana before life while affected by clarity". This is a highly recommended as it increases our ehp by a lot. Basically it will redirect 50% of the damage taken into mana instead of 40%, which helps a lot on our survivability. You don't need to look for other stats on watchers as we don't have much auras going on. ___________________________________________________________________ Cluster (IMPORTANT) To new players : - Cluster jewels are a newly introduced jewels, you can only place the cluster jewels in a "Large jewel Socket". You can't place these cluster jewels into "Basic Jewel Socket" as it does nothing. These cluster jewels basically adds new passives onto your tree. On Clusters you are highly recommended to run at least 2 cluster with these notables - Liquid Inspiration - Distilled Perfection - Jewel socket - Adds (4-5) passive skills (ENCHANTED) Distilled Perfection and Liquid Inspiration is our main source of fast mana recovery, without it your mana recovery rate will be abysmal. It is quite mandatory if you want to facetank shaper beam. Next, you would want to have at most "Adds 5 passive skills", not 6. Because you would need to spend an extra point routing to the jewel slot, do note that the implicit is an enchant. Finally Jewel socket, quite self explanatory since you have a lot of unique items and you need to cap your resistance, so having a jewel socket helps a lot. ___________________________________________________________________ Others This is your endgame jewel, it basically allocates all the small passives which you did not allocated in the jewel radius which is super strong for endgame setup. We will be socketing this jewel onto the Basic Jewel Socket near Shadow Tree, which grants us a life, mana, res and damage. Do note that it does gives us projectile speed but it won't kill the build or remove 10k shaper dps so don't worry! Place your Unnatural Instinct right here  Fun fact - When you hover over the jewel, it will list out all the buffs you will get from the jewel A second option will be a Thread of Hope with Large ring. Place it right here then allocate Assassination and Blast Cascade  I found thread of hope better at damage, if you want both survivability and damage you can take Unnatural but it will have a lower amount of damage but you save 2-4 passive points depending on your pathing. 2.4 Flask
Spoiler
You must have the mana flask at all cost and it must have the prefix "Enduring" on it, this will allow your mana flask continue to regenerate your mana even you have reached full mana. It will increases both smoothness of the build and survivability Quartz flask - This flask allows you to walk through monsters without getting body blocked and gives you additional dodge chance, this flask is a great defensive and utility flask overall. These are the stats I recommend. Prefix : Experimenter's Suffix : Of Staunching, removes bleed on use Diamond flask - This flask gives "Your Crit is Lucky", "Lucky" is quite hard to explain so would recommend you to check wiki here, but in short it gives you a higher chance to crit. On the prefix you can look for any stat, i am just too lazy to roll it :D. While on the suffix I recommend these stats Prefix : Any Suffix : Any "immune" except "of heat" which gives freeze immunity, personally recommend "of Grounding" to facetank Awakener Quicksilver flask - This flask gives you a lot of movement speed, increasing the smoothness of the build. You can get any stats on the flask but these are the stats I recommend Prefix : any Suffix : Any "immune" except "of heat" which gives freeze immunity. Personally prefer "Of Dousing", you can choose "Of Adrenaline" Enduring mana flask - As said above, you must have this flask because it increases both smoothness of the build and survivability. Look for these stats. It is recommended to use Divine mana flask for maximum recovery rate. Prefix : Enduring (MANDATORY) Suffix : Catarina Avoid Stun, this can be received by unlocking a veil mod from a flask, then obtain it from your crafting bench Atziri's Promise - This flask increases our damage and chaos resistance on use. Basically it gains an amount of our total elemental damage as extra chaos damage, which means it gives us additional damage in a nutshell. For the investment you need for this flask, it is worth it. Dying Sun - Dying sun only increases the clear speed as it creates more projectile and larger area. As explained above, ball lightning does not shotgun so it only increases the clear, I personally don't recommend it as our troubles are usually on bosses and the difference in clearing isn't huge, on top of that this flask is expensive, for the investment it is not worth it in my opinion. Bottled Faith - This flask is one of the most expensive flask available in the market on PoE. This flask gives high flat crit and increase damage taken on enemies. This flask gives us HUGE dps boost but it is not recommended for newer players to chase this item as it is very, very expensive. But if you do have the money to dump in, this flask could get you some crazy dps. _________________________________________________________________________ 3.0 Passive Tree pathing
Spoiler
3.1 Passive Tree explained
Spoiler
This section is only for beginner players! Scion Ascendancy have a weird starting location due to her attributes. She is meant to be the "you can be everything" class, which means that she has to be balanced between the 3 attributes classes, so her starting location is in the middle of all 3 types of attributes. Because we are using a mine supported Ball Lightning skill, we will be taking all the Mine and spell passive nodes in the tree. We will not be looking crits early on due to our chance to crit is still pretty low. For defenses we will be looking on life early on. Until we can swap into MoM and have Agnostic on our tree, we will be changing most of our passive nodes from Life into Mana. 3.2 Progress + Final Tree
Spoiler
21 points
Spoiler
 40 points
Spoiler
 62 points
Spoiler
 80 points
Spoiler
 94 points - before pathfinder
Spoiler
 104 points - after pathfinder
Spoiler
 114 points - after uber lab
Spoiler
 117 points - after cloak of defiance
Spoiler
 final tree + clusters
Spoiler
 _________________________________________________________________________
A glimmer of hope on 3.15??
 https://pastebin.com/2Ms95pVJ I didn't bother updating the guide, but there's a new PoB somewhere in the build. Just bumping it because people doesn't seem to know this guide existed once. I cast remi - a very beginner friendly guide : https://www.pathofexile.com/forum/view-thread/2866127 Support me if you want to! ttv/remicaster1 Last edited by Remicaster1 on Aug 30, 2021, 6:46:02 AM Last bumped on Aug 30, 2021, 6:40:59 AM
|

|
|
Archived
4.0 Ascendancy explained
Spoiler
4.1 Scion Ascendancy explaination
Spoiler
This is how a Scion Ascendancy looks like  Scion is designed to be versatile, so in a nutshell, she can be any ascendancy she wants. Think of her as a character in a fantasy game that copies other ability, but the ability is weaker than the original one. Unlike other Ascendancy which you will get a big notable for every 2 points, this is not the case for Scion. She has to take an attribute notable and taking another passive notable before getting an Ascendancy notable. When you allocate one of the Ascendancy notable, you will able to pick one of the 3 as shown in the picture. For example, I completed the Cruel Lab and received the a total of 4 ascendancy points. I will be able to take the Shadow Ascendancy note. When I allocate into the node, the game will only allow me to take one of the 3 shadow ascendancies, since we are a miner build, we will be taking Saboteur. Now for the biggest notable in Scion Ascendancy, it is called "Path of the (X Class). This basically allows you to allocate the starting location of the ascendancy you allocated into. In our case, allocating "Path of the Shadow" will allow us to allocate nodes at the start of the Shadow's Class node, and it gives us an additional 2 extra skill points. With Scion Ascendancy, you can get a maximum of 126 points if you helped a bandit, a total of 128 maximum points if you killed all the bandits. She has 5 more points compared to all other classes. The rule of the Scion Ascendancy for all builds is to take at least 2 classes of ascendancies and 1 starting location of a class while for other ascendancy is to take every big Ascendancy notables for each time you run a lab. 4.2 Ascendancy Order
Spoiler
Normal Lab
Spoiler
 Cruel Lab
Spoiler
 Merciless Lab
Spoiler
 Uber Lab
Spoiler
 5.0 Bandits & Pantheons
Spoiler
5.1 Bandits
Spoiler
Kill all Although we are a crit build, but due to the newly introduced cluster nodes, we are lacking on passives to get all the trees, so we will be getting the +2 passive tree. You could go Kill All early on, then respec back into +2 passive by vendoring 20 orb of regret and 1 onyx amulet, this will give you +2 passive. Do note that you will lose the 15% all res, which you have to get it back by jewels or your gear. 5.2 Pantheons
Spoiler
Major - Soul of Arakaali Minor - Soul of Shakari We are going for Arakaali and Shakari because we are lacking on chaos resistance, so chaos ground degen and poison would be a huge problem for us. We will be taking Shakari for poison immunity and Arakaali to deal against ground degen. 6.0 Gem Links
Spoiler
My setup
Spoiler
_________________________________________________________________________ Main Link _________________________________________________________________________ Ball Lightning - High-Impact Mines/Blastchain Mines - Elemental Focus - Slower Projectile - Swift Assembly - Inspiration _________________________________________________________________________ You can replace Slower Projectile with Greater Multiple Projectile for clearing Swift Assembly is my choice. You can replace it with Minefield. Minefield will throw a lot more mines compared to Swift Assembly but I dislike the "clunckyness" on the Minefield as it kinda "micro stuns" you, it felt pretty bad for me so I went with Swift Assembly. This is a personal preference. High-Impact Mines vs Blastchain Mines These 2 support gems have a big difference. I did experiment with a these 2 skills for quite a while, then I've finally settle down to Blastchain Mines. The reason Blastchain Mines is better is because we don't scale any aura effect on our tree. Due to the Double Damage from High-Impact Mines is an aura, we don't get the full benefit of it. On top of that, after having the habit of holding down a key rather than letting the mines chain, I do not get the full benefit of the double damage on High Impact, since the 5% more damage on is guaranteed, Blastchain Mines is way better. The main reason I use Inspiration is to deal against bosses, if you prefer more clearing you can use Charged Mines as it gives you more speed, but slightly lower damage. _________________________________________________________________________ 4 links setup - Helmet, Gloves, Boots _________________________________________________________________________ > Arcane Cloak - Arcane Surge - Second Wind - Increase Duration > Vigilant Strike - Ancestral Call - Faster Attacks - Second Wind > Clarity - Enlighten - Flame Dash - Precision _________________________________________________________________________ Arcane Cloak is one of the most important utility setup we have. It gives us a LOT of damage, by utilizing Indigon bonus damage, we gain a lot of flat lightning damage, increase spell damage AND a shield to protect us. We first support it with Arcane Surge because arcane surge gives us more spell damage, and since our Arcane Cloak counts as mana spent, we can immediately trigger a level 21 Arcane Surge on cast, which gives us a lot of spell damage. We will use Second Wind to reduce the cooldown of it, and increase duration is to increase the total duration of our arcane cloak damage and defense buff. Vigilant Strike will Fortify us on hit, and it will never miss because hits from it cannot be evaded. The downside of it is the range is very low and we don't scale any attack speed so the attack rate of it is pretty slow. So we will be using Faster Attacks to increase the attack rate, and Ancestral Call to increase the attack range. I personally use Second Wind to support it because it gives us 2 charges, able to use it 2 times in a short period of time and reduce the cooldown of it. _________________________________________________________________________ 3 Link - Weapons _________________________________________________________________________ > Wave of Conviction - Elemental Weakness - Blade Blast > Vaal Righteous Fire - Bear Trap - Increase Duration _________________________________________________________________________ The first setup is on the Trigger weapon, the weapon must have the stat "Trigger supported spell when you used a skill", this will allow us to proc 3 spell skills that debuff our enemies. > Wave of Conviction is to apply 25% lightning exposure on our enemies, allowing us to deal more damage. > Elemental weakness is pretty much self explanatory. Because we have other types of elemental damage in our ball lightning, so elemental weakness would be better than conductivity. > Blade blast is to unnerve our enemies, making them to take 10% increased spell damage. Bear Trap and Vaal RF is to increase our damage. Bear trap gives us 15% increased damage from mine hits when the bear trap triggers on them. Vaal RF pretty much gives us more spell damage in a short amount of duration Side note : Since our build have a lot of recovery rate, it is possible to use regular RF. But the downside to RF is it slightly reduces your survivability because it halves your regeneration. But for the 40% more spell damage it is worth to use on some situations. Using a flask with Ignite Immunity will remove the RF degen on you. Alternative setup
Spoiler
Storm Brand - Culling Strike This is the boss killing setup, if you don't want to use Vigilant Strike, you can put this setup on. Culling strike will kill any monster, including Shaper, as long as they are on 10% hp, they will be killed instantly, no matter the health pool they have. Phase Run - Increase Duration - Second Wind This setup is recommended to use on either lab farming or delve darkness farming. Phase run gives us large movespeed and phasing on default, which allows us to walk through monsters without being body blocked and they are harder to spot us, making the monsters hitting you almost impossible unless you stopped walking. _________________________________________________________________________ 7.0 Leveling
Spoiler
tl;dr leveling
Spoiler
This is a summary of my leveling progress, so it is made for experienced players who wants to quickly look through the leveling process Act 1 > Mule a Shadow, buy Stormblast mines then convert all item into Scion > Get Frost bomb after you reached submerged passage, buy orb of storm > Get Arcane Surge when you finish the Tidal Island quest, support it on frost bomb, keep it at lvl 1 > After reaching Prison, get added cold > Pick up Flame dash after killing Brutus > On reaching Caverns, get ice nova, then support it with Blastchain mines and Added Cold damage. Act 2 > Get Herald of Ice after completed Intruders in Black > Pick up Trap and Mine damage, swap out added cold after completing Sharp & Cruel quest. If you are using tabula, pick up elemental focus and controlled destruction > Kill All bandits Act 3 > Pick up elemental weakness on completing Lost in Love > Get a dex ammy on reaching Solaris 2 after talking to Piety > Go to Library, complete the Library quest then pick up Ball Lightning > Swap out Ice Nova with Ball Lightning, no change in support gems. Add Elemental Focus if you found a 4 link is BBBG, if the link is BBGG, pick up Slower Projectile. > If you are confident enough, do Lab on act 3, or else just do lab on reaching 800 hp+ > If you are using tabula, finish your links with Elemental Focus, Control Destruction and Slower Projectile. Your whole setup is finished on end of act 3. Just remember to balance res and life. Drop herald of ice as soon as you have MoM. Whole leveling
Spoiler
This section is made for beginners, since Scion cannot be played in your first playthrough, so I will not cover all of the basics of it, so I will give you some point forms on it. Act 1 > Wake up on the shores, after killing the zombie, set your default attack on the skill bar into move only, then kill Hillock with your Spectral Throw > Enter town, buy stormblast mine from Nessa, then look for 3 linked Blue - Blue - Green wands > Throw away spectral throw gem and the weapon, burn it to ash, TO ASH. > Go all the way to Submerged passage > Take portal, go back to The Coast using the waypoint in Submerged passage, then go to Tidal Island > Kill Hailrack, logout, log back in then take quicksilver flask as the reward. > Talk to Tarkleigh, take orb of storm and frostblink, then buy frost bomb from Nessa. Support Orb of storm with onslaught along with Frost bomb. > Go back to Submerged Passage, drop a portal near Flooded Depths door then go all the way to Lower Prison > After reaching Lower Prison, go back to town, then take the portal, go into Flooded Depths then kill the crab guy, then logout > Complete the Trial of Ascendancy if this is your first character on the league > Talk to Tarkleigh and Nessa, take added lightning from Nessa then kill Brutus at upper Prison. Support added lightning damage to stormblast mines. > After killing Brutus, immediately logout > Talk to Tarkleigh then take flame dash. Go all the way to Merveil's Caverns, remember to drop a portal near The Ship Graveyard Cave when you are in The Ship Graveyard to complete The Marooned Mariner quest. > Kill Merveil then proceed to Act 2 *Don't forget to take passive skill points* Useful tips : Vendor 1 Magic wand, 1 Topaz ring and 1 Orb of Alteration, it will give you a wand with tier 8 added lightning to spells, tier 7 if the ring is a magic ring, tier 6 if the ring is a rare. Your setup will be : (order doesn't matter) Wand 1 : Stormblast mine - Added Lightning damage - empty Wand 2 : Frost bomb - Onslaught - Orb of Storm Gear (any) : Flame dash Act 2 > After reaching Forest Encampment, Head to The Old Fields, then enter The Den, kill The Great White Beast then go back to town, take quicksilver flask as your reward > Go to The Crossroads, take waypoint then go left top side and enter The Chamber of Sins > After completed Intruders in Black quest, take Herald of thunder as your reward then buy Summon Skitterbots, socket it on your gear, doesn't have to be linked together, then reserve your mana on it. > Use the waypoint go back to The Crossroad, then go to The Broken Bridge, Kill the bandit there then go back to to town. > If this is your first character of the league, Use the waypoint again, go back to The Crossroad, go to The Crypt then complete the Trial of Ascendancy > Go to Riverways, take waypoint then go to The Western Forest. > At The Western Forest, take waypoint, then go all the way to the end and complete The Way Forward quest. > After that, go kill Alira, she is somewhere around the area in The Western Forest > After killing Alira, go to The Weaver's Chamber then complete Sharp and Cruel quest, go back to town then take Trap and mine damage as your reward, support it to Stormblast mines > Use waypoint go back to The Riverways, then travel upwards to The Wetlands, kill Oak at there, take waypoint then enter The Vaal Ruins > Go all the way to The Apex Pyramid, Kill the Vaal Oversoul, then head to act 3 Your setup should be : Wand 1 : Stormblast Mines - Added lightning damage - Trap and Mine damage Wand 2 : Orb of storm - Onslaught - Frost bomb Gear (any) : Flame dash, Herald of Thunder, Skitterbots Act 3 > Save Clarissa before you enter town, make sure you talked to her first before moving away > When you are in town, check for vendors (Hargan) if he is selling any 4 linked items. > Enter the Slums then travel to The Crematorium, complete Trial of Ascendancy at The Crematorium if you haven't. > Kill Piety, when she escape, take Tolman's bracelet then go back to town. > Talk to Clarissa, take the sewer's key then travel to The Slums, find the Sewers Door then enter The Sewers. > For the quest reward, take elemental weakness > In the Sewers, take all 3 Platinum Bust then deliver it to Hargan > Travel to The Marketplace, take the waypoint, if you haven't done Trial of Ascendancy yet, enter The Catacombs then complete the Trial in there. > Travel to The Battlefront, take the waypoint, then go to The Solaris Temple level 1. > Go all the way to Solaris Temple level 2, talk to the girl says you're not a cockroach, then take the amulet that gives you dexterity (Jade amulet) > Use the waypoint, go to The Battlefront, then go to The Docks > After taking the quest item, go back to Solaris Temple level 2, talk to Dialla then go back to The Sewers. > Kill the Undying Blockage then go to The Ebony Barracks > Enter The Lunaris Temple, go all the way to level 2 then kill Piety > Go back to town, talk to people who congratz you then go back to The Ebony Barracks by using the waypoint, then go to The Imperial Gardens > Take the waypoint at The Imperial Gardens, go to Library, find Siosa then complete his quest. The candle to the hidden passage can be difficult to find > After completing his quest, buy a lot of stuff, here is the list - Ball Lightning - Blastchain Mine - Swift Assembly - Elemental Focus - Arcane Cloak - Arcane surge - Slower Projectile > After buying all the stuff, if you haven't done Trial of Ascendancy yet, find it somewhere in The Imperial Gardens > Go to THe Sceptre of God then kill Dominus pizza. Your setup should be Body armour - Ball Lightning - Elemental Focus - Blastchain mine - Swift assembly (swap Swift to Slower projectile on bosses) Wand 1 : Arcane Cloak - Arcane Surge Wand 2 : *Same as before* Gear (any) : Elemental Weakness, Flame dash, Skitterbots, Herald of Thunder Act 4 > Go to Highgate, then move towards to The Dried Lake, kill Voll, take the Deshret's Banner then go to The mines > Travel all the way to THe Crystal Veins, take the waypoint, then go to Daresso's Dream > After reaching The Grand Arena, take the waypoint, go back to The Crystal Veins then go to Kaom's Dream. > Travel all the way to Kaom's Stronghold then kill the madman Kaom there > After killing the angry madman, go back to town, use the waypoint then travel to The Grand Arena, then kill the guy who wants to duel with you. > After killing him, go back to The Crystal Vein, talk to the girl calls you not a cockroach cus she can't remember your name, then go to The Belly of the Beast > Travel to The Harvest, kill the 3 doods who have the organ, then kill Malacai > During this act, if your total life pool is 900 or higher, go to act 3, move the statue then enter Aspirant's Plaza, then Ascend as a Ascendant No change in gear I cast remi - a very beginner friendly guide : https://www.pathofexile.com/forum/view-thread/2866127 Support me if you want to! ttv/remicaster1 Last edited by Remicaster1 on Apr 1, 2021, 9:59:25 AM
|
|
|
Archived
8.0 Additional Information
Spoiler
> Playstyle
Spoiler
Playstyle is very straight forward, hold down the D key, throw your mines then blast through everything. You can piano flask all the time, keep your mana up at all times and use arcane cloak as often as possible. On bosses this is what you want to do in order Preload all of your mines When the boss is almost active, activate righteous fire and vaal righteous fire, use arcane cloak then throw bear trap then activate all of your flask then detonate all the mines when the boss comes live, should be able to 1 shot them if you manage to do this properly Arcane cloak increases your damage by a lot, do use this often! > Boss Fight Tips
Spoiler
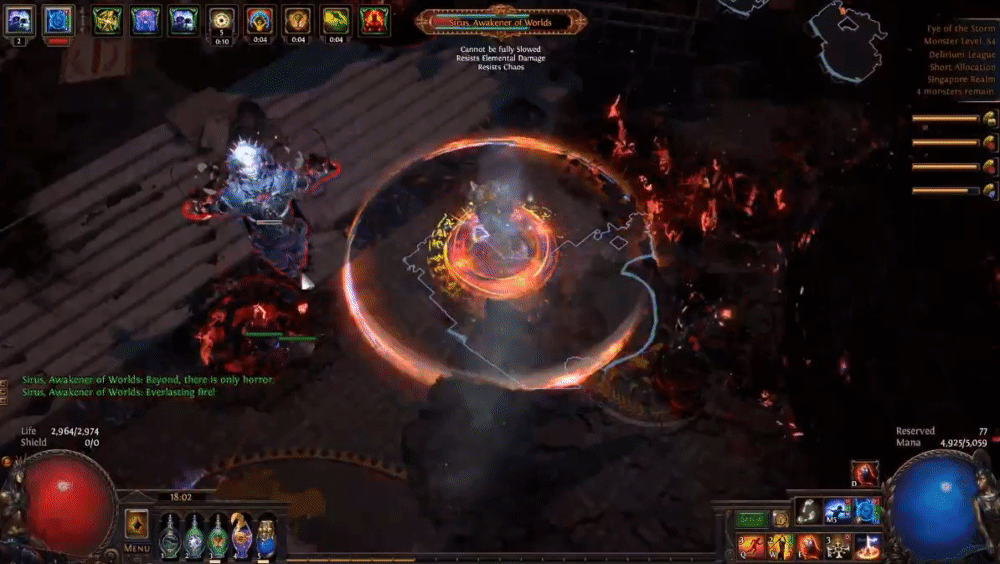
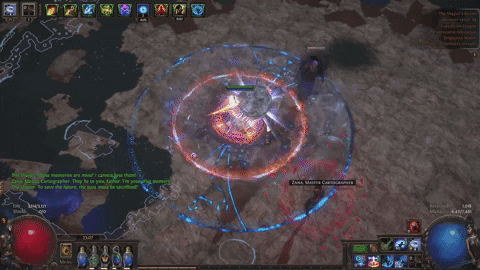
Sirus tip - When the fight starts, he will say "What's this? A challenge.. bla bla bla", during that time throw a bunch of mines under his feet, then detonate it when he becomes damageable, do make sure to use arcane cloak during this time - On the first 3 phase, repeat the same thing, do be aware of the carpet bombing where his statue fires at, that is the only thing we can die from in the fight (ofc we also die to the storm so beware) - Some of the ground degen hurts so you don't want to step on it for too long - When he enter the final phase, he will gain 3 extra abilities, > Empowered Die Beam > Spinning beam > Clone beam He will teleport more often during this fight so you have to adapt on it. - Empowered Die beam can be easily tanked as you can see on above - Spinning beam slow can't be negated, so avoid getting hit by it - On the clone beam, he will summon a bunch of clones then goes something like "Feel the thrill of the void", when he almost says the word "of the void" activate your Arcane cloak and your mana flask and shock immune flask, you will 100% survive the hit. Do not attempt to facetank the meteor slam!!! This is because it is a waste of time waiting when we have 200% movement speed, when he crits you are likely to die because our build have barely any physical mitigations 9.0 QnA
Spoiler
" A : My first question is, did you follow the build guide entirely and didn't threw your spin on it? (As in taking certain skill tree nodes by yourself, swap out certain stuff, cheap out in some ways like jewels etc). Jewels are important part of the build as they cap your resistances. If you do not have capped resistance, you take 4% increased damage for each 1% you are missing. For example if you have 50% fire resistance, you take double the fire damage of someone who have 75% fire resistance! (100% increased fire damage taken!). DO NOT RELY ON FLASK TO CAP YOUR RESISTANCE as they are insanely inconsistent and you can't guarantee you'd always press it do you. If you follow the build guide exactly, here is my second question for you. Did you use Arcane Cloak & Vigilant Strike often? Spam flask often? Those are quite mandatory on your defenses so you are suggested to always have Arcane Cloak and your flasks up. Note : VIGILANT STRIKE is EXTREMELY important as sometimes it can determine you survive it or not. Though it is something that we don't really use it often, but whenever you saw a huge wave of monsters or Kosis / Omniphobia (delirium bosses), you are suggested to use vilgant strike and keep your fortify up as long as possible as fortify is a huge part of your defenses. Most people tend to struggle on this build is only due to cheaping out in some ways (especially jewel parts) as they are quite mandatory on your defenses and can be expensive. You would really want a lot of mana (minimum 4.5k mana) in order to have some decent survivability. Even you have lower than 4.5k mana, you will rarely get one shotted, mostly is due to your positioning, attempts on facetank bosses with dangerous map mods (the only way to get one shotted). Also don't tank shaper balls as they have penetration (same goes to atziri's Flameblast) which could be very dangerous to our build. Community feedback + crafting guides
Spoiler
This section highlights some of the feedback received from the community within the discussion of this thread and the crafting guides that have been discussed around for improvement. Major thanks to these helpful people that are helping me to answering questions and helping out the community here. Crafting guides :
Spoiler
" " " " " " " " Community Feedback
Spoiler
" " " " " " " " I cast remi - a very beginner friendly guide : https://www.pathofexile.com/forum/view-thread/2866127 Support me if you want to! ttv/remicaster1 Last edited by Remicaster1 on Apr 1, 2021, 10:00:05 AM
|
|
|
This seems really strong i already have most of the endgame items.. but how to level? can u complete that section with a tldr of the gems to use? and when do lab?
The only thing i would miss is The watchers eye but i think i can farme easly with all the other equip. Last edited by Perzival3 on Apr 1, 2020, 1:17:26 PM
| |
" Sure, I will rush that leveling part first, gimme some time :) I cast remi - a very beginner friendly guide : https://www.pathofexile.com/forum/view-thread/2866127
Support me if you want to! ttv/remicaster1 |
|
" Also one question did you manage to do all content with this build right? seems pretty awesome! | |
" Yep, all content, faceroll all the map mods but slight issues on delving where the damage won't be able to 1 tap all the monsters can be a bit trouble. But this only happens when you delve pretty deep down I cast remi - a very beginner friendly guide : https://www.pathofexile.com/forum/view-thread/2866127 Support me if you want to! ttv/remicaster1 Last edited by Remicaster1 on Apr 2, 2020, 12:12:38 AM
|
|
|
Thanks for all the answers can i add u in game?
also 1 more add to complete the build can u put some trade link about the gloves and rare boots budget ones? like you do with the all gear? atm im leveling with one with nothing jewel seems more fast at act 10 i should hmm respec sorry i cant quote 3 quotes. | |
" have been looking on the budget boots but I can't find a good one yet, so thinking the best possible way to make a budget one. You can pm me by @remi_tv I cast remi - a very beginner friendly guide : https://www.pathofexile.com/forum/view-thread/2866127
Support me if you want to! ttv/remicaster1 |
|
|
Hey there, excellent guide. After your ice shot miner guide, it was another delight to read. I have played this build after seeing Akane’s videos. Some notes;
- I think an explode mace is worth of mention as it vastly improves clear and survivabiliy by destroying corpses - I felt like flat damage to spells infact doesn’t have that much of an effect mostly because arcane cloak adds so much flat. A warning for others, the damage feels weak sometimes until you press arcane cloak where your damage goes 2.5x. Pretty impressive. - Numbing elixir actually gives some phys reduction and we also have fortify. So we actually have some, I would say it’s a bit unfair to the build how you word in the ‘cons’ section. Some discussion: - I think it can be possible to add righteous fire (non-Vaal) because we have so much sustain. - Akane switches Sabo to Hierophant in his latest lvl100 video. I think this is a good trade if you have enough skill points. - I chose to annoint crusader. It currently gives +9% more damage for my character. Lose some throw speed but lots of damage and mana if you need that last bit to get to 5k for Omeyocan. Maybe add it as an expensive option? - Could you share a bit more of your delving experience with the build? How does it compare to your ice shot miner for instance, how deep do you think can go etc. Thanks again for the good read! Last edited by alpish on Apr 3, 2020, 6:06:59 PM
|


