


[3.2] The MagicBlaster - A detailed guide about MF'ing & Farming in general (with Kinetic Blast)
|
Hellooo Exiles!
After having received many questions about a character I've played in the last two leagues (Kinetic Blast Wander) and about farming and Magic Finding in general, both in game and in other guides I wrote, I decided to write few words about those topics. This guide is not just about the build itself (which is pretty simple), but also about many things you should know when you approach the MF'ing world and mapping in general. As always, english is not my native language, so I already apologise for possible errors and/or unclarity. I try to keep the guide updated almost daily, adding new stuff and enhancing older ones.
Main updates
- March 21st, 2018: Updated FAQs, added a whole new section (Filters, loot & routines), moved the generic topics in the second post. - March 23rd, 2018: Added some informations here and there, added a whole new section (Party play) - March 26th, 2018: Added two new sections (Eldritch Battery setup and Things I am working on), added some more infos, Screenshots and another Video Table of Contents: First post: - Why would you play this build? - Pros & Cons - Mechanics Breakdown - Detailed chapter - Bandits - Levelling, Passive tree progression & PoB - Ascendency & Pantheon - Gear - Gems & Links - Eldritch Battery setup - Problems you have to deal with - Screenshots - Videos - FAQs - Things I am working on Second post: - How to MF - All you need to know - Filters, loot & routines - Maps choice and Atlas management - Party play
Why would you play this build?
This build is designed to be a fast clearing build, allowing the player to spirnt through maps as fast as possible, enchancing the drops with a full MF setup. This build offers a smooth playstyle both in solo and in party play. You are gonna be able to single-handedly carry 6-man parties without any support, but in the ideal situation you will play with at least an Aurabot Character, providing massive buffs to your damage and survivability. This is not meant to be a boss killer build, this is not meant to tackle every content in the game, and this is not meant to be super cheap (but not even too expensive).
Pros & Cons
Pros: - Very fast clearspeed - Able to run full MF gear - Not too expensive for the power it offers - Able to carry full parties with no effort - Scales extremely well with investment and Aurabots - Flexible buildpaths and customization options Cons: - Requires some investment to start with (let's say about 3-5ex) - Not a boss killer - Not suited for every content in the game - Glasscannon (very low defensive capabilities) - Not suited for hardcore - Requires an accurate choice of maps to run - You need to solve some "problems" (discussed later) - Cannot run Elemental Reflect and no-leech maps
Mechanics Breakdown - Detailed Chapter
In this section I'm gonna talk about the mechanics of the build, which is quite simple overall. Damage: Our main damage option is Kinetic Blast, which is a skill that can only be performed with wands. Mechanically speaking, this is one of the most interesting skills in the game; it shoots an initial projectile in a straight line in front of you, when it collides with something (either an enemy or a wall/obstacle) it creates 4 additional explosions, each of them dealing a fraction (75%) of the initial damage. Let's start by saying that this looks really cool, but the main consequence is that when you have multiple projectiles and enough AOE scaling, it destroys the whole screen in a single hit. It's also worth mentioning that, if the initial projectile is able to pierce enemies (or it chains/forks off of it), the explosions are repeated for each and every monster that gets hit. It's also important to note that while projectiles cannot "shotgun" (i.e. a single monster can be damaged only by one projectile every cast, even if you shoot multiple projectile with a single skill), all explosions can overlap, since they gain the "Area" tag. Our clearspeed is boosted further thanks to other explosions, this time coming from Herald of Ice, which procs off of frozen enemies we kill (and 95% of the monsters we kill are going to die while frozen). To deal with tough enemies (some bosses or red beasts), when they are not hugging a wall, we also have the option of using Barrage. This is one the the strongest single target attacks in the game (along with Molten Strike and Blade Flurry), since you can scale its damage over the roof by adding additional projectiles. This setup is not mandatory and not even needed in most istances, but it's something worth considering. Since we are going to use a wand that provides no flat damage to start with (Piscator's Vigil), we need to obtain it from other sources: Wrath, HoI, Abyssal Jewels and the allmighty Esh's Mirror. By the way, for those of you having no idea why that shield is so good (and with "good", I mean "very fucking strong"), I invite you to consider that fact that you can easily kill few dozens of shocked monsters in the "recently" timespan (4 seconds window). Defense: LoL. Never heard of this kind of stuff, I don't know any defence other than killing things fast. Next topic. Allright, joking aside.. That wasn't a joke! The sheer amount of damage and offscreening potential of the build offers a good first layer of defence. We are also investing into a lot of Evasion and picking up Acrobatics for some dodge chance. That's pretty much it. Our life pool is barely reaching 4k HP and we are forced to physically avoid the most dangerous things, luckily we are very fast. Utility & stuff: We move around using our really high movement speed, this is granted by a combination of things (general movement speed, flasks, Queen of the Forest and Tailwind); we also use sometimes Flame Dash to jump over obstacles if necessary. We have a Curse on Hit setup, linked with Herald of Ice, that applies Poacher's Mark, this curse generates frenzy charges while clearing, offers better flasks' sustain and grants some life/mana on hit. Linked with the same setup, we also have Onslaught, this way when our HoI kills something, it does have a chance to grant us the buff. We have many free sockets in out setup, we have two main options: either we use them for additional utility stuff (golem, CWDT setups, etc.) or we use them to level up more gems. Since we are clearing maps very fast and the main goal of the build is to farm currency, levelling up many skill gems is a good way to gain some additional profit.
Bandits
You really want to help Alira; the additional crit multiplier is very good, but also the resistances help a lot.
Levelling, Passive tree progression & PoB
I highly suggest you to level using bows and Lightning Arrow/Tornado Shot. The reasons are pretty simple: there are a bunch of really good unique bows and pretty much no good wand to level with, moreover KB is crazy mana intensive early on (even later, but at that point you have the damage and the leech to sustain it), using wands also requires a lot of INT which you will not have early on. Bows and bow skills have none of these problems, they are just a better version of wands early on. You can check any other bow guide for reference and one of the many levelling guides out there, just buy the usual levelling item (Wanderlust, Sadimas's, Tabula rasa, Thief's Torment as soon as possible, Karui Ward and later Karui Charge, Goldrim and good unique bows every few levels) and push through those acts as fast as possible. I suggest you to transition towards Kinetic Blast and the actual wander playstyle around level 60-65, when you have all your required gear and most good passives. Here I'm gonna post the tree progression, don't feel forced to follow it point by point. If you feel like you need more life or more damage, adjust it to your needs. Skill tree progression As you can see, there's also an alternative pathing when you are min/maxing the points (you sacrifice Acrobatics but pick up a bit more life and resistances). At higher levels you can also drop Primal spirit (the mana node near the Ranger starting area), if you do not need his attributes anymore. I leave a link for Path of Building: https://pastebin.com/ZnPh5Kkh
Ascendency & Pantheon
Ascendency: Even though this guide is made for a Deadeye version, this build works just as well as a Pathfinder. Both classes have their pro's and con's. They achieve similar amount of damage and clearspeed; Deadeye has an additional projectile, free AoE and accuracy, and more notably free pierce. Pathfinder has way better flask uptime and better flask sustain, has immunity to ailments and scales better the more you invest into it. Normal Lab - Gathering Winds Cruel Lab - Far Shot Merciless Lab - Endless Munitions Uber Lab - Powerful Precision or Ricochet I suggest you to find someone carrying you through the labs, since this build doesn't really like that environment. The last ascendency point is more of a personal taste, I really enjoy the Pierce option, but I also tested the Chain and it feel just as good most of the times. For smaller packs and more spread out ones, chain is slightly better, while for big packs and more offscreening actions you should look for pierce. Pantheon: Not many options here in my opinion. Major god - Soul of the Brine King (you should unlock all the sub-objectives too), being able to not get stunlocked/freezelocked is mandatory Minor god - Soul of Ralakesh (mostly for the sub-objective), avoiding blind is mandatory in my opinion
Gear
Let's start showcasing my gear, this should give you a good idea about what you should aim for. I'm also experimenting the dual Pariah setup. Gear: I'm going to discuss the items, slot by slot, later in this section. Jewels: These are some of the jewels I've collected, at this moment I'm using only 5 of those. You want Abyssal jewels with at least 2/3 well rolled damage mods, other nice stats to look for are: - Life (30+) - Crit multiplier and crit multiplier if killed recently - Attack speed if crit recently - Evasion rating while moving - Resistances - Accuracy Flasks: The flask you should always have are: - Diamond flask (crit chance) - Jade flask (evasion to reach the QotF movement speed cap) - Quicksilver flask (some more movement speed) The last two slots are more of a personal taste, you have some good unique options: Dying Sun, Vessel of Vinktar, Wise oak and Atziri's Promise. But you can also use general utility flask, like stibnite, quartz or silver flasks. You should try to be immune to bleeding, curses and freezing. In reality, it's easier to just choose two of those immunities; I personally decided to go for bleeding and curse immunity, while allowing myself the risk of gettin frozen.
Piece by Piece description
Weapon
Piscator's Vigil is probably the best wand you can use, it scales super well with abyssal jewels, with Esh's Mirror and auras (even better if you are running with some aurabot). It's not even that expensive, offers good crit chance, damage and accuracy.
Shield
Esh's Mirror is your best option, it just gives so much free damage while clearing maps. It's a bit expensive (1ex or even less), but also offers life, lightning resistance and intelligence; all of those are things we are gonna need.
Body Armour
Queen of the Forest is the only real option available here, that's what allows you to move fast. It provides also a massive amount of evasion, some life and resistances. To cap the movement speed it can offer (100% increased movement) you need to reach 45k evasion, this force you into some specific choices.
Helmet
Starkonja is probably the most balanced option, since it provides lots of evasion and life, while also some crit chance. More glasscannon/damage oriented options are Rat's nest and Lightpoacher, but I honestly think they are neither worth nor needed in the end. Moreover, if you want to use a Lightpoacher, you need to reroll phisycal reflect maps too. For pure clearspeed you can also use Devoto's Devotion (20% movement speed), but you sacrifice a lot of life and evasion.
Gloves
Sadima's Touch are mandatory, since we are stacking IIQ; try to get a pair with 16% roll.
Boots
Goldwyrm are mandatory too, since we are always stacking IIQ; try to get a pair with 20% roll. They also comes with high fire resistance, which is really good.
Amulet
The amulet slot is more flexible. You are either choose a Shaper rare amulet like mine (ilvl 85+) with 10% IIQ, which can provides other additional stats too, or you can use the usual Bisco's Collar. The third option, the cheaper one, is using the Ascent, which is really good by itself, but forces you to use a magic item in your setup (probably you have to sacrifice the belt or the helm slot). Shaper amulet should be your goal, but they are very expensive so you can start with something cheaper and farm your way up. It's also been brought to my attention that you can use Spinefuse talisman, which can roll up to 10% IIQ as a prefix.
Rings
Ventor's Gamble are the most balanced option; try to get rings with 10% IIQ or as close as possible to that value, while mantaining positive resistances. If they also have good life and positive IIQ, you hit the jackpot. If you somehow manage to cap your resistances anyway, you can use a pair of Pariah with white sockets, they provide a lot more IIQ.
Belt
Best in slot is always Heahunter (that's true for 99% of builds), but the cheap and almost as effective option is the Bisco's leash, which gives you the Rampage effect. Last league I played this build with HH, now I'm using Bisco's and honestly the difference is not that mindblowing; if you manage to keep your rampage counter going, the additional damage and movement speed is pretty comparable most of the time. Bisco's also gives you some strenght and cold resistance, both needed stats. Talking about enchants: Helm - They are not really needed. Barrage +1 projectile is the best damage option for pure single target, otherwise you can get either 40% increased KB damage or the one that I'm currently using (75% chance for an additional explosion). Gloves - Doesn't really matter, play with whatever you have available. Boots - They are not really needed, but there are multiple good options. Fire damage if you've killed recently, attack/cast speed if you've killed recently, life/mana leech if you've killed recently, movement speed if you haven't been hit recently, stun avoidance if you have killed recently.
Gems & Links
As I announced before, you do not actually need many gems to make the build work. You need your auras setup, your damage setup, and that's pretty much it. You can use the other sockets for utility stuff, like vaal gems, CWDT setup, golem and so on, but they are not really needed. Since the purpose of the buils is to farm maps and generate currency, I highly suggest to dedicate all the empty sockets to other gems you want to level (for yourself or to sell later). The sheer power of Kinetic Blast allows us to clear easily with just a 4link setup, as long as we are playing solo, in low tier maps or with a small parties. If you want to farm high red tier maps or carry full parties without a support, you need to move your KB into a 5/6link setup, otherwise you might not be able to consistently 1-shot screens. On the other side, since you will be using a 4link setup most of the time, you can either use the 5/6 available links of the chest to level up even more gems, or you can dedicate it to a real single target setup (barrage), to deal with bosses or red beasts that are not hugging walls. The main gem setups are (gems in order of importance): - Kinetic Blast setup (4links): KB, Crit Chance, GMP, EDwA - Kinetic Blast setup (6links): KB, Crit Chance, GMP, EDwA, Added Lightning, Damage on full Life - Barrage setup (6links): Barrage, Crit Chance, Elemental Focus, EDwA, Added Lightning, Damage on full Life - Flame dash (2links): Flame Dash, Faster Casting - Wrath setup (1link): Wrath - Herald of Ice setup (4links): HoI, CoH, Poacher's Mark, Onslaught Optional setups: - CWDT, Immortal call, Increased Duration, Vaal Haste/Grace - CWDT, Ice Golem - Vaal Power Siphon, Crit Chance, EDwA, Damage on full Life/Added Lightning - Cast on Death, Portal - Grace or Purity of Elements (instead of Wrath) Note1: As you've probably noticed, we should use 5 off-colours in our QotF. This is not an easy task, and it's also pretty expensive. If you do not manage to obtain those colours, you can run just a setup with 4 off-colours (3b-1r-2g), using Slower Projectiles or Pierce instead of Damage on Full life. Note2: The best part about those damage setups is that they are easily interchangeable. I suggest you to always run with a 4link KB setup and a 6link Barrage setup; when you feel like you need a stronger KB setup for clearing, you just swap the place of KB <-> Elemental Focus and Barrage <-> GMP and you are good to go (barrage becomes your 4link setup, while KB becomes the 6link setup). Note3: By the way, KB=Kinetic Blast, CoH=Curse on Hit, GMP=Greater Multiple Projectiles, EDwA=Elemental Damage with Attacks, HoI=Herald of Ice, CWDT=Cast When Damage Taken.
Eldritch Battery setup
First, let me describe what's the problem I wanted to solve and therefore the reason I developed this alternative setup. Keep in mind that this option requires a specific sets of items to work, not necessarily cheap.
Underlying problem
When you are running high tier maps (t14+), even more when you are carrying a party, you kinda feel the need to run the 6link setup for KB, because your goal is to always clear the whole screen with a single attack. That's cool and everything, the main problem (as discussed in other sections) is that KB has a massive mana cost, which becomes crazy in a 6link setup (about 70 mana per attack, with something like 4 attacks per second). You will NOT be able to sustain it with pure mana leech, that's just way out of the leech cap. While clearing it's not a big deal, 'cause you are not attacking that often, so your mana pool has time to resplenish between to attacks; in pure single target scenario it become a problem though. You either use Barrage or you are going to miss some KB attacks, since you won't have enough mana. But now you have Barrage in a 4link setup, so you are going to sacrifice a lot of damage anyway. TLDR (of the problem): I want to have a smoother resource management to cast my KB in a 6link setup. What's my solution? - Take Eldritch Battery keystone, to use ES instead of mana - Use a Watcher's Eye jewel, with the mod that grants 20-30 ES on hit - Use a lvl4 Enlighten (or lvl3 in a corrupted pair of Sadima's with +1 level of gems) to run Discipline, Wrath/Haste/Grace and Herald of Ice.
Setup discussion
With the usual items I was using (Sadima's and Esh's mirror) you should have about 180-200 ES to start with, with Discpline you should reach at least 500 ES. That's a really good resource pool to cast your skill. Even without hitting anything, you can cast KB few times without problems; but the setup actually works because you can back up to 30 ES on hit, which just works too well with the skills we are using and allows us to deal with single targets without any problem. Keep in mind that the point we are using to grab EB itself is the hybrid life/mana leech one we can respec (south of the duelist area), so we actually spend no points for this change. We can also discuss the aura choices now. We have to use Discipline to make the setup work, we also need to use HoI since it's way too strong for clearing, and then we can also choose a 50% aura. In my opinion you should pick either the usual Wrath, Haste or Grace. - Wrath is obiovusly the damage oriented option (you can get also really good Watcher's Eye bonus for Wrath, but they are very expensive, even more in combination with the ES on hit) - Haste is on the utility side, since it provides some additional movement speed and some attack speed (Watcher's bonus include perma-Phasing and Onslaught on kill) - Grace is also focused on utility, it provides lots of evasion (allowing us to only need a Jade flask to cap our evasion at 45k) and has also a Watcher's bonus that grants up to 15% movement speed. Feel free to choose whatever you prefer; I suggest you to use the one that is affected by the Watcher's eye you are going to buy. To run all those auras/buffs we need to have about 12% reduced mana reservation; we do not want to invest any passive point into it, so we have to link our auras with a level 4 Enlighten. That gem is very expensive though (about 6ex at this moment); a better option is to buy a pair of Sadima's with the corruption that grants +1 level of socketed gems, this way we can use just a level 3 Enlighten (which is like 30 chaos). With this solution, you can keep Discipline and the 50% aura linked with Enlighten, while you can keep HoI in a separate setup with CoH (you have to drop Onslaught though). Our new setup becomes: - Enlighten, Discpline, Wrath/Grace/Haste - HoI, CoH, Poacher's Mark If you do not care about the CoH setup, you can just put HoI in the goves with the other auras. I've personally chosen Grace, since I do not really feel like I need Wrath for the damage and the extra utility is also really nice. This way I can free up a flask slot (which was a Stibnite flask) to use a Quicksilver flask, to gain the Onslaught I lost from the HoI setup. Note: You want to buy Sadima's that already have the four linked colours you want, otherwise you need a Vorici level 8 to change the sockets/links/colours on a corrupted item.
Problems you have to deal with
As said earlier, this build (but most full MF builds) have some problems you have to solve. - Life and resistances: you are going to use pretty much all unique items, this means that your life pool is very low (about 3.5-4k at level 90, depending on your setup) and you have to be able to cap your resistances anyway, potentially "sacrificing" some passive points or jewels - High INT requirments: this is not a real problem when you are at high level, but as soon as you want to transition into a real wander (I suggest around level 60-65), you need to satisfy really high INT requirements on those wands. - Achieving enough evasion: since we are using QotF, we want to maximize the movement speed it can offer, which means that we want to have at least 45k evasion. This can be obtained with the right flasks and/or jewels. - Mana issues: for some reasons, Kinetic Blast has a massive mana cost and we can actually attack pretty fast; this means that we have serious problems of mana sustain, even with really high damage and leech. This is partially solved by running just a 4link setup for KB, while when you are running a 6link setup, I suggest you to drop Wrath (if you have an aurabot or someone else that can provide it anyway). You can also spec into the Eldritch Battery setup (see section above).
Screenshots
Kinetic Blast damage (6link setup, only HoI as damage buff) 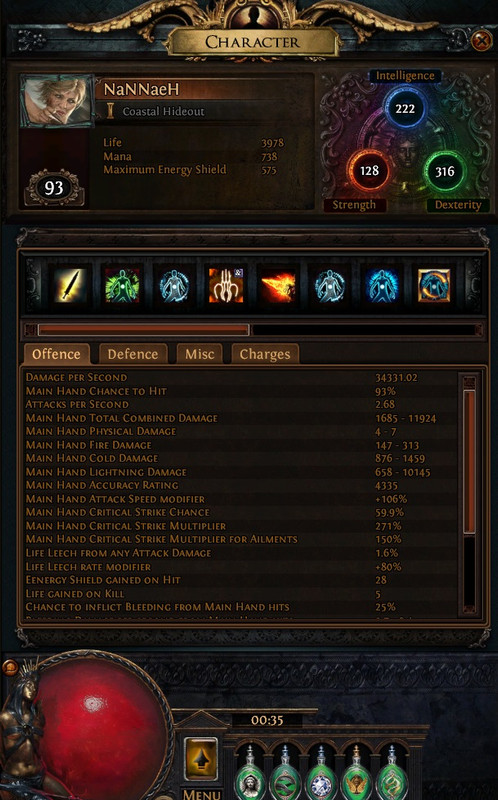 Defences (Grace and Discipline as only buffs)  Defences (Grace, Discipline, Flasks and Tailwind) 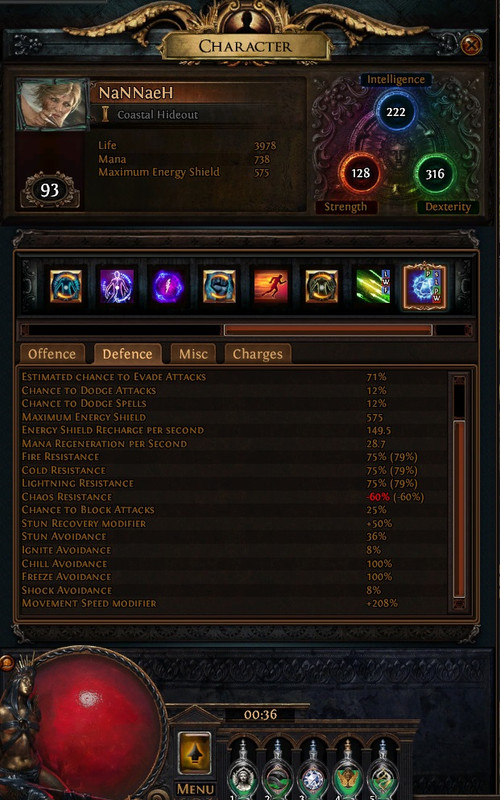 Atlas (my 29-maps Elder "ring", with Jungle Valley being the extra map) 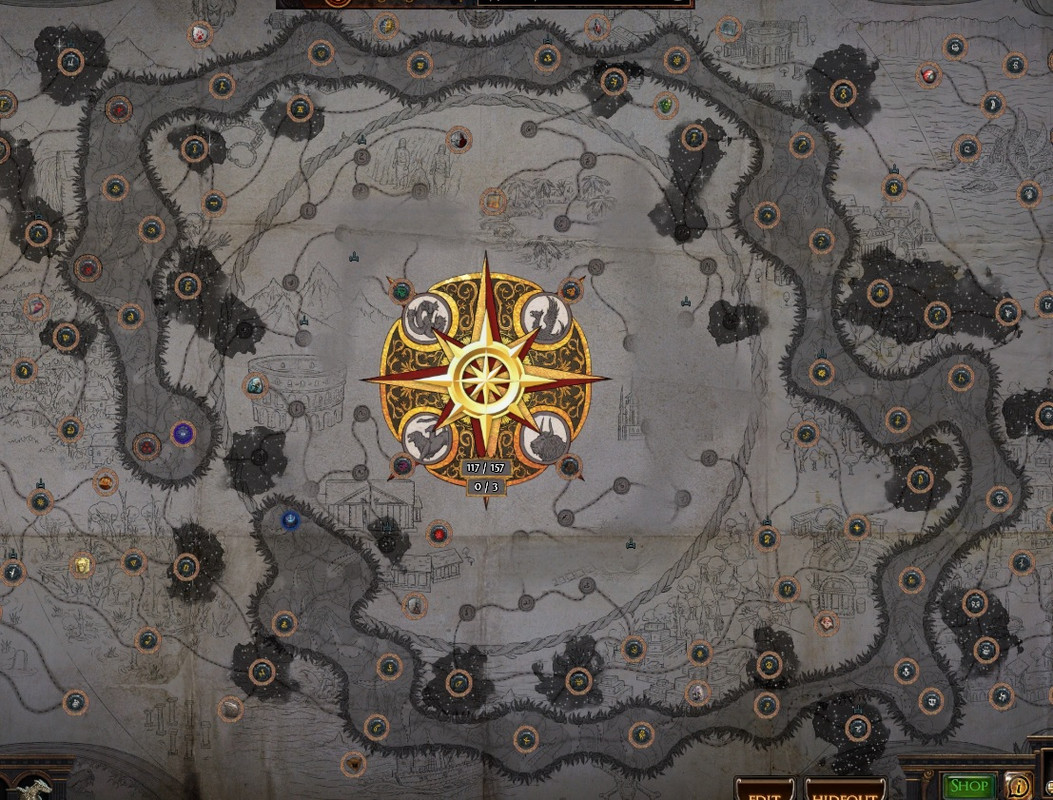 screengrab screengrab
Videos
Shaped Grotto run (T9) Shaped Toxic Sewer run (T10) Shaped Waste Poll (T14) with EB setup Gonna update more videos in the future, this is just to give a rough idea of the build.
FAQs
Q: Why Poacher's Mark in the CoH setup? Can I use something else? A: Poacher's Mark is my choice since it allows you to gain more flask charges (very important for the build), while also offering life/mana on hit, which is a very strong sustain option against tough enemies (if they have adds around them, so they get cursed in the first place). You can use whatever curse you like, it doesn't really change how the build works or performs. Q: Can I farm every tier of maps? Does the build slow down in higher tiers? A: You can run any tier, I've farmed all guardian maps without any problem, playing solo and with the 4link setup (but killing the boss with another character). As long as the layout is good, the clearspeed is untouched. Obviously if you get a map with crazy annoying mods (monsters life + ele. resistances + ele. equilibrium + chilled ground + whatever) you ability to kill stuff is gettin hindered, but that's gonna happen in like 1 map every 500. Q: Can you give me more informations about levelling? A: I suggest you to level up as an archer, using unique bows which are cheap and effective. Silverbranch -> Stormcloud -> Roth's Reach -> Death's Harp or The Tempest -> Death's Opus -> Infractem You do not have to buy and use all those uniques, just move forward in the list when you are not killing monsters fast enough with the bow you are using. Use common bow skills like Split Arrow -> Lightning Arrow -> Tornado Shot The support gems you want to use are similar to the ones you would use in the Kinetic Blast setup, except Crit Chance which is not really worth while levelling (you can use Added lightning/cold in its place). At level 65 you should be able to equip every item needed (the last one is the Piscator's wand itself at 65) and you can fully convert into a wander. Q: Lycosidae vs Esh's Mirror A: Always Esh's Mirror. With the usual setup you should have 93-95% chance to hit, which is already good enough (the cap is 95% btw). The damage provided by Esh's is just way too powerful while clearing with a good pace. Moreover Esh's Mirror provides some INT, higher amount of life and a lot of lightning resistance.
Things I am working on
This section is more of a personal section, it includes things I am currently trying out or working on, feel free to just skip it. - Switched to using two Pariah rings to maximize IIQ, decided to cap my resistances with the help of a Wise Oak flask (resistances are triple-balanced) - Switched to the Eldritch battery version, smoother playstyle - Trying out a Devoto's Devotion, to squeeze in as much movement speed as possible - Locked a "ring" of Elder influence (not the perfect fool proof ring, but still almost unbreakable) to start farming shaped red tier maps - Shaped maps I'm currently running: Underground Sea (T11), Underground River (T12), Armoury (T13), Waste Pool (T14) - Still not sure about the T12 map, I've tried both Tribunal and Underground River, yet to decide which one works best for me I hope you may give a chance to this build, trying it out yourself and enjoy it as much as I did. I will try to answer any question, so feel free to ask and make objections. I also wanna thanks all the players that will give their feedback and answers to this thread, helping myself and others to enjoy this build. I invite you to read the guide, or at least the FAQs, before asking something already discussed. I prefer if you write your questions here in the forum. If you need suggestions on your character, try to post your gear and/or a PoB link. If you wanna check the character, it's called NaNNaeH. Have a nice day and stay safe, Exiles. Abyssal Volatile Poet: https://www.pathofexile.com/forum/view-thread/2057243 MagicBlaster Deadeye: https://www.pathofexile.com/forum/view-thread/2115343 Fortifier Aurabot: https://www.pathofexile.com/forum/view-thread/2084465 Last edited by lallalaus on Apr 19, 2018, 6:37:49 PM Last bumped on May 23, 2018, 1:38:10 AM
| |
|
In this second post I'm gonna talk about more generic topics, not strictly related to this build.
Table of Contents: - How to MF - All you need to know - Filters, loot & routines - Maps choice and Atlas management - Party play
How to MF - All you need to know
This section is not just about this specific build, but about the general topic. Lemme make this clear from the start. Do NOT expect to get one exalted orb per map when you use a MF setup, do NOT even expect to go "from zero to hero" (as far as wealth goes) in a matter of 10 maps. This is not how the game works, playing with a MF setup just increases your overall gains over a reasonable period of time. Have faith and be persistent.
What is MF?
MF stands for Magic Finding, generally speaking it means that you are adopting a playstyle or investing into something that should enhance your ability to find valuable items and the amount of loot you are going to get. How it translates into PoE world? In this game you have two main attributes related to the MF: Increased Item Rarity (IIR) and Increased Item Quantity (IIQ); let's discuss them briefly, even though they are pretty self explainatory. - IIR: the rarity tiers of items, from the most to the least common ones, are: Normal (white), Magic (blue), Rare (yellow) and Unique (orange/red). This stat literally increases the chances of you finding items that more "rare", (e.g. you are gonna find more unique items). Cool enough. - IIQ: well, it seems pretty clear what this thing does. You drop more stuff, that's it. This stat affects every single item (currency, weapons, armours, cards, etc.), except maps. Maps are only affected by the IIQ bonus of the map you are running, not the the amount you provide from your items. This means that you are also gonna find more unique, which was the point of having a lot of IIR in the first place. You should be able to understand by this point that IIQ is the stat you are looking for, since it provides the same effect of IIR, but with additional positive effects. You want items that give you as much IIQ as possible, if they also offer some IIR cool, otherwise it's not a big loss, even more 'cause 95% of the uniques in this game are worth less than an alchemy orb. Note1: IIQ has diminishing returns (actual diminishing returns, it's literally something coded into the algorithm that calculates item drops), which means that if you lose some percentages of IIQ among your items, it's not the end of the world. Note2: Magic monsters (blue) have additional 200% IIR and 600% IIQ, while rare monsters (yellow) have 1000% IIR and 1400% IIQ, unique monsters (orange/res) have 1000% IIR and 2850% IIQ.
Items to look for
At this point, people usually want to know which items are suited for this playstyle. Easy enough, since there aren't many real options, let's highlight the main ones (for a complete list, you can check the wiki page IIQ items). - Sadima's Touch gloves, up to 16% IIQ. - Goldwyrm boots, up to 20% IIQ. - Ventor's Gamble rings, up to 10% IIQ each (20% with two rings), Thief's Torment up to 16% IIQ or The Pariah with a white socket, which offers up to 15% IIQ (30% with two rings). - Bisco's Leash or Perandus Blazon belt, respectively up to 5% and 8% IIQ. - Bisco's Collar amulet, up to 50% IIQ (just against normal monsters), The Ascetic, up to 15% (with a magic item equipped) or a Shaper Amulet, which can roll up to 10% IIQ. - Windripper bow, up to 15% IIQ. You can clearly see that we do not have many choices. Moreover, most of those items do not really offer much more than that MF bonus. Note1: Just to make it clear. Even though, at a first glance, Bisco's Collar may appear as the best MF item in the game by a massive margin, its real value is way lower than what it seems. While its effectivness totally depends on the actual composition of the map you are running, many tests (run by players, in the last few leagues) showed that its un-nerfed version (which went up to 100% IIQ) was giving about 20-25% effective IIQ, considering all the mobs present in a generic map. This means that the present version (up to 50% IIQ) is giving something like 10-15% effective IIQ, so it's not really that much better than a Shaper amulet/The Ascetic. Note2: Since Bisco's affects only normal monsters, if you are adding zana mods to your map (for example beyond or bloodline), a Shaper amulet is going to outclass Bisco by a good margin. Moreover, all Beasts (yellow and red ones) drop a lot of stuff and they are not affected by Bisco. This means that a Shaper amulet is definitely your endgame goal and you should farm your way up towards it.
Build options
After what we already said, people usually want to know which builds are the most effective users of a MF setup. Let's say that most builds in this game can be adapted into a MF playstyle, but currently just few of those are commonly played. We can divide them into two main classes, depending on how they travel the maps: Shield Charger and Runners. - Builds using Shield Charge: Ethereal Knives - 360° coverage, really great clearing capabilities but underwhelming single target damage. Probably the cheapest option. Autobomber - This build uses Heralds skills that triggers themselves, fast enough at clearing with bad single target, expensive, but requires almost no action from the player. Cospri's Discharger - Probably the fastest build, also good single target, but requires really high investment to be effective. - Builds that run, using QotF: Tornado Shot Windripper - Probably the best option overall, achieves the highest amount of IIQ, mantaining super fast clear speed and impressing single target damage, very expensive to build. Kinetic Blast Wander - Similar to the previous one, offers less IIQ (not using Windripper) and performs best in indoor and narrow layouts, cheaper that the Windripper option. This guide is not meant to teach you how to build and play each of these options, since there are many guides ot there for each of them. I personally love the Kinetic Blast option; even though is not as good as a min/maxed Windripper character, it performs similarly and with a much lower budget. All the explosions are also way too satisfying to be ignored.
Filters, loot & routines
This is another hot topic. Often people wanna know what they should gather, what they should just leave on the ground, and which items they should just hide from their filters. Let's start by saying that if you leave something on the filter (I mean, the item filter you are using is showing you those items), you should grab it 95% of the time, otherwise there's no reason to leave it visible. In my humble and personal opinion, there are about 4 categories of PoE players: 1) New Players - They have little or no clue about what they are supposed to do, they just gather random things, sell something, keep something else, for no specific reason (playing with a slow pace). 2) Avarage players - They are usually aware of what they are doing, but they play with a slow/medium pace without rushing too hard, they gather most things (currency, recipe items, rares, uniques, etc) and they take their time. 3) Advanced players - They enjoy farming with a good/fast pace, they gather few selected things (usually with self-modified filters) and are quite methodical in what they are doing 4) "Zoom zoom" players - Elite players, they just "eat" maps one after the other at the highest speed possible, looting just the bare necessities (usually "fat" currency, good cards, maps, some uniques and 6-sockets), playing in the so called "most efficient way" If you fall into the first category, try to climb your way up and find the one which is more fitting for your playstyle. Players in the top category are not better than ones sitting in the lower ones. Let's also remember that this game should be.. well, a game. Don't feel forced to push faster and faster because someone else (streamer, youtuber, reddit user, whatever) is telling you to do so, follow the playstyle you enjoy and are more confortable with. After this preface, let's get into the real topic.
What should I loot
There's not a perfectly defined list of things you should gather, since they mostly depends on your playstyle (see categories in the preface). If you are playing this build (or any MF build) you need to speed up your playstyle though, since it's pretty reliant on keeping a good "momentum" and you cannot pick up every single item that drops on the ground. For this reason, I highly suggest you to find your way into the third or the fourth category; I'm gonna actually discuss just those two. First of all you need to setup your own item filter, the easiest way to do it is starting from a general filter (e.g. NeverSink filter) and adjust it with the help of FilterBlade. Items that should always be picked up are: good divination cards, good currency (I personally start grabbing Alternations, Chromatics, Chances, and so on), 6-sockets, maps, good uniques. 3rd category: This is the playstyle I personally enjoy the most and the one I usually follow when I'm playing solo. You can start from a standard "Strict filter" or "Very strict filter" and customize it a bit. I gather all the things mentioned above, I grab all uniques (and vendor them if they are worth less than 1c) and many rare items too (for chaos/regal recipes). I also pick up small "chromatic-items" (2x2 or 3x1), gems with quality (gcp recipe), flasks with 15%+ quality (glassblower recipe) and sometimes few transumations (they directly convert into scrolls). When my inventory is full, I just portal out, sell to the first vendor the instant-recipe items (6-sockets and chromatic-items) and throw everything else into a dumb quadtab, then I go back into the map. Once my dump tab is full, I take a break from the mapping process and sort stuff out in their appropriate tabs. Even though this is not the most efficient way of mapping, it's quite relaxing and you do not feel forced to always rush through everything. Doing chaos/regal recipe is also one of the most lucrative options you have to farm currency in a consistent way, but you have to do it in good ways, otherwise it becomes too time consuming. A good way is having at least a tab dedicated to each slot (jewels, belt, helmets, boots, gloves, armours, weapons), when they are full or do the recipes in bulk. You can also do some recipes while taking a break from mapping (when you wait for a trade, wait for friends to join the party or whatever). Keep in mind that even though other "more efficient" ways of farming offer higher chaos-per-hour rates, they usually consider the value of everything they gather converted into chaos orbs, while with chaos/regal recipe you are actually farming pure chaos. You do not have to convert or sell anything, you just gain pure chaos, which is a massive pro. this options is awesome to balance a poor rng, since rare items are always gonna drop in high amounts, so you always have a costant flow of currency gain. 4th category: You can customize your filter, starting from a "Uber strict version" for example. You only gather the items listed above, wasting almost no time in-between maps and speeding every process up. When you are done with a map, you open a new one as soon as possible (you already have some maps in your inventory), you throw everything into a dumb tab, and then back again into the new map. Even though this is what "elite-players" usually like to do, I find it way too stressing and allow myself to play that way just in some specif istances. This process is also highly rng-reliant, if you get few good drops, you gain no money.
Maps choice and Atlas management
This is a pretty important topic in general, but it's even more for this specific build. Kinetic Blast really shines is indoor and narrow maps, small rooms and corridors, allowing the projectiles to collide with the walls and destroying everything on the screen and beyond. This doesn't mean you cannot run open maps, but doing so you are just going to hinder yourself. It's not even this simple, because you want to be able to choose which maps you want to farm in the first place, but then you also want to be able to sustain those maps. This is a pretty tough topic, and probably it's not the first time you hear about it. This cannot be a full guide about how to manage your atlas, since it's an immense topic and there are many good video-guides out there, but I want to amke clear the most important things you need to know and consider.
Choosing the right maps
Let's start discussing which are the best layouts for our build. Keep in mind that in any case you should always choose maps that you like running, since that's the main reason you should play this game in the first place. I'm gonna discuss the most interesting maps, tier by tier, starting from T1 to T10. Generally speaking you do not want to farm "real" red maps, but just Shaped maps. If this is not clear for you at this points, I'm gonna talk about it later. I also highly suggest you to check poewizard to find out more informations about all the maps. T1 - Beach (linear and clean layout, not many walls though, easy boss), Dungeon (messy layout, but full of walls) T2 - Arid Lake (clean layout, not many walls though, tricky boss), Pen (nice layout, many wall, easy boss, good div cards) T3 - Burial Chambers (nice layout, not many walls though, good div cards), Cage (nice layout, many wall, easy boss, good div cards) T4 - Strand/Canyon/Gorge (linear layout, not many walls though, tricky bosses), Volcano (nice layout, not many walls though, good div cards), Grotto (ok layout, many walls, tricky boss, good density) T5 - Channel (linear layout, not many walls though, good div cards), Toxic Sewer/Haunter Mansion (nice layout, many walls, good density) T6 - Atoll (linear layout, not many walls though, tricky boss, good div cards), Underground Sea (ok layout, many walls, good density, nice div cards) T7 - Dunes (clean layout, not many walls though), Bone crypt (ok layout, many walls, nice div cards) T8 - Shore/Infested Valley (clean layout, not many walls though, tricky boss), Vaal Pyramid (ok layout, many walls, nice div cards) T9 - Vault (nice layout, many walls, good density, good div cards), Waste Pool (nice layout, many walls, good density) T10 - Bog/Siege (clean layout, not many walls though, tricky boss) I invited you to check out those maps, but also test other options. You should not farm all these maps, you just decide few of those maps/tiers to farm, according to your Atlas planning (discussed a bit later).
Atlas management
First of all you need to know how map drop works in PoE. When the game rolls a map drop, first it decide the tier of the map, then it check if there are available map drops in that tier, otherwise it goes down by one tier and the process repeats until you get a valid drop. What do I mean with valid drop? When running a map, you can only drop maps you already completed or adjacent to the map you are running. That's it. Why is this so important? Because if you manage your atlas progression in a proper way, you are able to force the game to only drop the maps you actually want. This is possible if you use Shaper's Orbs, upgrading a tier "X" map into a tier "X+5" one; let's make a simple example: if you use a Shaper's Orb on a Beach map (which is a T1), all the following Beach maps you are going to drop in the future are going to be T6 ones, and you cannot drop any more T1 Beach. What's the point? Let's make another example: you shaped Atoll (T6), which enters into the pool of T11 maps as a consequence, and you do not complete any other T11 map. When you are going to run you Shaped Atoll maps (T11) and the game rolls a drop of a T11 map, you have to get a Shaped Atoll drop, since it's the only T11 completed and there are no other adjacent T11 maps (it's linked to T5 and T7 maps). You can push it further if you want, if you do not complete any T12 map, even when you would drop a T12, you won't have any available one the "loot table", so it gets downgraded into a T11 (Shaped Atoll again). This process can be implemented in any tier of maps, ajusted according to your needs. Another positive aspect of having a "Shaped Atlas" is that you can use white sextants to affect yellow Shaped maps, and yellow sextants to affect red Shaped maps. Sextants are another really important aspect of the mapping process, I suggest you to check them out and use them as often as possible. A whole different aspect of the Atlas is managing the Influence of Shaper/Elder. When a map is unfluenced, it gains additional monsters (more exp and loot), moreover all the enemies have a chance to drop Elder/shaper Items, which can be quite valuable (the right bases with high enough ilvl). You really want to "lock" your influence in a good place, allowing you to have an alternating influence on the maps you want to run. This is a bit tricky to explain here, but there are good video-guides out there that explain the process. You pretty much want to spawn elder guardians or elder himself as close as possible to the maps you want to run, this should provide a permanent alternating influence (as long as you do not kill the elder or his guardians). My personal plan for the league, at least in this first part of the league, is to complete everything up to T8, complete Shaped Grotto as the only T9, then everything else completed up to T13, Shaped Waste Pool as the only T14. Not completing any T15 (I don't like them) and then completing all Guardians, Shaper and unique maps. I'm consistently farming Shaped Grotto with 2 white sextants, just alch and go. The layout is not bad and has one of the best monster density I've found, you also find very often the divination card Loyalty (3 fusing for a set of 5 cards); I'm averaging almost 1 set completed per map (let's say 2 fus per map), which is a nice addition to your overall gains. A bit later into the league I plan to stop farming Shaped Grottos, completing all other T9's, while moving towards the Shaped Waste Pool farming. This option is more profitable in the long run, but it's also more expensive to sustain.
Party play
Allright, this section is about partying with other players. I wanna dedicate few words about this topic since it's not just a nice experience to play with others, but it's also profitable most of the times.
General guidelines & tips
Even though you can party up with whoever you want and everyone can do whatever they want, if you wanna farm in an effective way, you should have a "plan". Generally speaking, the best plan is to have 1 (or maybe 2) carry, at least 1 boss-killer and at least 1 aurabot. The role of the carry is to.. well, the carry gotta carry the party. He is the guy wearing the full MF gear, he is the guy providing good AOE coverage and clearing abilities. The aurabot has to provide damage and ruvivability to the whole party, while the boss-killer need to have some strong single target ability to melt bosses. If you are playing this build, you are the Carry. While it would be cool if you always manage to have a party of this kind, usually you won't be able to (if you are partying up with random people). What usually happens is that you (the carry) are going to look for an aurabot to start with and you run a couple of maps with him to see how things go; if everything is going fine, you ask the aurabot if it's ok for him if you invite more people into the party (99% he's fine with it, since he doesn't actually have to do much). Now you just fill up the party with whoever you want, for example but writing something in you guild chat (if you got one), in Global 820, Trade 820 or in your character's message (I don't know how it's actually called, the message that everyone in your friend list can see). Make sure to decide beforehand what you want to do with the party and the payment method. Are you asking for a fee? Is it free? Tips are welcome but not mandatory? Make it clear in the message you are writing to find people. Since you are the carry and usually you are the one creating the party and providing the maps (therefore you are also the one spending the currency in the first place, for sextants, for rolling the maps, zana mods and whatever), you need to make sure everyone is on the same page and everyone knows what you are going to do. How fast you wanna farm the maps? Do you want them to kill stuff (if they do not have a MF setup, they should not)? Do you need help with boss, or are you going to skip it? All these informations need to be delivered to the party members before getting started. Note1: you should never ask the aurabot (or support in general) to pay you. He is providing his buffs, that's his payment. What I personally do: - Find 3-4 random people that wanna join the party (I have many guys in the friend list, so I usually fill the party pretty fast) - Find an aurabot (if not already found in the previous point) - Advise time; writing in party chat all the useful informations (fast pace, I am the one killing but I need help with bosses, follow me and don't split, all map mods are possible except no leech and reflect, clock-wise or counter clock-wise clearing of the map) - Collecting fees, I usually ask at least 1alch/chis per map, but for high-tier maps you can and should ask more (usually you ask "X" currency per 3 maps, since you have to reroll sextants every 3 maps) - Enter the map and wait for all the join it, before start clearing.
Why I should group?
Ok, let's start by saying that sometimes it's funny to play with other people. I think I've always found good and funny people, the community is really nice in this game. Moreover when you find some nice players, you should add them to your friend list, this way when you are gonna run maps in the future, you can easily let them know about it. Anyway, partying with other players makes the monsters tougher (they gain more life) but also more rewarding (each additional player adds a bonus of 10% IIQ and 40% IIR, multiplicative with your character's stats, and 50% IIQ for currency items). Monsters are affect only by the amount of IIQ and IIR the killed has, that the reason you want to be the one killing stuff. Those bonuses are already good by themselves, but you (as a carry) are also getting currency from the other players' fees. By the way (in my opinion) you should make them pay something, since they are leeching exp and loot in the first place. For example: if I'm running a Shaped Grotto with a full party (4 random characters and a support) and I ask 1 alch each per map, I'm gaining 12 alchs after 3 maps. With this currency I'm not only paying the cost of rolling the maps (let's say 3 alchs), but also partially covering the cost of the sextants I'm using (let's say I need to use an average of 4 sextants to get 2 good mods). I would have the same costs running solo, so this is just pure profit for me. It's not just good for you, it's also good for them. They get free exp (and if you are keeping a fast pace, they exp pretty fast) and lots of drops from the map, enxhanced by all the IIQ you are running (they can easily gain more than what they are paying you). By the way, talking about partying, I also have a guide for an Aurabot character if you are interested into it: The Fortifier Aurabot, Abyssal Volatile Poet: https://www.pathofexile.com/forum/view-thread/2057243 MagicBlaster Deadeye: https://www.pathofexile.com/forum/view-thread/2115343 Fortifier Aurabot: https://www.pathofexile.com/forum/view-thread/2084465 Last edited by lallalaus on Mar 23, 2018, 10:03:31 AM
| |
|
Hey, thanks a lot for your detailed guide!
Got one question tho, what's the highest possible tier of maps it can clear without significant loss in terms of clear speed? Of course we're talking about well geared character. | |
" You can farm any map tier, as long as the layout is good you won't even slow down. I've personally cleared all guardians map with the 4link setup (killing the giardians with another charachter). Keep in mind that the higher you go with map tiers, the more chances you have of getting 1-shot randomly; I suggest to play with an aurabot if you wanna farm T14-15-16 consistently and you care about exp. Abyssal Volatile Poet: https://www.pathofexile.com/forum/view-thread/2057243
MagicBlaster Deadeye: https://www.pathofexile.com/forum/view-thread/2115343 Fortifier Aurabot: https://www.pathofexile.com/forum/view-thread/2084465 | |
|
Nice Guide,
But why are you not using HoI, CoH, Assassins Mark, Onslaught +Bloodrage for Frenzy? |

|
" Bloodrage is not really suggested, since you have no life regen (vaal pact) and it can cause some troubles. Neither Frenzy nor power charges are actually needed for the build to work properly. I've chosen Poacher's Mark since it grants more flask charges when you kill cursed monsters (and flasks are one of the main sources of power of this build). Moreover Assassin's Mark grants life/mana on kill, which is cool while clearing, but Poacher's grants life/mana on hit, which is awesome against tough enemies/bosses (if they are surrounded by adds, so they get cursed in the first place). Abyssal Volatile Poet: https://www.pathofexile.com/forum/view-thread/2057243 MagicBlaster Deadeye: https://www.pathofexile.com/forum/view-thread/2115343 Fortifier Aurabot: https://www.pathofexile.com/forum/view-thread/2084465 Last edited by lallalaus on Mar 21, 2018, 10:06:34 AM
| |
|
Hi, i want to make this build, in kind of "new", any sugestion/guide for firsts lvls?
|

|
" I do not really have a detailed guide for you, you can follow the passive trees you find in the guide though. I suggest you to level up as an archer though, using unique bows which are cheap and effective. Silverbranch -> Stormcloud -> Roth's Reach -> Death's Harp or The Tempest -> Death's Opus -> Infractem You do not have to buy and use all those uniques I suggested, just move forward in the list when you are not killing monsters fast enough with the bow you are using. You can use common bow skills like Split Arrow -> Lightning Arrow -> Tornado Shot The support gems you want to use are similar to the ones you would use in the Kinetic Blast setup, except Crit Chance which is not really worth while levelling (you can use Added lightning/cold in its place). At level 65 you should be able to equip every item needed (the last one is the Piscator's wand itself at 65) and you can fully convert into a wander. Abyssal Volatile Poet: https://www.pathofexile.com/forum/view-thread/2057243
MagicBlaster Deadeye: https://www.pathofexile.com/forum/view-thread/2115343 Fortifier Aurabot: https://www.pathofexile.com/forum/view-thread/2084465 | |
|
Im currently farming Shaped Burial Chambers, looking for any advice for gear upgrades that are worth getting while farming for Headhunter. Im thinking a Kinetic blast helm enchant, and probably a 2nd Ventors. while I could afford a 6l I feel its probably overkill for now given the content I'm running.
I also had two Lycosidae's drop today, thoughts on it vs Esh's mirror? Any advice is welcome. | |
" Seems really good to me. KB enchant is not really needed, the difference in actual damage is negligible, and, as you said, for the content you are running a 6link is not needed at all. I would definitely invest into a second Ventor's Gamble, IIQ is never too much. The flaw I can see is that, with flasks, you are barely at 30k evasion, so you are actually sacrificing more than 30% movement speed. About Lycosidae, I do not really see any reason to use it. With your setup you are sitting at 91% chance to hit, which is already good enough and I don't think you will ever find yourself in the situation "oh.. I really wish I'd never missed that attack". The damage provided by Esh's is just way too powerful while clearing with a good pace. You also do not have any additional source of accuracy (except the wand), but with an amulet with some accuracy or being a Deadeye (which gives 200 accuracy) you would push your chance to hit towards the 93-94% mark. That's pretty much as good as it can get. Moreover Esh's Mirror provides some INT, higher amount of life and a lot of lightning resistance. Abyssal Volatile Poet: https://www.pathofexile.com/forum/view-thread/2057243
MagicBlaster Deadeye: https://www.pathofexile.com/forum/view-thread/2115343 Fortifier Aurabot: https://www.pathofexile.com/forum/view-thread/2084465 |


