


[3.2] Scionic Flametank "16k ES ed." (ES-CI-ZO-GR, SR-CWC-FS, extensive guide)
|
The Scionic Flametank is an attempt to make a build that has exceptionally high survivability regardless of whether the player is on the ball or not... or even present, for that matter.
 3.2 Patch Notes for this build:
Introduction If you are looking to survive nearly everything even if you happen to nod off for a minute, have to deal with small children, want to leave the screen to get a drink, need to absent yourself on short warning to throw an underperforming henchman in the shark pool, or just prefer a relaxed playing style while doing maps, you are looking in the right place. This build was first published in May 2015 and a lot has changed since then, but the build philosophy remains the same as ever:
Videos Here are some 3.0 videos. T15 Kaom-lookalike demonstrates recovery mechanics T16 Forge of the Phoenix fragment run Dual Flametanks take on the Hall of Grandmasters And upon request, possibly the most boring Path of Exile video ever: Passive defenses kill eternal Izaro in 3 minutes 23 seconds while I'm AFK The Nature of the Beast Core aspects of the build:
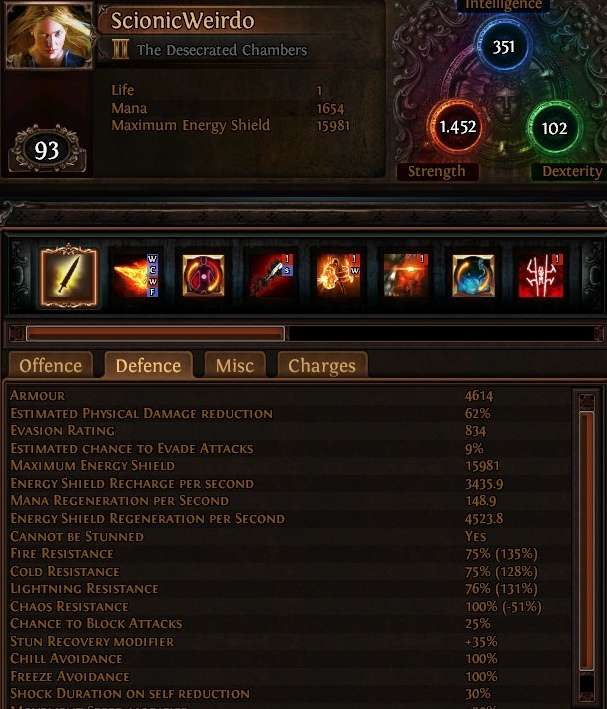 Defenses at level 93 with both defensive flasks active, Molten Shell triggered, and 3 endurance charges that are just waiting for Immortal Call to come off cooldown to be consumed. The recovery from regeneration is 4523.8 ES/s*1.5 = 6785.7 ES/s in fights due to soul of Arakaali, but this is not reflected in the tooltip as it shows base ES regeneration, not actual ES recovery. (Same with any other source of life or ES recovery modifier.) ES recovery from leeching is on top of this. Playstyle The playstyle is relatively simple. Mostly, you stand still flaming enemies until they are all dead, then you move to a new location. You only need to move when you face enemies that are capable of consistently overcoming your passive regeneration aided by leeching or have exceptionally powerful one-shot kill mechanics, and as you gradually improve your equipment after completing the passive defenses in the late 70s that happens ever less frequently. In case you do encounter something that is capable of beating down your energy shield simply run or flame dash away and your energy shield should recover in a few seconds. It is certainly possible to die with this build once you've completed its basic defenses in the late 70's and gathered the four required uniques, but it takes an effort. Required Uniques You need Geofri's Sanctuary, Shaper's Touch, Doon Cuebiyari, and Alberon's Warpath, as well as three Efficient Training jewels and one Energy From Within jewel. Level 93 3.2 Flametank with 3.0 gear Equipment recommendations This section describes desirable equipment to seek out and which stats to focus on on each. Regardless of any other considerations, when you start out mapping it is a high priority to get your resistances maxed (75/75/76). You don't need that for the white maps, but the sooner you max resistances the better. Once you get to yellow maps, I advise overcapping resistances to counter elemental weakness maps so you can ignore that map-mod. For yellow maps that means having at least 29% higher resistances (104/104/105) and for red maps 34% higher (109/109/110). I list recommended mods with (p) for prefixes, (s) for suffixes.
Doon Cuebiyari
You want one with as high strength as possible. Full stop. The mana roll is irrelevant and the casting speed roll only applies to scorching ray. Strength is what it is all about.
Geofri's Sanctuary
You want one with as many links as possible and as high ES as possible. Getting one with a high resist roll is nice as well, but ES is what it is all about.
Shaper's Touch
You want one with as high ES as possible. Labyrinth enchant: The Light enchant which spawns Concecrated Ground on your location when you are critically hit is useful if you are the sort of person who sometimes forgets activating Sulphur flasks when things get hectic, which is exactly the time you need the extra regeneration the most. I am such a person. The Reflection enchant means you'll never walk alone, your sister-in-arms always willing to go bash enemies with her Doon Cuebiyari. It does negligible damage but it is always nice to have company and enemies love to hit on the dumb blonde. Or you can just go for one of the damage enchants if you are inclined that way.
Alberon's Warpath
You want the 18% strength version. No ifs or buts. The other rolls (armour and chaos resistance) are irrelevant. Labyrinth enchant: There are two good enchants: regeneration and leech. If you have a reliable non-curse source of life leech from equipment (e.g. Watcher's Eye jewel with life leech) the regeneration when hit recently is best as it helps at all times. (2% regenerated from eternal labyrinth.) If you do not have a reliable source of life leech from equipment the best enchant is leech when killed recently as it helps a lot on groups in ensuring you also leech from those that aren't cursed (yet) but still doing damage. (0.6% leeched from eternal labyrinth.)
Helmet
You want a rare ES helmet with high ES and other useful mods. Shaper/Elder mods don't bring anything truly useful. The best they can give is damage, but that comes at the cost of a prefix, and ideally all three prefixes are ES related. Standard mods: maximum ES(p), maximum ES%(p), strength(s), intelligence(s), all attributes(s), resistances(s) Master crafting: intelligence(s), strength(s), resistances(s) Labyrinth enchant: Any firestorm enchant > any scorching ray enchant > anything else if you play enough that the idea of a helmet that has appropriate stats and enchant isn't utopian.
Shield
You want either a pure ES shield or a hybrid armour/ES shield with 12% to all resistances as an implicit (Angelic or Archon Kite Shield). In the long run a high-end pure ES shield is the best by far, but they are usually quite expensive and a decent hybrid shield will carry you far while gearing up in the 70s and 80s due to its bonus resistances. Hybrid mods: four kinds of ES mods(p), life regeneration%, strength(s), and resistances(s). Pure ES mods: four kinds of ES mods(p), intelligence(s), and resistances(s) Shaper/Elder mods: max resistances(p), recover x% energy shield when blocking(s), additional physical damage reduction(s) Master crafting: intelligence(s), strength(s), resistances(s)
Amulet
The default amulet of choice is a rare marble amulet, which provides a lot of energy shield regeneration. Get one with good explicit mods, then reroll the implicit with blessed orbs until you get a high roll. Shaper/Elder mods change the situation somewhat. You may want to use a non-marble amulet if it has one or more of their great mods. Standard mods: maximum ES(p), maximum ES%(p), strength(s), intelligence(s), all attributes(s), resistances(s) Shaper/Elder great mods: increased attributes(s), 1-2% of life regenerated per second(s) Shaper/Elder good mods: damage penetrates elemental resistance(p), fire damage leeched as life(p), 1% increased damage per 15 strength(p), non-chaos damage as extra chaos damage(p), life per second to max life leech rate Master crafting: maximum ES(p), maximum ES%(p), resistances(s) The Elder/Shaper mod x% increased attributes is hands-down the best single mod for amulets for this build, easily providing 100+ strength when geared, but it is still only one mod when all is said and done. Useful rule of thumb: Think of it as worth roughly a high tier strength and all-attributes mod combined. Since a mastercrafted ES% mod can go nearly as high as the random rolled ES mod while the base ES in the mastercrafted mod is at best half as good as a high roll random rolled ES mod, your priority here is to get a high random ES roll and either no maximum ES% roll and an open prefix (so you can mastercraft) or both high rolls. There's are two other Shaper suffixes worth mentioning that grant L22 discipline and vitality respectively. These are obviously worth something and they do free up a socket for whatever you might want a free socket for, but they are NOT worth going for in general as attributes, resistances, etc. beat them handily.
Rings
Rings can provide base energy shield, both as an implicit (moonstone ring) and explicit, but not maximum ES%. There are no truly interesting Shaper/Elder affixes for rings for this build. If you get one that is useful, great, but your focus is on attributes, resistances, and energy shield. Standard mods: maximum ES(p), strength(s), intelligence(s), all attributes(s), resistances(s) Master crafting: maximum ES(p), resistances(s)
Belt
The default belt of choice is a rare crystal belt, which provides high energy shield as an implicit. Get one with good explicit mods, then reroll the implicit with blessed orbs until you get a high roll. Shaper/Elder mods change the situation somewhat. You may want to use a non-crystal belt if it has one or more of their great mods and good standard mods as well. A Stygian Vise may also be an option, if you find one with great standard mods and can slot it with a great Abyssal jewel with great standard mods. But it does take something truly exceptional to compete with a great crystal belt, that will usually have 75-80 maximum ES as implicit and another 40-50 as an explicit. Standard mods: maximum ES(p), strength(s), intelligence(s), all attributes(s), resistances(s) Shaper/Elder great mods: increased attributes(s), increased energy shield recovery rate(s) Shaper/Elder good mods: reduced extra damage from critical strikes(p), maximum ES%(p), Shaper/Elder amusing mods: level 22 Rallying cry(p), level 22 Abyssal Cry(p) Mastercrafting: movement speed(p), resistances(s) Finally, the unique Cyclopean Coil is an important cheap alternative and available already from level 68, providing up to 15% increased attributes. Furthermore it provides easy immunity to ignite. I advise picking one up for leveling purposes if nothing else. A high-roll version is competitive in energy shield with great crystal belts and provides added damage to boot, but its complete lack of resistances when compared with the 1-2 resistance mods common to great rare belts (on top of ES and strength mods) is hard to overlook.
Jewels
The core build uses four unique and five rare jewels. The unique jewels are 3 Efficient Training jewels and 1 Energy From Within. One other unique jewel is of interest: Watcher's Eye. It has a limit of 1, and it is rolled with 2-3 random mods from a fixed list, each providing a certain benefit if a certain aura is active. The best mods are extremely good for this build, but most are worthless.
Watcher's Eye, details
Four of the possible mods that are connected to Vitality and Discipline respectively are so awesome, that if you can get your hand on a Watcher's Eye with just one one of these mods, you should do so regardless of what its 1-2 other aura-mods are and just accept that you have to find some way, any way, to cope with having one less rare jewel to provide resistances, strength, and maximum energy shield. (And if you get an Eye with TWO of the great mods... then you've won the league. Congratulations. :p) 1.0-1.5% of damage leeched as life if affected by Vitality (this easily allows you to drop Warlord's Mark in favour of another curse) 20-30% increased energy shield recovery if affected by Discipline (this is huge, as 170-180% recovery is 13.3%-20% MOREe recovery than 150%) 12-18% of maximum mana as extra maximum energy shield if affected by Clarity (-and free up a socket to add a level 1 Clarity aura from one of the damage CWDTs) 20-30 energy shield gained for each enemy hit while affected by Discipline (recovers more than the life leech Watcher mod on groups and has the advantage of completely ignoring the leech cap, but loses out to it on bosses) One mod is so good that you may want to use a Watcher's Eye with this mod even if the other mod(s) are junk depending on how hard the lack of resistances in that jewel slot will be to compensate for: 1.5-2.5% of maximum energy shield regenerated per second if affected by Discipline Finally these two mods are nice to get as a secondary useful mod on a Watcher's Eye that has one of the former mods, but are never reason enough for an Eye on its own: 100-140 life regenerated per second if affected by Vitality (corresponds to about 0.7-0.9% ES regeneration at high levels) 5-8% chance to block spells while affected by Discipline Rare jewels have 0-2 prefixes and 0-2 suffixes each. It is advised that you start out buying or crafting cheap useful jewels and then over time buy more expensive and better ones. As every lady knows, it is important to match jewels to clothes, and the Scion is no different. She uses jewels to address inadequacies in the main equipment as well as to further boost her strengths, and it is very helpful for her to have different jewels in her casket so she is able to adjust to any new equipment you acquire, providing either strength or resistances as needed. These are the affixes to look for; In the list C denotes that the mod can be found on cobalt jewels, H, M, S, and G on hypnotic, murderous, searching, and ghastly abyss jewels respectively. Prefixes: (up to 2) The great: +6-8% maximum ES (C) +25-50 maximum ES (HMSG) The decent: +14-16% spell damage while holding shield (C) +14-16% increased fire damage (C) +add chaos damage to spells while holding a shield (H, hypnotic) +add fire damage to spells while holding a shield (H, hypnotic) Suffixes: (up to 2) The great: +12-16 STR (CHMSG) +8-10 STR & INT (CHMSG) +8-10% to all elemental resistances (CHMSG) +10-12% to two elemental resistances (CHMSG) The good: +12-16 INT (CHMSG) +8-10 STR & DEX (if needing dex for Arctic Armour) (CHMSG) +12-15% to one elemental resistance (CHMSG) 0.5%-1.0% of life regenerated while moving (HMSG) The decent: +10-12% increased spell damage (C) +10-12% area damage (C) +8-10% damage (C) add fire damage to spells, high tier roll (H) add chaos damage to spells high tier roll (H) damage penetrates 2% of elemental resistances if you haven't killed recently (HMS) 15-20% increased damage if you've killed recently (HMS) 20-30% increased critical strike chance if you haven't dealt a critical strike recently (MS) Once you start mapping, a decent jewel is one that has any three affixes from the list, but by the time you reach red maps you want every jewel to ideally have the great maximum energy shield prefix and two great suffixes. The abyssal jewels' maxES prefix is more valuable for this build than the cobalt jewel's maxES%, but good abyssal jewels can be very expensive due to their much greater rarity. An exceptional rare jewel for this build is one that on top of that has one of that has a damage prefixes as well. The list is prioritized with an eye to tanking. If you'd prefer more damage feel free to rate the damagedealing suffixes higher. In particular the hypnotic eye suffixes that add fire and chaos damage provide a significant boost, much greater than any of the damage prefixes. Both your main equipment and your jewels can provide resistances and primary attributes, and your main equipment is better at both of those tasks than jewels are due to higher ranges on the suffixes. BUT, while your main equipment is equally good at usings its suffixes to provide attributes and resistances, the same is not the case for jewels, which can provide considerably more resistances than primary attributes per suffix. So in the long run having the main gear's focus for suffixes be on attributes and jewels on resistances will give you most bang for the suffix. In the beginning, just use what you can easily lay your hands on. Gem links 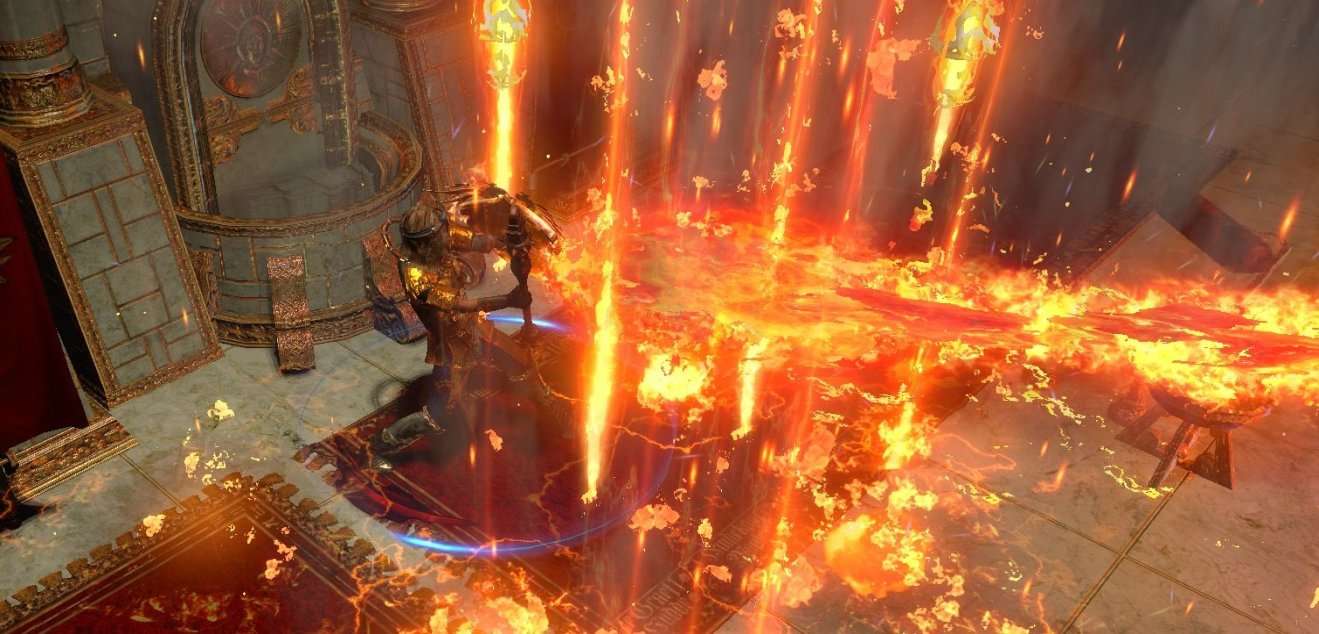
Chest: 1R 5B, any order
Links are in order of preference; I.e. If you have 5L, leave out the Controlled Destruction.
Weapon: 2R 1B, any order
Molten Shell provides armour and a very strong explosion hurting enemies around you while Firestorm rains fire on enemies that hurt you. Since this CWDT setup is socketed in the Doon Cuebiyari both spells are supported by a level 30 Iron Will and hit harder than you might expect.
Shield: RGR or GRR
This is the trigger for Blood Rage, Immortal Call, and via their interaction (described in game mechanics) the +50% Arakaali recovery bonus. You should only use this CWDT once you have upgraded the soul of Araakali via capturing the soul of the Arachnoxia boss in the Toxic Sewer map. The level of the Blood Rage gem is fairly irrelevant, higher levels providing minimal benefit. Just ensure that a) it is 7 or less so it can be triggered by a level 1 CWDT, and b) you have dexterity to match its requirements. This is the only link in the build where the socket colour ordering is important. While spells triggered by the same Cast When Damage Taken go off in the same frame, they are still processed in a specific order within that frame and it is important to colour the shield such that Blood Rage is socketed to be processed before Immortal call. If you do not get the order right it will still work, but the recovery bonus will not kick in immediately on the first triggering. The order in the shield is: upper left => upper right => lower right, so the ones that work well are: CWDT-BR-IC BR-CWDT-IC On a shield of the armour/ES variety it will be trivial to achieve the right colouration; On a pure ES shield I recommend using Vorici's 1R1G until you get RGR or GRR
Helmet: 1R 1G 2B or 2R 2B, any order
Flame Dash is your handy teleport, useful for getting out of trouble and jumping gaps. The choice of Arctic Armour vs. Herald of Ash is one of survivability vs. damage. I recommend Arctic Armour unless you have very good gear, as it provides significant damage reduction against two of the most common sources of damage, which include every physical slam boss attack in the game. The build has 70 dexterity, which is not enough to sustain a level 20 Arctic Armour that requires 98 dex. Use the highest level that your gear allows. None of four gems need to be linked. This is gem setup is for when the tank has gone CI and the build's core mechanics come into their own. Until then you are better off just using Herald of Ash and Anger to speed up burning the easy leveling content.
Gloves: 3R 1B (or variant), any order
The Stone Golem provides up to 105 ES/s regeneration, which is a nice little boost and is also quite decent at taunting a few enemies, and any damage it suffers is damage that you don't. Dual-cursing is only available once the occultist baby-ascendancy has been picked, and as the Chieftain baby-ascendancy is taken first that means after completing the first three labyrinths. Until then you should stick with Warlord's Mark. Warlord's Mark provides life leech to all spells that hit (i.e. all except Scorching Ray) and occasionally endurance charges on kill to power Immortal Call. 3 endurance charge gives 0.4s*(1+45%+3*106%) = 1.852s duration, which sounds awesome, but the gaining of charges is unreliable – many monsters die before they are cursed and thus have no chance of providing a charge, and on solo bosses you don't gain any at all – the Immortal Call interaction is strictly a secondary benefit. For the second curse I recommend either Flammability or Enfeeble depending on whether you feel a need for more damage or more survivability on hard content. I run Flammability most of the time myself, as the tank is ludicrously tough as-is, but for trying out new tough bosses or really tough map mods Enfeeble may be a better choice. Note that if you use a Watcher's Eye unique jewel that provides life leech, you may want to replace Warlord's Mark in favour of a combination of Flammability/Elemental Weakness, Flammability/Enfeeble, or Enfeeble/Temporal Chains, depending on your needs for offense and defense. This will require recolouring sockets as appropriate.
Boots: 1R 3BBB or 1R 2G 1 B, any order
The purpose of this Cast When Damage Taken is to reliably trigger Elemental Overload when you get hit hard enough that it hurts. For 3.2 I have been experimenting with:
So-far it seems to be nearly as good and much more colourful as well as dealing more damage than the classical approach from earlier editions of the Flametank. The downside is that if you are already wiping out groups of enemies swiftly enough that they don't manage to deal any significant damage than it won't trigger at all due to the highlevel CWDT. But arguably if that's the case you don't need EO in the first place. As both Unearth and Cremation are dex gem, use the highest level you have dexterity for. If for whatever reason you don't feel that EO is reliably active when it counts, you should use the classical approach instead:
And this works very well on both groups and solo bosses, swiftly flinging spears and getting EO up fast. Divine Souls These are the soul upgrades you need.
Leveling guide The basic idea is to level as armour/life until level 64, when Geofri's Sanctuary comes into play and you go hybrid. You then start replacing armour/life items for ES items until you are ready to fully dedicate yourself to ES with Chaos Inoculation, which will happen sometime in the 70s. Equipment milestones, earliest use of: 38: SR-CWC-FS skills (CWC requires 38) and CWDT trigger skills 49: Alberon's Warpath boots 64: Doon Cuebiyari sceptre 64: Geofri's Sanctuary ringmail 64: 2 Efficient Training jewels (but you may want to wait until 66) 66: Shaper's Touch crusader gloves ??: Energy From Within jewel when you choose to take Chaos Inoculation 74: Marble Amulet 79: Crystal Belt With regards to ascendancies I would recommend spending the ascendancy points in this order: Normal: +40 STR and +40 INT Cruel: +1 skill point and Chieftain ascendancy Merciless: +1 skill point and Occultist ascendancy Eternal: +3 skill points and the Witch alternative start This pastebin pastebin link contains the level the skilltrees for 54, 92, 102, 118, and 128 skill points. In the following I will briefly explain what is going on and show a screenshot of the tree.
Phase 1: 54 skillpoints| Strength and regeneration
Start out by taking everything in the bottom-left and bottom – path through strength nodes picking up regeneration and the fat notable life nodes you pass close by. Take jewel slots along the way if you've got anything half useful to slot in them. Kill all the bandits for 2 skill points. Oak's 1% regeneration is tempting, but at high levels you'll be better off with the extra skill points so get them now. Since you'll have negligible attributes other than strength during phase 1, I recommend leveling with the strength skill of your choice. Molten Strike is always a good choice and supports are plentiful; You get access to Added Fire Damage, Elemental Damage with Weapons, and Melee Physical Damage just from quest rewards and they work fine. You'll also get Herald of Ash and a bit later Anger, and both should be used. If you'd like to level as a spellcaster, something like Bladefall supported by Iron Will is always fun. You can switch to SR-CWC-FS any time after reaching level 38 sometime during chapter 4 if you have the gems, as you pick up 20 INT from the tree and 40 INT from the normal labyrinth ascendancy points, giving you a base of 80 which is enough to work with. For sake of ease you may want to wait until you have completed chapter 4, which is when CWC and CWDT gems are available for sale from vendors. Don't waste time making 4L CWDTs as soon as you get access to the trigger gem as you will be replacing equipment frequently; just set up a Warlord's Mark curse CWDT as a minimum and whatever else is convenient. By the time you have 54 skillpoints, which should happen during chapter 5 or thereabouts, the skill tree will look like this:  The 6 skill points spent on getting Constitution, Discipline and Training, Heart of the Warrior will be recouped when going CI, and the two spent on Unwavering Stance will be recouped when completing merciless Labyrinth and getting the Occultist ascendancy. If you feel you need more life while leveling feel free to do so.
Phase 2: 92 skillpoints | Going hybrid
Your next goal is taking passive skills providing elemental resistances, getting Elemental Overload, and then to collect great maximum Energy Shield% passives as you transition into a hybrid playstyle. If you haven't done so already done so near the end of the first phase, you will want to switch to SR-CWC-FS as your main spell during the early stage of this phase. By the time you have 92 points in the core build, which should happen sometime close to the end of chapter 10, the skill tree will look like this: 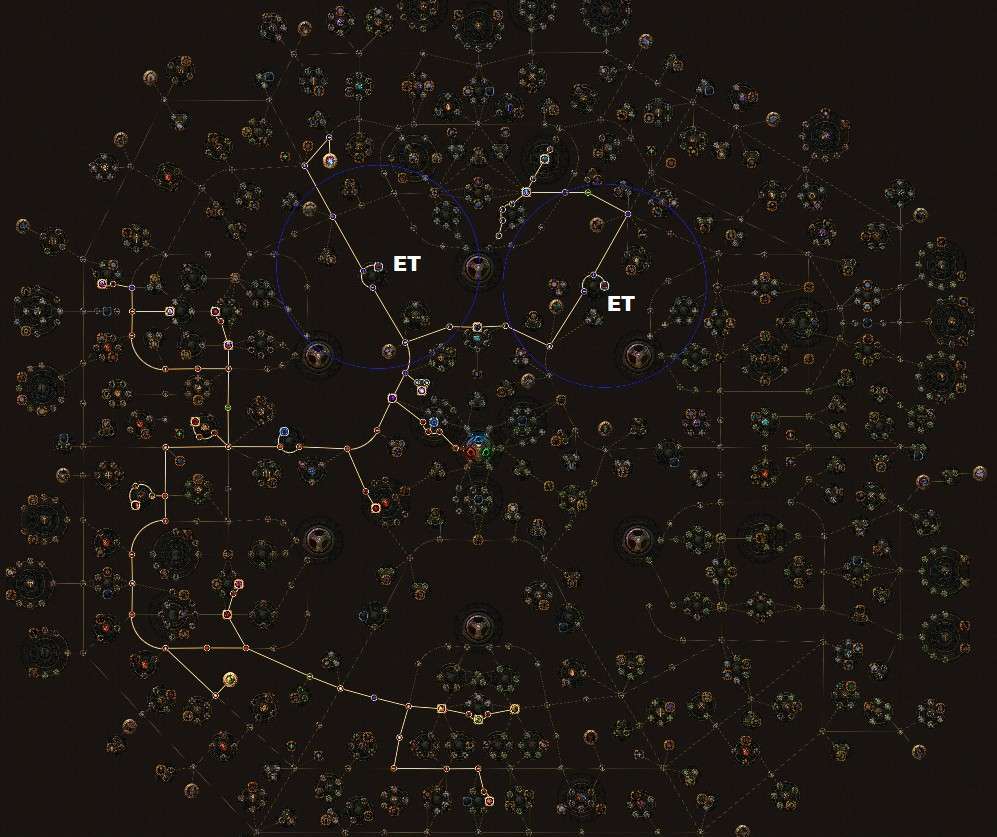
Phase 3: 102 skillpoints | Going all out ES-CI, core build completion
After that prepare to go CI. In this phase you pick up ES leeching from Ghost Reaver, the fat Unnatural Charm maxES% wheel, and the jewel node that is needed for Energy From Within in the Duelist area. I recommend beelining for Ghost Reaver first such that you can choose to go CI whenever you feel like it during the process. By this point you should be fully engaged in replacing the non-unique armour/life rares you are using with ES rares and setting up CWDTs if you haven't done so already. You will want to respec out of the 6 life passives (Constitution, Discipline and Training, Heart of the Warrior) since after level 66 when you equip both Geofri's Sanctuary and Shaper's Touch your primary defense will be your huge energy shield. Do not use the Arakaali trigger CWDT until you've captured the recovery bonus soul from Arachnoxia in the Toxic Sewer map, which should be your first priority during mapping since you will not gain the recovery bonus until you do so. By the 102th skillpoint the skill tree looks like this: 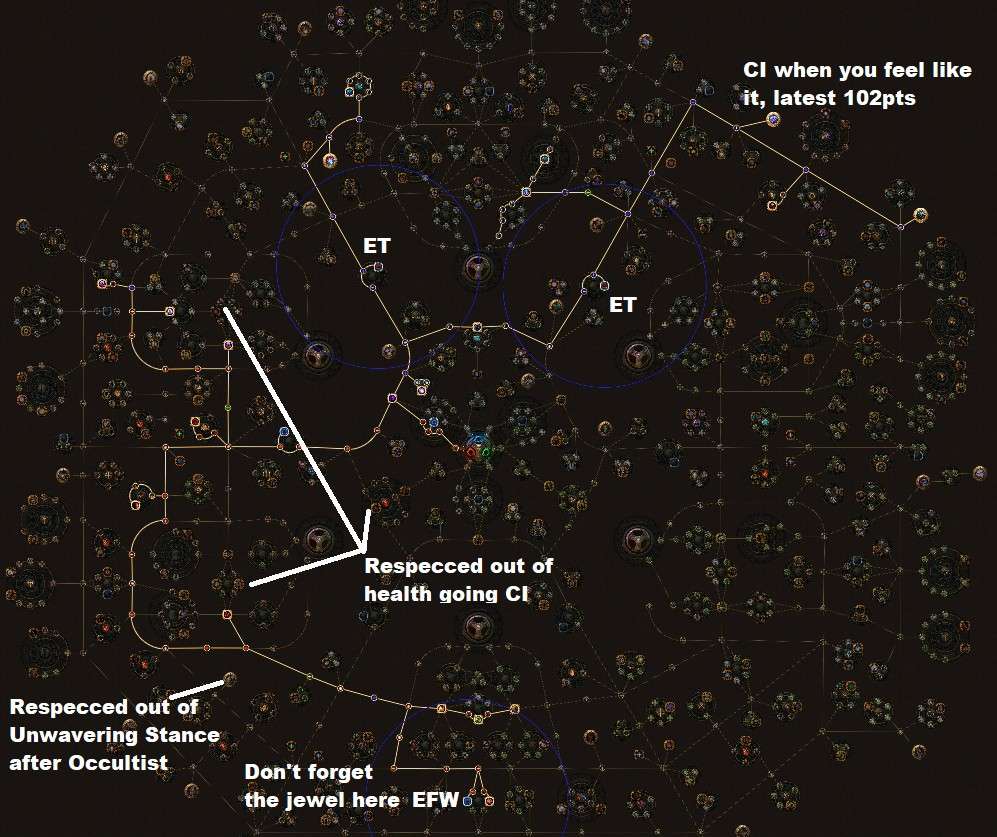
Phase 4: 118 skillpoints | Enlarging Primary Attributes
Post level 74, you are now CI with a quite strong regeneration/leech tank and from here you have many options, but I strongly recommend focusing on gaining strength and jewel slots as there are some cheap and powerful options available. My recommendation will take you to level 90 and 118 points. It reroutes 5 old skill points, 2 to use Witch alternate start and 3 to get some high-value INT-STR nodes instead of the Arsonist wheel. Since leveling slows down a lot by this point, the picture below details the recommended order: 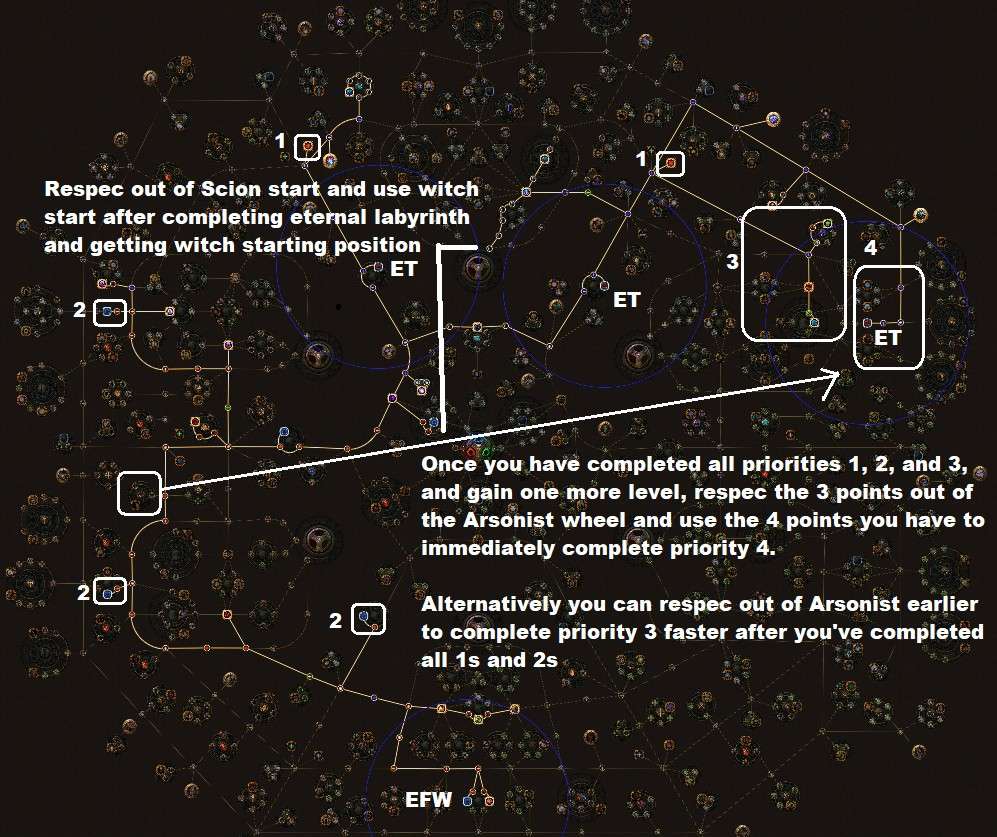
Phase 5: 128 skillpoints | Wonder Child Grinding
If you are taking the character beyond level 90 you will undoubtedly know best what you want to spend the last 8 points once you reach that point of deprobably don't need advice on which skills to pick, but just in case you do here are some suggestions... and yes, I pick up Arsonist again along the way, because it is still valuable. It is just that getting the fat 2% ES regeneration cluster in the Shadow area together with lots of ES and strength in phase 4 is important enough to temporarily dump Arsonist. 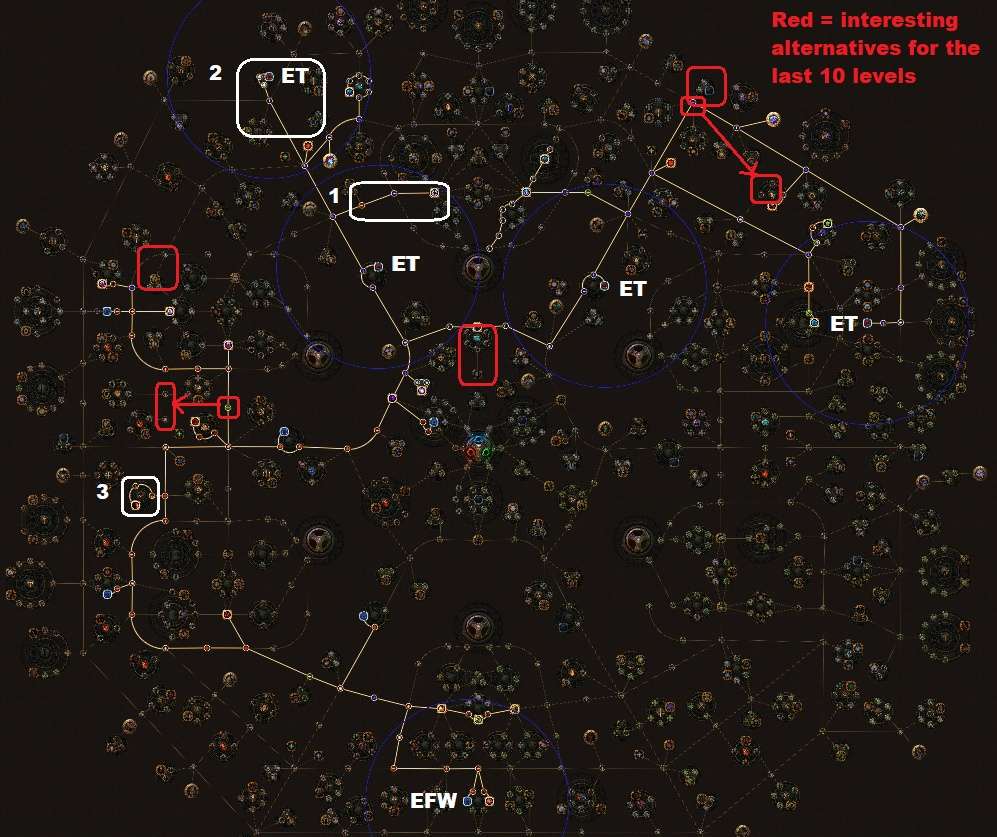 FAQ 
Enough about tanking, what is the DPS?
Complicated, which is always the answer when firestorm is involved. The short answer is that it deals pretty good damage... for a tank build. A single firestorm doesn't deal all that much damage, but in the sustained scenario where you hold the button down stacking firestorms until everything is dead it adds up nicely. At level 93 POB puts my damage with frenzy charges, elemental overload, flammability, and flasks at 94k Scorching Ray dps, and 11090 damage on average per Firestorm fireball that hits. Plugging that Firestorm damage into the Firestorm damage calculator yields an average 6.68 hits per firestorm over the duration, 8.3 overlapping Firestorms on average, and 19.1 hits per second on average against any enemy caught within the area the stacking Firestorm covers, which gives a sustained Firestorm dps of 212k against size 2 enemies, so around 306k dps total against enemies caught in the Ray and staying within the Firestorms. Against standard size 4 bosses this drops to 74k dps Scorching Ray and a sustained Firestorm dps of 228k dps for a total of 302k dps total – the saviour here is the Covered in Ash modifier from the Chieftain that nearly counteract the increased resistances for bosses. Against Shaper/Elder and Guardians, I really don't know large they are, but the total average ranges from 250k (size 4) to 308k dps (size 6). All this is with sustained casting stacking Firestorms on top of each other so it ramps up over time and only reaches this max after 2.9s of casting and with optimal conditions and flasks used. To counterbalance that, it is also ignoring the extra CWDT Firestorms and Molten Shell burtsts that further cloud the issue.
Path of Building link, please
The POB pastebin link contains the level 93 flametank with 3.0 equipment used for the guide purposes. The unique Pantheon in a bottle amethyst flask in the POB links will when enabled simulate the effects of the Arakaali and Tukohama Pantheons
Is the build solo self found viable?
No. Two specific uniques are required to function at all, four specific uniques are required to function well, and that's just the start.
What's up with the Elementalist variant?
Chiftain-Elementalist works well as a high damage version that definitely needs to use the Herald of Ash. It requires you to pick up dual-cursing and stun-immunity from the tree, with the result that its defenses are significantly weaker. On the upside, you get elemental damage reflection immunity as well as higher damage, so it isn't all doom and gloom. The POB includes an alternative level 93 build for CHI-ELE.
What's up with the Trickster variant?
Chiftain-Trickster works well as a better-on-groups, worse-on-bosses variant. You get 50% increased ES recovery rate for 4s after killing anybody affected by your DOT (e.g. anybody who has a Scorching Ray debuff active at point of death), taking the ES recovery modifier from 150% to 200%, a gain of a third. But you need to pick up dual cursing and stun immunity via tree, so it means giving up on some defenses – so long as you are fighting groups of mobs and regularly killing enemies that is a perfectly acceptable tradeoff, but when you are fighting solo bosses and gain zero benefit as the Trickster's recovery bonus doesn't activate the reduced defenses can hurt. The POB includes an alternative level 93 build for CHI-TRI.
Which MTX are you using?
To create my golden wonder child, I use the following skin transfer MTX: Helm: Lunari's Circlet Body: Full Plate Gloves: Embroidered Gloves Boots: Lioneye's Paws Shield: Rise of the Phoenix Strictly speaking a Solaris Circlet would be more golden and appropriate, but I like the looks of it marginally less than Lunaris. I wish there were more good-looking circlets or tiaras in Path of Exile, preferably some that fit on the outside of the Scion's hair. ;-) Game mechanics Okay, this is where things get slightly technical. I've chosen to spoiler this rather large section to only expose people who like numbers a lot to the gritty details of the build.
Tell me more about strength
The heart of the build is the combination of Geofri's Sanctuary and Shaper's Touch, which results in your strength having a quadratic relationship with your energy shield as it both provides a linear increase to your base energy shield and to your increased energy shield multiplier. The more strength you already have, the more energy shield is provided with each additional point of strength. Chieftain provides a 10% increase to strength, and Alberon's Warpath then provides 18% at the cost of having negligible base energy shield, something that the increased strength covers for, and then some, and it has movement speed too. Once you've got all the essential uniques, every 10 strength from the tree and equipment gives you: 2.56% Maximum Energy Shield% 5.12 Extra Maximum Energy Shield 4.16% Increased Damage 6.4 Maximum Mana The build does not use the Black Sun Helmet despite its percentagewise increases to strength and intelligence because the head slot can use all three prefixes for ES and attain much higher total ES that way in addition to making good use of suffixes for resistances and base strength. Cyclopean Coil and Shaper amulets and Elder belts with increased attributes, if used, makes each point of strength even more valuable. Brawn jewels are mostly a trap for this build as while they provide good strength the build benefits more from decent rare jewels.
Tell me more about ES regeneration
The ES regeneration is provided by life regeneration transformed into ES regeneration by the Zealot's Oath keystone provided by Geofri's Sanctuary. The baseline is as follows at level 90: 10.9% from the core skill tree 2% from the Chieftain ascendancy 1.5% from the Occultist 1.65% from level 20 Vitality aura 105 hp/s from level 20 Stone Golem 2% after 4s standing still from Tukohama in the Pantheon 0-2% after being hit recently from boot enchant 0-1.1% from the shield (can only get regeneration on hybrid shield) 0-1.6% from the amulet 6% if you are on Consecrated Ground from a Sulphur Flask or Light enchant on gloves Thus, if you aren't being hit and don't have a hybrid shield but do have a good amulet, that's around 18% ES/s when moving, 20% ES/s when standing still, 22% ES/s standing still and being hit recently (assuming eternal enchant), and 28% when standing still while using your flask, and that is the baseline for end-game play. In practice, you will recover much more ES/s than the base regeneration when you fight due to increased ES recovery as will be explained in a following sections.
Tell me more about ES leech
It is possible to leech up to 20% of maxES/s using life leech and the Ghost Reaver passive that transforms life leech to ES leech. The build does not include any always-active life leeching – it is all conditional or dependent on equipment. Conditional: 2.2% of damage dealt to normal enemies afflicted with Warlord's Mark 0.88% of damage dealt to normal bosses afflicted with Warlord's Mark 0.44% of damage dealt to Guardians, Shaper, Elder afflicted with Warlord's Mark 0.4-0.6% of damage dealt if you've recently killed an enemy (boot enchant) 0.3%-0.4% of damage dealt (rough estimate) using Atziri's Promise flask 1%-1.5% of damage dealth (rough estimate) using Vessel of Vinktaar flask (spell damage version) Warlord's Mark leech is affected by curse effectiveness modifiers: +10% increased from Occultist, and 60% less for normal bosses, 80% less for the Guardians, Elder, and Shaper. This explains the numbers above. Permanent 1.0-1.5% of damage dealt if you get a Watcher's Eye jewel with the relevant mod 0.3%-0.5% of fire damage dealt if you get an Elder amulet with the relevant mod. It is important to note that life leech only occurs on hit, each hit generating one leech instance, so the Scorching Ray does NOT leech – only the Firestorm and the passive CWDT defenses leech. All existing life leech effects are canceled whenever ES is full. Fortunately, given that this build relies on a large number of frequent small leech effects of short duration rather than on a small number of infrequent large leech effects of large duration this is not a problem. Typically you will be leeching at full 20% of maxES/s rate only when fighting groups of monsters, because there are many targets for Firestorm's fireballs to hit.
Tell me more about ES recovery
This is where it gets slightly tricky. Every source of life, mana, and energy gain is considered to be recovery, because you recover some of a resource you have expended. Internally the game sums up how much life you gain in each frame from all sources (regeneration, leech, potions) and this is the recovery that is then added to your life pool. Likewise with mana and energy shield. These recovery sums are not shown anywhere on the character panel – it all happens behind the scenes (with the exception of energy shield recharge, that is treated as a special case and actually shows the recovery-from-recharge value at all times rather than the base recharge). There are very few effects that modify recovery directly in Path of Exile, but they are very powerful as they are applied after everything else. This build makes use of one of them, and the Trickster variant makes use of two. You can also find 10-20% increased energy shield recovery as a Shaper mod on belts, which is obviously highly valuable. Soul of Arakaali Recovery This pantheon bonus provides 50% increased life and energy shield recovery if you have stopped taken damage from a damage over time source within the last 4s. That is not worth taking if you have to rely on enemies inflicting damage over time on you and waiting for it to stop, but fortunately there is a way to get around that: Self mutilation. The spell Blood Rage deals 4% of life and energy shield as physical damage per second in return for generating frenzy charges on kill. This provides a way of starting taking physical damage over time. The spell Immortal Call provides immunity to physical damage. This provides a way of stopping taking physical damage over time. That is a great interaction, so I have chosen to automate it, by having a level 1 CWDT trigger Blood Rage and Immortal Call in that order. This means that whenever the Scion has taken 528 damage since the last triggering of the CWDT and its internal 250ms timer has timed out, the Scion starts taking damage over time and stops doing so immediately if Immortal Call is off cooldown, ensuring that the recovery bonus from Soul of Arakaali is active the next 4s after triggering Immortal Call. ...unless the Scion is at the same time suffering from some non-physical damage over time effect, such as being ignited. Cyclopean Coil specifically prevents ignition. Immortal Call has a cooldown of 3s which is shorter than the 4s Arakaali lasts, which means that barring rare special cases like being ignited you will always have Soul of Arakaali's 50% recovery bonus during a fight unless you are not taking damage (in which case you don't need the bonus anyhow). Taking 4% of maxES as damage per second in return for a 50% bonus to 18%-28% regeneration and 0-20% life leech (capped at 20%) is a huge bonus. For this to work perfectly, it is imperative to slot the Blood Frenzy and Immortal Call so Blood Frenzy is triggered before Immortal Call as described in the gem setup section. You really don't lose much if you slot them in the wrong order, but when you've got such a beautiful mechanical interaction, why not perfect it? Trickster variant Recovery The Trickster baby ascendancy grants 50% increased life, mana, and energy shield recovery rate if you have killed anybody affected by your damage over time within the last 4 seconds. This stacks with the Arakaali modifier. Scorching Ray applies burning debuffs to anybody it touches, so anybody with the debuff when they die qualify. Likewise anybody ignited by CWDT Firestorm, Fireball, or Molten Shell qualifies so long as they die while ignited. What about the Labyrinth? You regenerate a lot. You will have to pay attention while running the normal and cruel labyrinth, but when you hit merciless and eternal labyrinth your regeneration will be so high you can ignore many types of traps and survive walking through all those you cannot ignore. It is not a fast labyrinth runner as you only have 20% runspeed (plus a quicksilver flask with extra speed mod, hopefully), but it is a safe one. Problematic Maps No life (ES) regeneration are a no-go. x%less recovery maps are doable if you are careful; less facetanking, more hitting enemies with firestorm from afar. Elemental reflection maps should be run using the Soul of Yugul and with a Sibyl's Lament ring on the left hand, for a total of 65% reduced reflected elemental damage Maps with strong frost bosses such as T16 Guardian of the Hydra are much easier to run if you equip a Dream Fragments ring for the occasion. Maps with both strong frost bosses AND elemental reflection should probably be avoided as juggling resistances with two rings changed sounds like too much of a chore. Bosses with Lightning Thorns are dangerous as your firestorm keeps hitting up to 2.9s after you release the button. This is not a problem with weak bosses, but the T13 Scriptorum map boss, a Shavronne clone, is very dangerous. The best and easiest way to deal with her is simply to bring along two blue gems that support Scorching Ray (e.g. Efficacy and Arcane Surge) and have them replace Cast While Channeling and Firestorm in the boss fight, since that makes you use a buffed Scorching Ray without Firestorms, and as SR does not have a "hit mechanic" it does not trigger lightning thorns. Bosses with strong bleed mechanics (e.g Rigwald clones) are best fought bringing along extra anti-bleed flasks. I use these two in place of the Atziri and Overflowing Chalice for such fights. Parting Words The Scionic Flametank really is a tough little beast. If you like a relaxed playstyle, you should try it out. Now, honesty compels me to admit that there is at least one thing more awesome in Path of Exile than running maps with a flametank... ...Doing it with two!  Scionic Flametank 3.2: The classic ES-CI-ZO-GR regeneration tank is back in business, stronger than ever before with 50-60% ES/s recovery during most fights due to creative use of regeneration, leech, and recovery mechanics https://www.pathofexile.com/forum/view-thread/1271604 Last edited by Pi2rEpsilon on Mar 16, 2018, 4:58:52 PM Last bumped on Mar 19, 2019, 10:10:25 AM
|

|
|
Greetings!
Well done my friend! I like it. ~Dy'Ness QBotU_DyNess - www.pathofexile.com/forum/view-thread/1171890
| |
|
Loving it so far.Only level 50 atm.Question tho how much ES should we aim for before we go CI?
| |
|
If I recall correctly, I had somewhere between 3k and 3.5k Energy Shield when I finally went CI, but it was a few months ago and I'm afraid I don't remember it better than that since I didn't use the size of my Energy Shield as the determining factor in when to pick CI.
I am pretty sure that if I were to level the build again I could pick CI earlier and do well, but as a new player who'd read all the warnings about not taking CI too early, I thought better safe than sorry. The measure I had set myself was that I'd pick CI when I had enough ES that I had managed to fight my way through a zone without drinking any life flasks - and that was at roughly the level that the suggested build order presents it to be picked. The only important ES number I recall is that when I later hit roughly 6K ES, I was capable of repeatedly solo farming Dominus safely in 5-6 minutes per run, which did wonders for improving my gear and building up stocks of orbs for constructing even better armour. (At 6K ES I couldn't reliably facetank all Dominus' damage in phase 1, that only came later, but it was practically impossible to die unless I tried to facetank all damage in phase 1, so it provided a lucrative, if boring, way to rapidly improve at that point.) Scionic Flametank 3.2: The classic ES-CI-ZO-GR regeneration tank is back in business, stronger than ever before with 50-60% ES/s recovery during most fights due to creative use of regeneration, leech, and recovery mechanics
https://www.pathofexile.com/forum/view-thread/1271604 |
|
|
Fantastic ideas here, Zealot's Oath doesn't get enough play. Wouldn't it be prudent though to get the endurance charge nodes and get yourself that free perm 20-24% phys reduction and the potential 1.0-1.2 es regen?
I imagine putting enduring cry somewhere in the CWDTs would keep you just permanently at max charges, or is that one of the things going away with Awakening? 2 Last edited by notmfrthis on May 25, 2015, 10:50:31 PM
|
|
|
Enduring Cry is changing type from Spell to the new keyword Warcry in Awakening, which means it cannot be cast by a Cast when Damage Taken.
Knowing this I developed this tank without using Enduring Cry because I did not want to become reliant on a mechanic that would be going away soon, and I couldn't find any other handy way to generate Endurance charges that didn't have atrocious opportunity costs given the hardcore focus on ES. There's nothing preventing a player from slotting an Enduring Cry and manually activating it, of course, but that does go against the spirit of developing a simple yet effective flametank that only needs to spam Incinerate, use flasks, and occasionally move. I hit 63% physical damage resistance when the Molten Shell and Granite Flask #1 are active with the current level of Molten Shell, and since physical damage resistance is capped at 75% I don't lose out that much by not having any Endurance charges. Some time ago I tried slotting in a Frost Wall in a CwDT as an alternative, and it worked pretty well, but frankly I just didn't feel the need for it. Scionic Flametank 3.2: The classic ES-CI-ZO-GR regeneration tank is back in business, stronger than ever before with 50-60% ES/s recovery during most fights due to creative use of regeneration, leech, and recovery mechanics
https://www.pathofexile.com/forum/view-thread/1271604 |
|
|
So. I've been looking at the current beta skill tree (in the planner), and it looks as if this build should have little trouble adjusting to 2.0 though it might want to drop the Herald of Thunder component if the current beta 10% damage effectiveness modifier remains. At any rate, it should be able to pick up something like eight jewel slots without going much out of its way, which will allow a lot of customization (especially if projectile speed remains a possible jewel affix as it is now).
So I am cautiously optimistic that the build will be going as strong as ever post 2.0 despite the forum doomsaying about Incinerate when it no longer shotguns. (Though I'll be damned if I understand why its damage effectiveness was reduced from 30% to 10%. Yes, people like twinning Incinerate with Heralds or Added Chaos Damage... but surely that's a good thing?) Let's see what happens. Lots of things can change in the beta before release. Scionic Flametank 3.2: The classic ES-CI-ZO-GR regeneration tank is back in business, stronger than ever before with 50-60% ES/s recovery during most fights due to creative use of regeneration, leech, and recovery mechanics https://www.pathofexile.com/forum/view-thread/1271604 Last edited by Pi2rEpsilon on May 28, 2015, 9:44:58 AM
|
|
|
where are the videos?
| |
" I generally don't record game videos. I should think that the description of what the build does is clear enough. Stand still and flame with mediocre damage until everything is dead or you want to reposition. Repeat. :D Was there anything specific you were interested in seeing? Scionic Flametank 3.2: The classic ES-CI-ZO-GR regeneration tank is back in business, stronger than ever before with 50-60% ES/s recovery during most fights due to creative use of regeneration, leech, and recovery mechanics
https://www.pathofexile.com/forum/view-thread/1271604 |
|
|
Why GMP, incinerate dont shotgunning anymore so everyone drop GMP, why you leave this gem ?
|


